Patients › Rehabilitation
Carpal Tunnel Release
Post-operative exercises and precautions after carpal tunnel release, including tendon and nerve glides.

This protocol guides your recovery after carpal tunnel release with Dr Kieran Hirpara at Mater Private Hospital Rockhampton. It explains what to expect as your wound heals, the precautions for the first weeks, and the exercise program that keeps your nerve and tendons gliding freely while everything settles. Bring this page or its PDF to your physiotherapist or hand therapist so your rehabilitation stays coordinated.
If you have any concerns about your wound after surgery, get in touch with the rooms. It is often helpful to take a photo of the wound and email it for review.
What to expect
Care of your wound is explained in the practice's wound care guidance. At the wrist the nerve and tendons run close together, right where the surgery heals, so the exercises on this page matter: keeping the nerve and tendons gliding stops them from sticking to the healing tissue as your wound settles.
The healing edges of the released ligament stay tender for at least four to six weeks. Tenderness on each side of the palm (where the ligament attaches to the bones) is also common; this is called "pillar pain" and it settles gradually. The ligament itself is not meant to re-join: scar tissue forms a "pseudo-ligament" that does the same job, which is why the release frees the nerve without leaving the wrist unstable.
Studies that have followed patients after carpal tunnel release show how predictably this tenderness fades: roughly four in ten people still notice pillar-type discomfort one month after surgery, about one in four at three months, and by twelve months it has settled in nearly all hands (Povlsen & Tegnell, 1996). So if the sides of your palm are still tender a few weeks after surgery, that is a normal part of healing, not a sign that something has gone wrong.
Hand strength follows a well-described recovery curve. In a frequently cited study, grip strength was about a quarter of its pre-operative level three weeks after surgery and about three-quarters by six weeks, was back to the pre-operative level by three months, and went on to exceed it by six months; pinch strength recovers sooner, reaching close to its pre-operative level by six weeks (Gellman et al., 1989). A temporary drop in grip in the early weeks is therefore expected; it reflects the healing ligament and palm rather than a problem with the operation, and it recovers as the pillar tenderness settles.
Moving early is deliberate, and the evidence supports it. Current clinical guidance is that the wrist should not be routinely held in a splint after carpal tunnel release (AAOS, 2024), and published hand-centre protocols start active movement of the fingers, thumb and wrist straight away to keep the tendons and median nerve gliding while the wound heals. A Cochrane review of rehabilitation after carpal tunnel release found that recovery is usually straightforward and that no single add-on treatment has strong evidence behind it, which is why this program is kept simple, and why your hand therapist tailors it to how your own hand is recovering (Peters et al., 2016).
For the first week, keep the hand elevated above heart level as much as possible; less swelling means less pain and a freer nerve. Your therapist may also apply compressive dressings or taping (Coban, Tubigrip or kinesiotape) to control swelling and support the arch of the palm.
Once your wound is healed, apply heat to your hand for 20 minutes before performing these exercises. After completing the exercises, ice may be applied to prevent inflammation.
Sometimes the hand or wound becomes sensitive. This is normal, and it can be prevented or eased with daily desensitisation: gently tapping and rubbing over the wound (or dressing) and the palm, starting immediately after your surgery. This "sensory feedback" retrains the nerve to read touch and texture normally. Short, frequent sessions work best (for example 2–3 minutes each hour), and your therapist may supply a silicone pad or glove to help settle the scar and the sensitivity.
Once the wound is fully healed, commence scar massage: firm circles over the incision. The wound care page has more information on scar management.
Getting back to work and activity
Most people return to work within a few weeks of carpal tunnel release, and the timing depends mainly on what your job asks of your hand. A systematic review of 56 studies found that people in desk-based or non-manual roles went back to work a median of three weeks after surgery (reported range one to six weeks), while those in manual roles took a median of about five and a half weeks (reported range roughly three to fourteen weeks); many returned sooner on modified or lighter duties before resuming full duties (Newington et al., 2018). Treat these figures as a guide rather than a deadline: the right timing for you depends on your wound, your comfort and the precautions below.
As a practical guide, you are usually ready to return to a particular task when:
- your wound has healed and tolerates the pressure or contact the task involves;
- you can use the hand comfortably for what the task actually requires, within the precautions below; and
- any heavier gripping, lifting or vibration exposure in your role waits until the precautions are lifted.
If your work is heavy, repetitive or involves vibrating tools, raise it at your post-operative review so that a return date and any modified duties in the meantime can be planned with your employer.
Precautions and limitations
Light functional use of your hand is encouraged for daily living tasks such as self-care, feeding, dressing, writing and typing. Beyond that, the limits for the early weeks are:
- No lifting, gripping, weight-bearing or use of vibration machinery (for example power tools or the lawn mower) for up to 6 weeks post-operatively.
- Driving is limited for the first 1–2 weeks, or until you can achieve a full fist.
For your physiotherapist:
Management
- Wound care as per the practice's wound care guidance
- Elevation above heart level as much as possible in the first week; compressive dressings/taping (Coban, Tubigrip, kinesiotape) for swelling control and carpal-arch support as indicated
- Tendon gliding and median nerve gliding program as per the exercise cards below, to prevent adhesion of the nerve and tendons during wound healing
- Once the wound is healed: heat to the hand for 20 minutes before exercises; ice after exercises to prevent inflammation
- Daily desensitisation from immediately post-surgery: gentle tapping / rubbing over the wound (dressing) and palm, to allow the nerve to normalise touch and texture
- Scar massage (firm circles over the incision) once the wound is fully healed
Precautions
- Light functional use of the hand is encouraged for activities of daily living (self-care, feeding, dressing, writing, typing)
- No lifting, gripping, weight-bearing or use of vibration machinery (e.g. power tools, lawn mower) for up to 6 weeks post-operatively
- Driving limited for the first 1–2 weeks, or until a full fist is achieved
Evidence notes
- Immobilisation: moderate evidence is against routine post-operative splinting after carpal tunnel release (AAOS CPG, 2024); early active motion as per the exercise cards is the intended default
- Rehabilitation adjuncts: the Cochrane review found limited, low-certainty evidence for individual post-CTR rehabilitation treatments (Peters et al., 2016); tailor the program to the patient rather than protocolise adjuncts
- Strength recovery: expect grip ≈28% of pre-operative level at 3 weeks and ≈73% at 6 weeks, returning to pre-operative level by 3 months and exceeding it by 6 months; pinch recovers faster (≈96% by 6 weeks) (Gellman et al., 1989)
- Return to work: median 21 days for non-manual work (range 7–41) versus 39 days for manual work (range 18–101); modified duties earlier (Newington et al., 2018)
- Pillar pain: reported in ≈41% at 1 month, ≈25% at 3 months and ≈6% at 12 months after open release (Povlsen & Tegnell, 1996)
These are the exercises from your handout, performed as described on each card. This exercise program was written in association with Sarah Farrell, BOccThy AHT (occupational therapist and accredited hand therapist), with additional post-operative guidance from Ruby Doolan, Accredited Hand Therapist, Extend Rehabilitation.
Your exercises
Kieran Hirpara 4.0
Wrist flexion / extension stretch
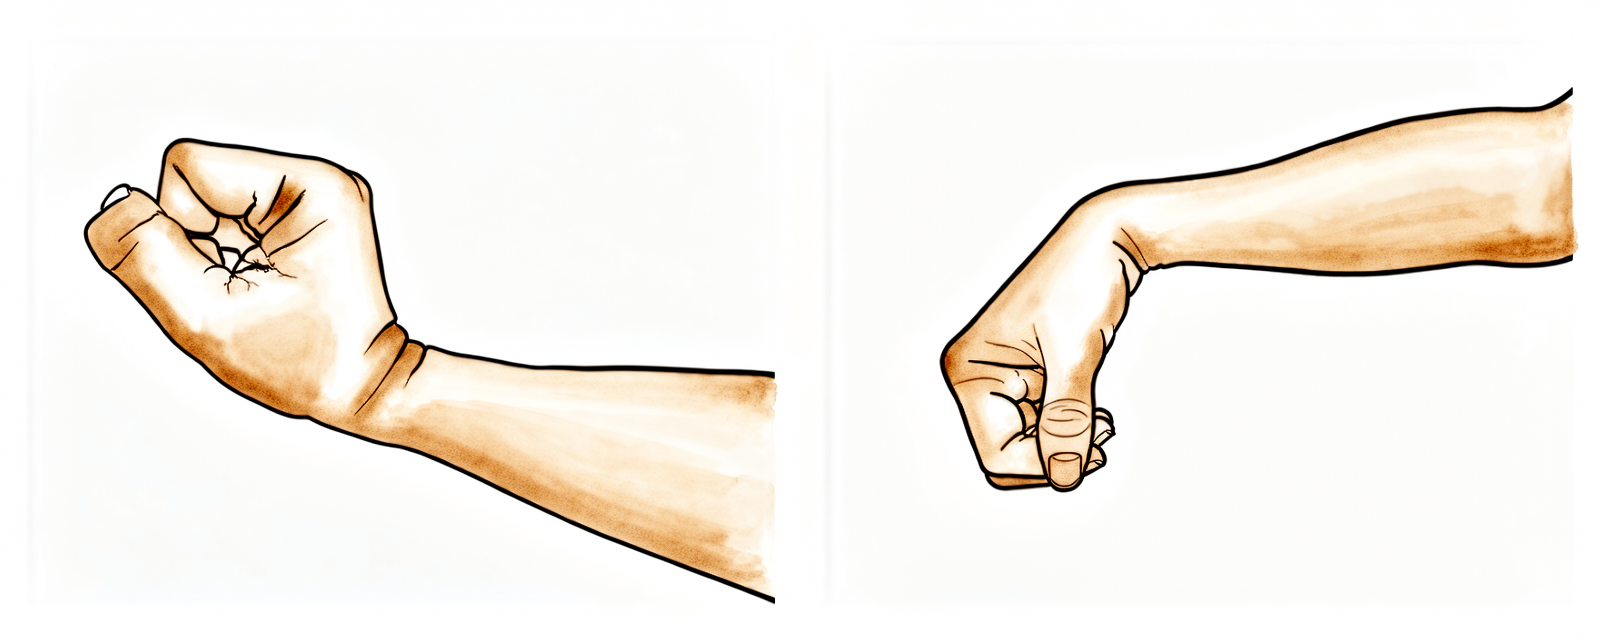
Rest your elbow on a table (or your wrist over the edge of a table or armchair) and gently rock your wrist back and forth. Once more comfortable, grasp your palm with the other hand and push the wrist backwards (fingers loose, pointing to the ceiling) — hold 15 seconds; then the other way (fingers loose, pointing to the floor) — hold 15 seconds. Repeat 5 times in each direction.
10 reps (5 each direction, holding 15 seconds), 4–5 times daily
Kieran Hirpara 4.0
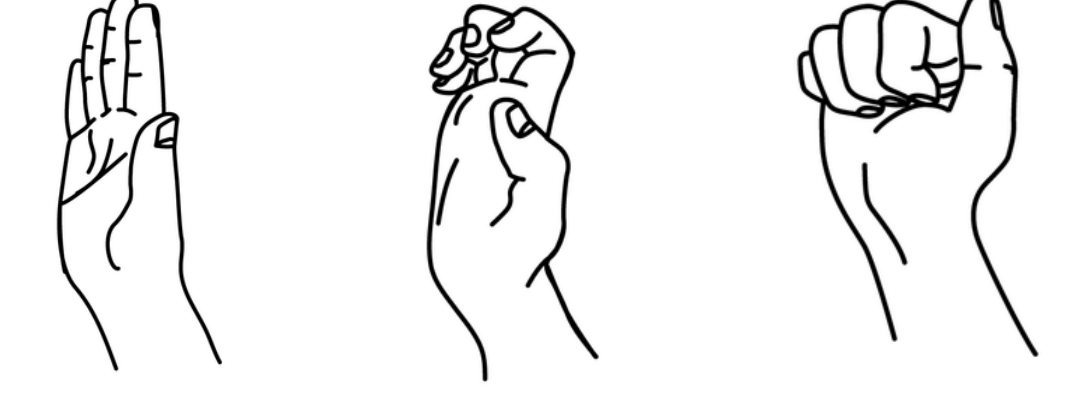
Tendon glides — Series A
With your hand in front of you and your wrist straight, fully straighten all of your fingers (1). Bend the tips of your fingers into the “hook” position with your knuckles pointing up (2). Make a tight fist with your thumb over your fingers (3).
5–10 repetitions, 2–3 times a day
Kieran Hirpara 4.0
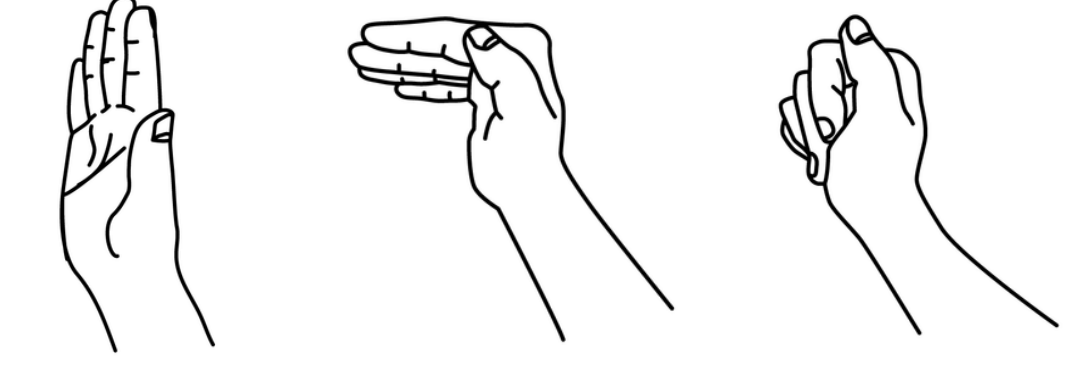
Tendon glides — Series B
With your hand in front of you and your wrist straight, fully straighten all of your fingers (1). Make a “tabletop” with your fingers by bending at your bottom knuckle and keeping the fingers straight — ensure your wrist does not drop forward (2). Bend your fingers at the middle joint, touching your fingers to your palm (3).
5–10 repetitions, 2–3 times a day
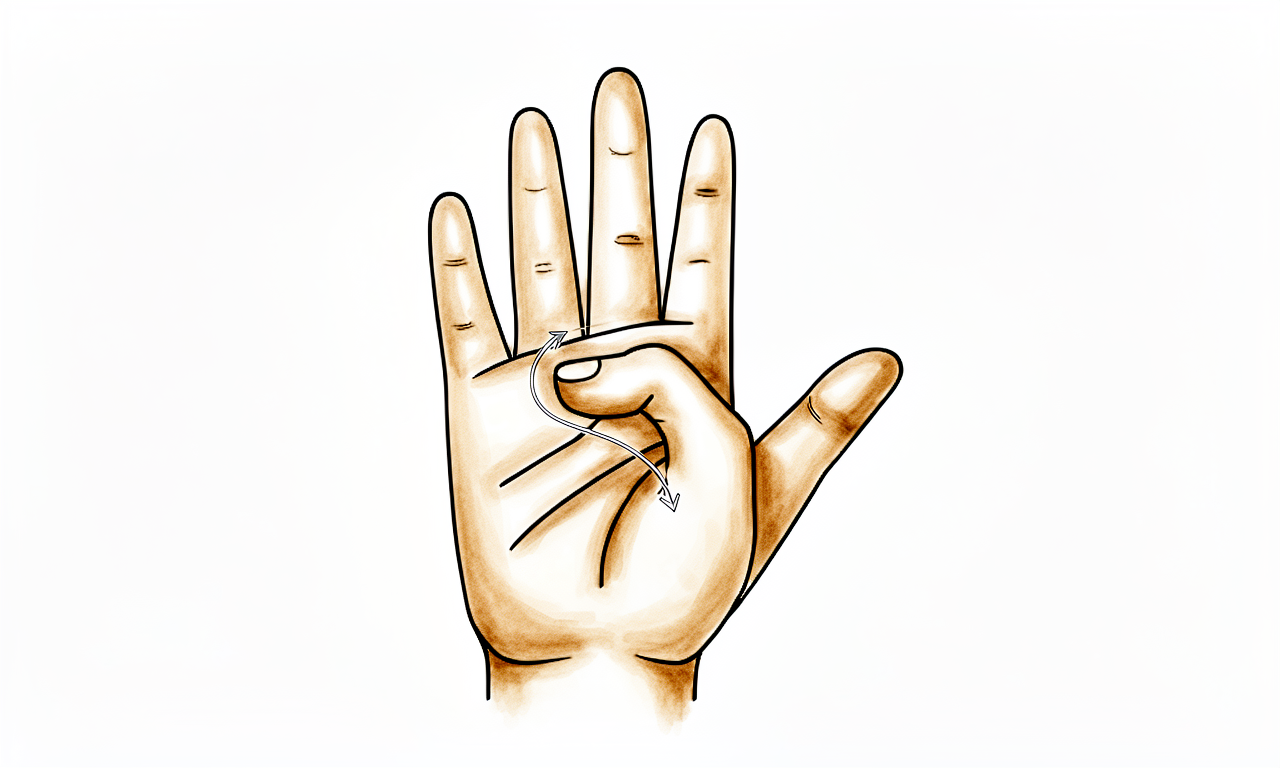
Kieran Hirpara 4.0
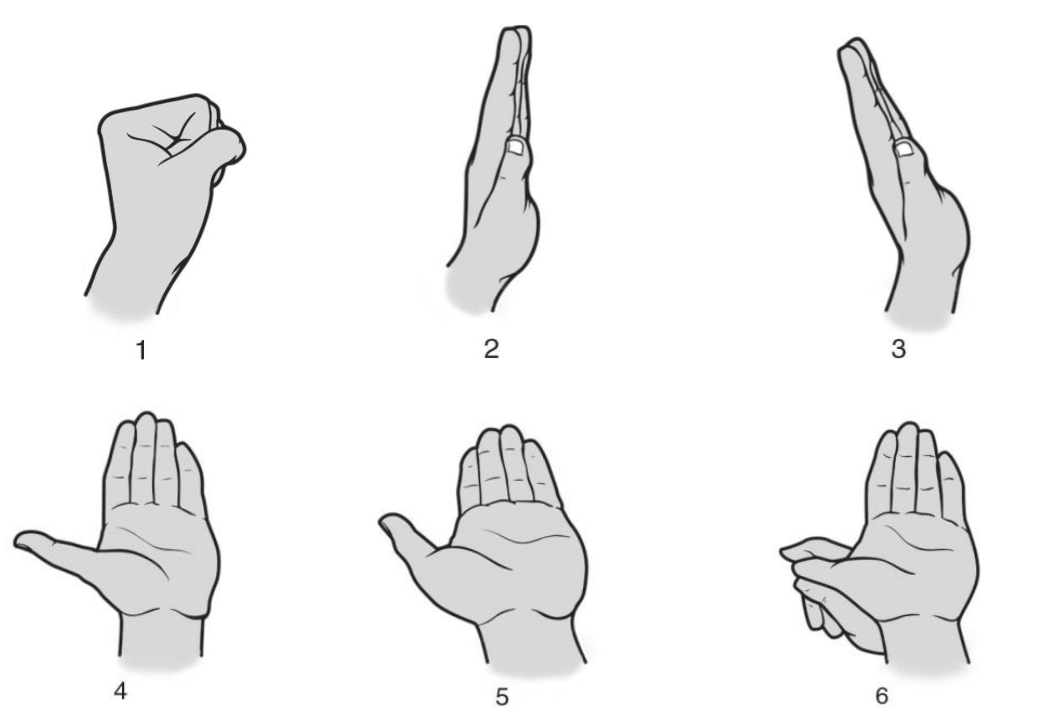
Median nerve glides
Move your hand through the six positions shown, holding each position for 3–7 seconds. Do not put too much pressure on your thumb in position 6. Then add the nerve stretch: straighten your arm with your palm facing down and bend your wrist so that your fingers point down. Gently pull your hand toward your body until you feel a stretch on the outside of your forearm. Hold the stretch for 15 seconds. Repeat 5 times, then perform this stretch on the other arm.
10–15 repetitions a day, holding each position 3–7 seconds
Kieran Hirpara 4.0
Thumb opposition
Move your thumb across your palm toward the base of your little finger, then straighten it back out.
5–10 reps, 2–3 times a day, daily
After your protocol
This protocol works alongside the practice's general recovery advice: see managing post-operative pain, wound care and hand therapy basics. For the operation itself, see carpal tunnel release.
References
- Peters S, Page MJ, Coppieters MW, Ross M, Johnston V. Rehabilitation following carpal tunnel release. Cochrane Database of Systematic Reviews. 2016;2:CD004158.
- American Academy of Orthopaedic Surgeons. Management of Carpal Tunnel Syndrome — Evidence-Based Clinical Practice Guideline. 2024 update.
- Newington L, Stevens M, Warwick D, Adams J, Walker-Bone K. Sickness absence after carpal tunnel release: a systematic review of the literature. Scand J Work Environ Health. 2018;44(6):557–567.
- Gellman H, Kan D, Gee V, Kuschner SH, Botte MJ. Analysis of pinch and grip strength after carpal tunnel release. J Hand Surg Am. 1989;14(5):863–864.
- Brigham and Women's Hospital Department of Rehabilitation Services. Standard of Care: Carpal Tunnel Release. 2007 (pillar pain natural-history figures after Povlsen & Tegnell, 1996).
Evidence & references
Carpal Tunnel Release — Procedure Outcomes & Post-operative Rehabilitation (Open / Endoscopic Decompression)
Topic scope: post-operative rehabilitation after surgical decompression of the median nerve at the wrist by division of the transverse carpal ligament — open or endoscopic carpal tunnel release. This is a decompression, not a reconstruction: nothing is repaired or tightened, so the rehab is an early-motion pathway built around oedema control, scar/desensitisation work, and tendon + median-nerve gliding rather than months of protected healing.
Defining principle of the rehab here: carpal tunnel release relieves nerve compression and does not create a construct that needs protection. The divided ligament is meant to stay divided — a scar "pseudo-ligament" reconstitutes the carpal arch without re-tethering the nerve. So (unlike a tendon or ligament repair) immediate, unrestricted light use is the default, and the only deliberate restraint is a short window of heavy-load/grip/vibration avoidance while the palm and ligament edges heal. The therapy programme exists to keep the median nerve and flexor tendons gliding through the healing surgical bed so they do not adhere — not to immobilise. The single branch point is whether a concurrent procedure (e.g. flexor tenosynovectomy, revision with a fat-pad flap) was performed, which can extend the protected/oedema phase.
A. PROCEDURE OUTCOMES (open vs endoscopic)
Carpal tunnel release is one of the most reliable operations in upper-limb surgery: the great majority of patients obtain durable symptom relief, and the principal debate is over access (open vs endoscopic), not whether to decompress.
- Both open and endoscopic release give equivalent long-term outcomes. Randomised comparisons and meta-analyses find no meaningful difference in symptom relief, function or patient satisfaction at long-term follow-up between open and single- or dual-portal endoscopic release. Endoscopic release offers a modestly faster early recovery and earlier return to work at the cost of a small increase in transient nerve-related events; by 5 years the two converge [HAND meta-analysis 2022; J Hand Surg 5-year RCT 2009; J Bone Joint Surg RCT 1994]. Strong (RCTs/SR).
- Symptom relief is high and durable. Night symptoms and paraesthesiae typically resolve early; numbness and thenar weakness recover more slowly and may be incomplete where compression was long-standing. Five-year and elderly-cohort series confirm sustained benefit, including in patients over 65 [J Hand Surg 5-yr follow-up; elderly cohorts]. Moderate–strong.
- Division of the transverse carpal ligament alters carpal-tunnel biomechanics (canal volume increases; the flexor tendons shift volarly), which is the anatomical basis for pillar pain and the transient grip-strength dip — both expected, self-limiting consequences of the decompression rather than complications [Clinical Biomechanics 2003]. Mechanistic.
B. REHABILITATION / THERAPY EVIDENCE
The central rehab questions are (1) should the wrist be immobilised afterwards, and (2) does routine formal hand therapy change the outcome. The evidence answers no to routine splinting and no to mandatory protocolised therapy — while supporting a simple, early-motion, glide-based home programme.
- Routine post-operative splinting is NOT recommended. Moderate-quality evidence (AAOS 2024 CPG; supporting systematic reviews) finds wrist immobilisation by sling/orthosis after release does not improve pain, grip or function and may delay recovery. Early active motion is the intended default. Moderate (CPG + SR).
- No single rehab adjunct has strong supporting evidence. The Cochrane review of rehabilitation following carpal tunnel release found only limited, low-certainty evidence for any individual add-on — orthoses, dressings, exercise, cold/ice, multimodal hand therapy, laser, electrotherapy, scar desensitisation or arnica. Recovery is usually straightforward; the implication is to keep the programme simple and individualise it rather than protocolise adjuncts [Peters et al., Cochrane 2016]. Moderate (Cochrane SR — of low-certainty primary evidence).
- Tendon- and nerve-gliding exercises are biologically and clinically rationalised. The rationale is that wrist/digit motion produces longitudinal excursion of the median nerve through the surgical bed, preventing adhesion of nerve to flexor tendons; ultrasound studies confirm measurable nerve excursion during gliding exercises, and comparative-effectiveness work supports tendon/nerve gliding and neural mobilisation as low-risk adjuncts [Am J Phys Med Rehabil 2011; J Hand Therapy 2008 (excursion; neural mobilisation)]. The benefit is modest and the adhesion-prevention purpose is mechanistic/consensus rather than proven by hard outcome trials. Weak–moderate (mechanism strong, outcome modest).
- Supervised therapy is not required for most patients. Outcome series using a standard protocol with a single hand-therapy visit and a home programme report good patient-reported outcomes, supporting selective rather than universal formal therapy. Moderate (cohort).
Recovery trajectory (expected, evidence-anchored)
| Phase | Window | Restraint | Hand use / therapy focus | Strength / load | Notes |
|---|---|---|---|---|---|
| I — Early motion & oedema control | Week 0–1 | None routine (no splint) | Elevate above heart level; immediate active finger/thumb/wrist motion; tendon + median-nerve glides; desensitisation from day 1; compressive dressing/taping for swelling | Light functional use only | Less swelling → freer nerve. Grip is expected to be low |
| II — Wound & ligament healing | Week 1–6 | Heavy-load avoidance | Continue glides; add scar massage once wound healed; heat before / ice after exercises | No lifting, gripping, weight-bearing or vibrating-tool use up to 6 weeks; driving from ~1–2 weeks (once a full fist is achievable) | Pillar tenderness peaks then settles; grip ≈¼ pre-op at 3 wk, ≈¾ by 6 wk |
| III — Return to load & work | Week 6–12+ | Restrictions lifted | Progress gripping, lifting and task-specific loading | Grip back to pre-op by ~3 months, exceeding it by ~6 months; pinch recovers sooner (≈ pre-op by 6 wk) | Non-manual work median ~3 wk; manual work median ~5–6 wk, earlier on modified duties |
(Phase windows mirror the precautions and recovery-curve figures in the patient protocol; they are typical guides, not trial-derived deadlines.)
C. KEY CONTROVERSIES / EVIDENCE QUALITY
- Open vs endoscopic. Equivalent long-term outcomes; endoscopic buys a faster early recovery for a small transient-complication trade-off. Choice is largely surgeon/patient preference and cost. Strong evidence of equivalence.
- To splint or not. Older practice favoured post-operative wrist splinting; current moderate-quality evidence and the AAOS 2024 CPG advise against routine immobilisation. This page's no-splint, early-motion default reflects the current guideline. Moderate.
- Does formal therapy change outcomes? No rehab adjunct has high-certainty benefit (Cochrane). Gliding exercises rest on a sound mechanistic (adhesion-prevention, nerve-excursion) rationale but modest outcome data. The defensible position is a simple home programme + selective therapy, not universal supervised rehab. Weak–moderate.
- Pillar pain & grip dip are expected, not failure. Both follow predictably from dividing the transverse carpal ligament and resolve on a well-described curve; mislabelling them as complications drives unnecessary anxiety. Strong natural-history data.
- Recurrence/revision is uncommon but real; persistent symptoms warrant assessment for incomplete release, the wrong diagnosis, or a second compression site rather than more of the same therapy [JAAOS recalcitrant-CTS review; revision-rate series]. Moderate.
D. EVIDENCE STRENGTH FLAGS (summary)
- STRONG (RCT / SR): equivalence of open vs endoscopic release at long-term follow-up (faster early recovery with endoscopic); high, durable symptom relief from decompression.
- MODERATE: AAOS 2024 CPG against routine post-operative splinting; Cochrane review (limited, low-certainty evidence for any single rehab adjunct → keep it simple); biomechanical basis of pillar pain / grip dip; uncommon but defined revision rate.
- WEAK / CONSENSUS: the specific early-motion, glide-based therapy programme (mechanistically rationalised, outcome benefit modest; surgeon/hand-therapist protocols); exact phase timings (typical, not trial-derived).
CITATIONS
RAG corpus (180,000+ Orthopaedic articles)
- Open versus single- or dual-portal endoscopic carpal tunnel release: a meta-analysis of randomized controlled trials. HAND. 2022. DOI: 10.1177/15589447221075665
- Open compared with 2-portal endoscopic carpal tunnel release: a 5-year follow-up of a randomized controlled trial. J Hand Surg Am. 2009. DOI: 10.1016/j.jhsa.2008.10.026
- Carpal tunnel release: a randomized comparison of three surgical methods. J Hand Surg (Eur Vol). 2013. DOI: 10.1177/1753193412475247
- Carpal tunnel release. A prospective, randomised assessment of open and endoscopic methods. J Bone Joint Surg. 1994. DOI: 10.2106/00004623-199408000-00020
- Five-year follow-up of carpal tunnel release in patients over age 65. J Hand Surg Am. 2010. DOI: 10.1016/j.jhsa.2009.10.020
- Carpal tunnel syndrome (clinical review). BMJ. 2014. DOI: 10.1136/bmj.g6437
- Biomechanical and anatomical consequences of carpal tunnel release. Clin Biomech. 2003. DOI: 10.1016/s0268-0033(03)00052-4
- The comparative effectiveness of tendon and nerve gliding exercises in patients with carpal tunnel syndrome. Am J Phys Med Rehabil. 2011. DOI: 10.1097/phm.0b013e318214eaaf
- The effects of neural mobilization in addition to standard care in persons with carpal tunnel syndrome. J Hand Ther. 2008. DOI: 10.1197/j.jht.2007.12.001
- The excursion of the median nerve during nerve gliding exercise: an observation with high-resolution ultrasonography. J Hand Ther. 2008. DOI: 10.1197/j.jht.2007.11.001
- Effective self-stretching of carpal ligament for the treatment of carpal tunnel syndrome: a double-blinded randomized controlled study. J Hand Ther. 2020. DOI: 10.1016/j.jht.2019.12.002
- Use of conservative therapy before and after surgery for carpal tunnel syndrome. BMC Musculoskelet Disord. 2021. DOI: 10.1186/s12891-021-04378-3
- Power grip, pinch grip, manual muscle testing or thenar atrophy — which should be assessed as a motor outcome after carpal tunnel decompression? A systematic review. BMC Musculoskelet Disord. 2007. DOI: 10.1186/1471-2474-8-114
- Management of recalcitrant carpal tunnel syndrome. J Am Acad Orthop Surg. 2019. DOI: 10.5435/jaaos-d-18-00004
- The rate and timing of revision carpal tunnel release with long-term follow-up. J Hand Surg Am. 2026. DOI: 10.1016/j.jhsa.2026.02.006
- Does aging matter? The efficacy of carpal tunnel release in the elderly. Arch Plast Surg. 2015. DOI: 10.5999/aps.2015.42.3.278
Carpal tunnel rehabilitation literature (URLs)
- Peters S, et al. Rehabilitation following carpal tunnel release. Cochrane Database Syst Rev. 2016;2:CD004158. https://www.cochranelibrary.com/cdsr/doi/10.1002/14651858.CD004158.pub3/full
- O'Connor D, et al. Rehabilitation treatments following carpal tunnel surgery (original Cochrane review). 2003. https://www.cochranelibrary.com/cdsr/doi/10.1002/14651858.CD004158/full
- American Academy of Orthopaedic Surgeons. Management of Carpal Tunnel Syndrome — Evidence-Based Clinical Practice Guideline (2024 update; moderate evidence against routine post-operative immobilisation). https://www.aaos.org/quality/quality-programs/upper-extremity-programs/carpal-tunnel-syndrome/
- Wrist immobilization after surgical decompression of the median nerve in carpal tunnel syndrome: a systematic review. PMC. 2024. https://www.ncbi.nlm.nih.gov/pmc/articles/PMC11374399/
- Sensory nerve conduction velocity predicts improvement of hand function with nerve gliding exercise following carpal tunnel release surgery. PMC. https://www.ncbi.nlm.nih.gov/pmc/articles/PMC8470096/
- Patient-reported outcomes after open carpal tunnel release using a standard protocol with 1 hand therapy visit. J Hand Ther / ScienceDirect. https://www.sciencedirect.com/science/article/abs/pii/S089411301630031X
Published rehab protocols (patient-guidance — basis for the early-motion phase structure)
- Bakker — Carpal Tunnel Release Post-op Protocol (Twin Cities Orthopedics). https://tcomn.com/wp-content/uploads/2017/11/Carpal-tunnel-release-protocol.pdf
- University of Virginia — Carpal Tunnel Release Open Protocol and Home Exercise Program. https://med.virginia.edu/orthopaedic-surgery/wp-content/uploads/sites/242/2015/11/copy_of_CTROPENProtocolandHEP.pdf
- Brigham and Women's Hospital, Department of Rehabilitation Services. Standard of Care: Carpal Tunnel Release (pillar-pain natural history after Povlsen & Tegnell 1996; grip-recovery after Gellman 1989). https://www.brighamandwomens.org/assets/BWH/patients-and-families/rehabilitation-services/pdfs/wrist-carpal-tunnel-release-pt.pdf