Patients › Rehabilitation
Distal Radius Fracture (ORIF)
Staged rehabilitation after plate fixation of a distal radius fracture, from the first days to return to full activity.
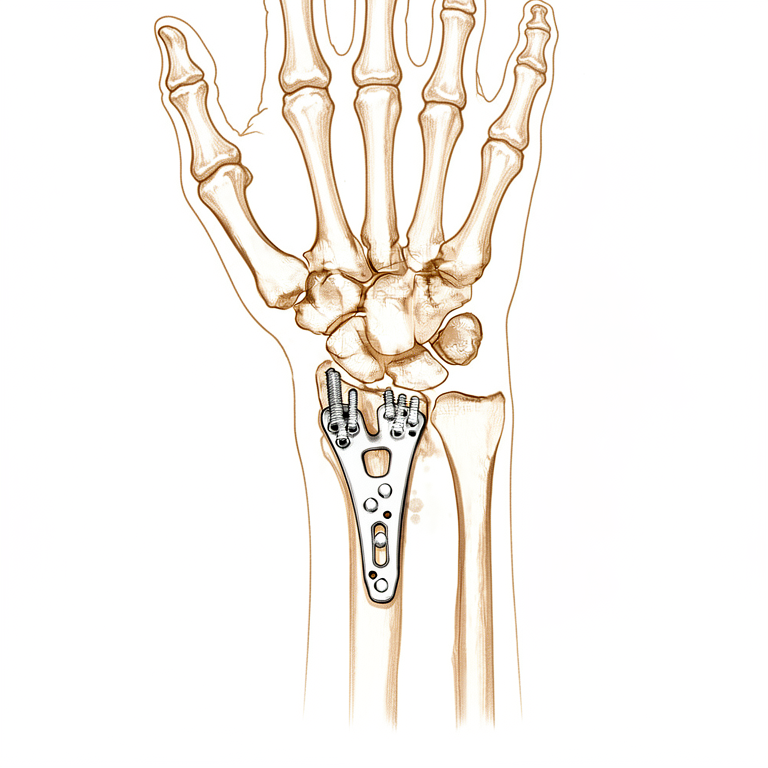
This protocol guides your recovery after surgical fixation of a distal radius (wrist) fracture (open reduction and internal fixation, ORIF) with Dr Kieran Hirpara at Mater Private Hospital Rockhampton. It begins with your home exercise program, followed by the structured clinical protocol written for your physiotherapist or hand therapist: bring this page or its PDF to your first therapy visit so your rehabilitation stays coordinated. Your therapist may adjust the plan depending on how your recovery progresses.
If you have any concerns about your wound after surgery, get in touch with the rooms. It is often helpful to take a photo of the wound and email it for review.
What to expect
For wound, swelling and scar management, see the practice's wound care guidance.
Following your surgery, you may be referred to a hand therapist for fabrication of a thermoplastic splint. In this situation, the splint will be worn temporarily for comfort and protection, and you will still be required to remove the splint for your home exercise program. If you are referred for a splint, you will receive more information regarding wear and care.
The exercises below are essential for regaining range of motion of your fingers, wrist and forearm. Heat and ice are good modalities often used for regaining movement, restoring function and improving comfort. Once the wound is healed, you may apply heat prior to exercises; an ice pack may be used afterwards to prevent or settle inflammation.
Scar management (particularly massage) is very important after distal radius surgery, so that the tendons running beneath the incision keep gliding freely and do not become stuck down (adherent) to the healing scar.
A volar locking plate is designed to hold the fracture firmly enough for movement to begin early, and this protocol is built around that. Research comparing early wrist movement with several weeks of immobilisation after volar plate fixation shows that starting motion early can improve short-term movement, grip and comfort without compromising the position of the fracture [1][2]. At the same time, trials comparing wrist motion started at about two weeks with motion started at about six weeks found the two groups were similar by three to six months [3], so while there is an early benefit, there is no need to rush, and the steady progression set out below is well supported. Bone healing follows its own timeline regardless of how the wrist feels, which is why the later precautions (no weight-bearing, heavy lifting or contact sport until 12 weeks after the fracture) are kept even once movement is comfortable.
Precautions and limitations
Light functional use of your hand is encouraged for daily living tasks such as self-care, feeding, dressing, writing and typing.
It is important to avoid lifting, gripping, weight-bearing and impact for up to 8 weeks after your operation. Gentle strengthening is introduced gradually from about week 4, starting with light finger work and isometric wrist exercises, and is built up carefully so that it does not undo this early protection.
These are the exercises from your handout, for regaining movement of your fingers, wrist and forearm. If you have a splint, remove it for your exercises. Start them as guided by Dr Hirpara and your therapist.
Your exercises

Kieran Hirpara 4.0
Wrist flexion / extension
Rest your elbow on a table and gently rock your wrist back and forth (or rest it over the edge of a table or armchair, as pictured). Once more comfortable, use your other hand on the palm to push the wrist backwards (fingers pointing to the ceiling), then the other way (fingers pointing to the floor), keeping the fingers loose. Hold each stretch for 15 seconds.
10 times each direction, 4 times daily
Kieran Hirpara 4.0
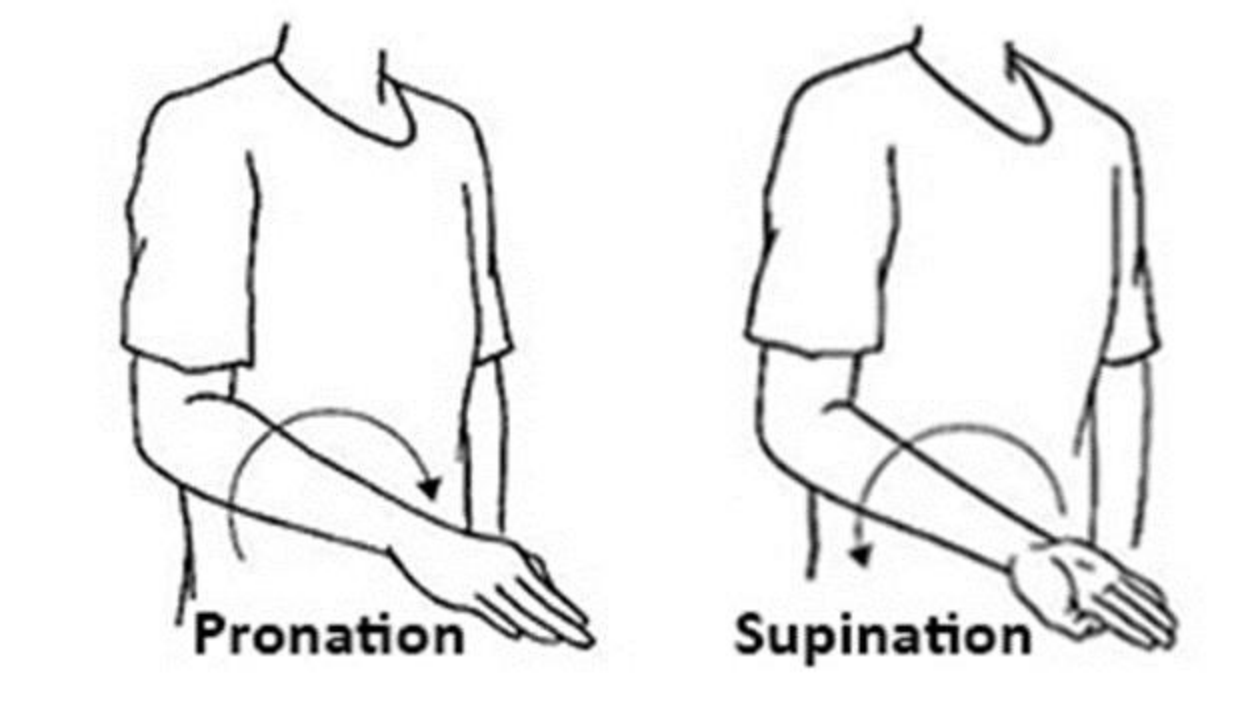
Forearm rotation (pronation / supination)
With your elbow by your side and your forearm in a neutral position (thumb up), gently rotate your palm up towards the ceiling (supination), hold for 3–5 seconds, then return to neutral. Repeat palm down towards the floor (pronation). Don't let your elbow come away from your body. You may assist the movement with your other hand, held at wrist level.
10 times each direction, 4 times daily
Kieran Hirpara 4.0
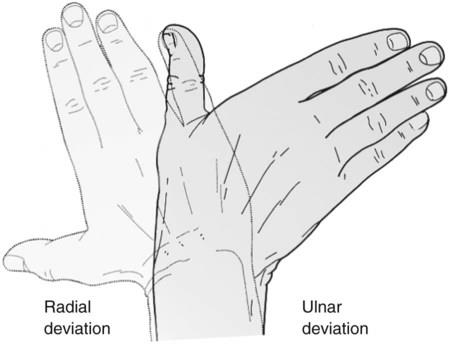
Ulnar / radial deviation
Place your hand and forearm on a flat surface. Keeping your forearm still, gently move your wrist and hand from side to side (as pictured).
10 times, 4 times daily
Kieran Hirpara 4.0
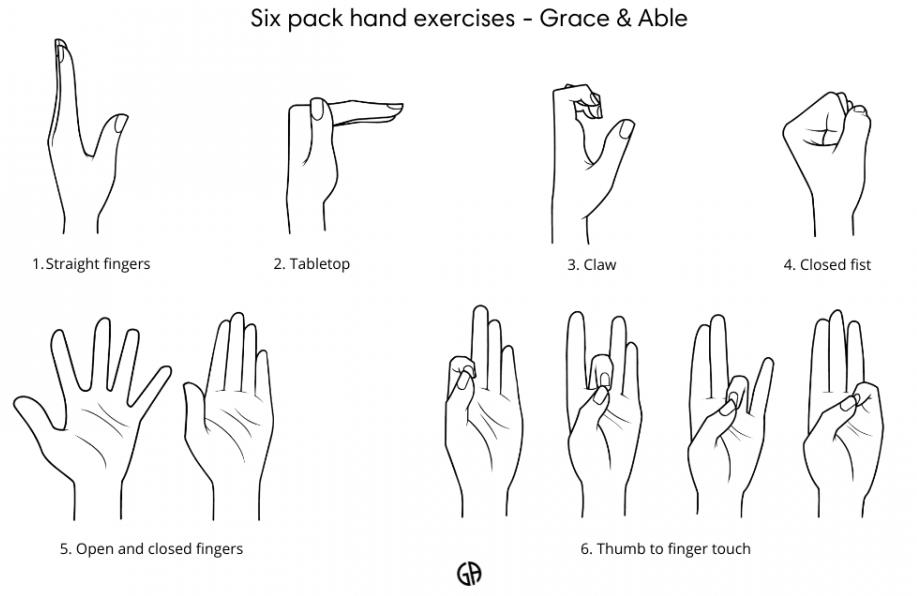
Six pack hand exercises
With your hand in front of you and your wrist straight, work through the six positions shown: straight fingers; “tabletop” (bend at the bottom knuckles, fingers straight); “hook” (bend the fingertips, knuckles up); tight fist with the thumb over the fingers; fingers spread then back together; and thumb to each fingertip, from index to little finger.
5–10 of each, 2–3 times a day; progress as tolerated
Your clinical protocol
The rest of this page is the accelerated clinical protocol for a distal radius fracture treated with open reduction and internal fixation with a volar plate. This section is to be provided to your physiotherapist or hand therapist, and each phase below opens with a plain-English explanation of what is happening.
Days 1–4 after your operation
In the first few days the focus is on protecting the fixation, settling swelling, and keeping your fingers, wrist, forearm, elbow and shoulder moving. Your surgical bandage stays in place until day 3, when it is reduced and the wound is redressed. Keep the hand elevated when resting, use it for light everyday tasks (under 1–2 kg) within comfortable limits, and avoid weight-bearing through the arm, tight gripping or lifting. A splint is not routinely needed, but one can be arranged if you are returning to work or the wrist is more painful.
For your physiotherapist:
Prior to treatment, check the patient's x-ray, operation report and past medical history (PMHx), and liaise with the treating surgeon regarding the stability of the fixation of the fracture and the likely prognosis.
Education and precautions
- Avoid weight-bearing through the arm, tight gripping or lifting
- Encourage use of the affected hand for light (less than 1–2 kg) activities of daily living (ADL) tasks within pain limits and normal movement patterns
Management
- Splint: nil required, but may be utilised if the patient is returning to work or in the presence of increased pain; consider a thermoplastic splint or off-the-shelf support
- Wound: surgical dressings/bandage to be left intact until day 3; debulk bandage and redress wound from day 3 post-operation; education regarding wound management
- Oedema: provide education regarding elevation; provide compression therapy and retrograde massage as required
- Exercises: provide active six pack exercises to maintain finger range of motion (ROM); provide active wrist, forearm and finger range of motion exercises; encourage regular active elbow and shoulder ROM
Week 2–4 after your operation
Your sutures come out at day 10–14, and scar massage begins once the wound has healed enough. The exercise program continues (the six pack exercises stop once your fingers regain full movement) and gentle muscle-activation (isometric) wrist strengthening starts. During this phase the wrist should still move only under its own muscle power: no one, including you, should push or stretch it passively yet, as the fracture is still uniting. Keep avoiding weight-bearing, tight gripping and lifting; light everyday tasks under 1–2 kg are encouraged. You must not drive while your wrist is in a splint; driving resumes once you are out of the splint, as confirmed at your review.
For your physiotherapist:
Assessments
- Self-reported assessments: Patient-Rated Wrist Evaluation (PRWE), Disabilities of the Arm, Shoulder and Hand (DASH)
- Oedema circumferential measurements
- Visual analogue pain scale (VAS) or numerical rating scale
- Active range of motion (AROM) goniometry measurements: hand, wrist
- Subjective review, including the patient's compliance with the regime, functional use of the hand in ADL tasks, and problems/concerns
Education and precautions
- Avoid weight-bearing through the arm, tight gripping or lifting
- No passive wrist movement
- Encourage use of the affected hand for light (less than 1–2 kg) ADL tasks within pain limits and normal movement patterns
- No driving while in a splint; driving resumes once out of the splint, confirmed at review
Management
- Wound/scar: removal of sutures at day 10–14; commence scar management as appropriate, dependent on healing progress
- Oedema: consider use of compression bandaging, retrograde massage, manual oedema mobilisation (MEM), contrast bathing and/or elevation if required
- Exercises: cease active six pack exercises once full finger range achieved; consider passive finger and thumb exercises, including place/hold, if active ROM not full in the hand; continue active wrist ROM exercises; encourage regular active elbow and shoulder ROM; commence wrist isometric strengthening
Troubleshooting
- Monitor for signs of wound infection, sensory changes in the hand, or early signs of complex regional pain syndrome (CRPS)
- Identify aberrant movement patterns and intervene as required
Week 4–6 after your operation
Strengthening starts gently in this phase: low-resistance finger strengthening from week 4, while the isometric wrist work continues and is gradually upgraded. If your x-ray is satisfactory and the fixation is stable, gentle passive wrist stretches (where the wrist is moved with help from your other hand or your therapist) can begin at 4–6 weeks. Restoring movement still takes priority over building strength. Keep avoiding weight-bearing through the arm and heavy lifting, while continuing to use the hand for light everyday tasks.
For your physiotherapist:
Assessments
- Oedema circumferential measurements
- Visual analogue pain scale or numerical rating scale
- AROM goniometry measurements and quality of movement patterns
- Subjective review, including the patient's compliance with the regime, functional use of the hand in ADL tasks, and problems/concerns
- Grip strength using dynamometer (3 each limb)
Education and precautions
- Avoid weight-bearing through the arm, or heavy lifting
- Encourage use of the affected hand for light (less than 1–2 kg) ADL tasks within pain limits and normal movement patterns
Management
- Scar: continue scar management as required
- Oedema: continue compression therapy, retrograde massage, MEM and elevation as required; discontinue contrast bathing
- Exercises: continue passive finger and thumb exercises if ROM not full; continue active wrist ROM exercises; commence finger strengthening exercises against low resistance at 4 weeks; commence gentle passive wrist exercises at 4–6 weeks if the ORIF is stable and the x-ray satisfactory; encourage regular active elbow and shoulder ROM; continue/upgrade isometric wrist strengthening exercises
Troubleshooting
- Review for signs of CRPS and shoulder pain
- Consider the volume of exercises in the home programme and prioritise ROM over strength
- If wrist ROM is significantly limited, consider commencing gentle passive range of motion (PROM) wrist exercises within 4/10 VAS, with the surgeon's approval
Week 6–8 after your operation
This phase begins a graded return to full activity over the next 3 weeks. Wrist strengthening steps up to light weights (0.5–1.0 kg) or low-resistance theraband, and the resistance for finger strengthening increases. Two hard limits remain: no weight-bearing, heavy lifting or contact sport until 12 weeks after the fracture. Your therapist will consider discharging you once you have full movement and a suitable return of function.
For your physiotherapist:
Assessments
- Oedema circumferential measurements as required
- Visual analogue pain scale or numerical rating scale
- AROM goniometry measurements
- Grip strength
- Subjective review
Education and precautions
- Graded return to full activity over the next 3 weeks
- Avoid weight-bearing, heavy lifting and contact sport until 12 weeks post fracture
Management
- Scar: continue scar management as required
- Oedema: continue oedema management as required
- Exercises: continue passive finger and thumb exercises if ROM not full; continue active and passive wrist ROM exercises if required; increase resistance in finger strengthening exercises; commence wrist strengthening exercises with use of 0.5–1.0 kg weights or low-resistance theraband; upgrade weights and resistance used in the wrist strengthening programme as tolerated
Troubleshooting
- Consider/commence night serial progressive splinting, boxing glove or dynamic splinting if slow improvement of ROM
- Monitor any signs of wrist instability and treat as appropriate
- Consider discharge when full ROM and suitable return of function
- Consider referral back to the treating doctor if the condition plateaus and/or there is a poor outcome
This protocol was written in association with Sarah Farrell, BOccThy AHT, and Kristy Gerlach, BOccThy AHT.
After your protocol
This protocol works alongside the practice's general recovery advice; see managing post-operative pain, wound care and hand therapy basics. For the operation itself and the injury it treats, see distal radius fixation (ORIF) and distal radius fracture. The phased plan above is consistent with published evidence on rehabilitation after volar locking plate fixation, and your ongoing recovery is guided individually by your physiotherapist or hand therapist according to how your wrist progresses.
References
- Quadlbauer S, Pezzei C, Jurkowitsch J, et al. Immediate mobilization of distal radius fractures stabilized by volar locking plate results in a better short-term outcome than a five week immobilization: a prospective randomized trial. Arch Orthop Trauma Surg. 2022;142(5):1–11.
- Gutiérrez-Espinoza H, Araya-Quintanilla F, Olguín-Huerta C, et al. Effectiveness of early versus delayed motion in patients with distal radius fracture treated with volar locking plate: a systematic review and meta-analysis. Hand Surg Rehabil. 2020;39(4):261–271.
- Lozano-Calderón SA, Souer S, Mudgal C, Jupiter JB, Ring D. Wrist mobilization following volar plate fixation of fractures of the distal part of the radius. J Bone Joint Surg Am. 2008;90(6):1297–1304.
- Miller LK, Jerosch-Herold C, Shepstone L. Effectiveness of edema management techniques for subacute hand edema: a systematic review. J Hand Ther. 2017;30(4):432–446.
Evidence & references
Distal Radius Fracture (ORIF) — Post-operative Rehabilitation Evidence Brief
Topic scope: post-operative rehabilitation after open reduction and internal fixation (ORIF) of a distal radius fracture with a volar locking plate. This brief backs an early-motion-but-protected hand/wrist pathway delivered with hand therapy, where wrist motion begins early while bone-dependent loading (weight-bearing, heavy lifting, contact sport) is deferred until ~12 weeks. It does not cover the indications for surgery vs casting, nor fragment-specific/dorsal/bridge-plate constructs (which carry their own loading rules).
Defining principle of the rehab here: a volar locking plate is a fixed-angle construct stable enough to permit immediate wrist motion — the screws lock to the plate and hold the articular reduction independent of the cast. So (unlike a cast-treated fracture, and unlike a tendon or ligament repair) the wrist does not need weeks of immobilisation to protect the reduction: the rehab is an early-movement pathway — finger/forearm/wrist active motion and oedema control from day one, splint for comfort only, isometric then progressive strengthening from ~weeks 4–6. The one timeline that is not negotiable is bone healing: union takes ~6–12 weeks regardless of how the wrist feels, which is why weight-bearing, heavy lifting and impact are held to 12 weeks even once motion is comfortable.
A. PROCEDURE & CONSTRUCT — what the rehab is protecting
Volar locking plate fixation is the dominant operative construct for displaced distal radius fractures and is the reference standard against which other techniques are compared. Key surgical-outcome facts that shape the rehab:
- Volar locking plates restore and hold articular reduction reliably, and across randomised comparisons give equivalent or better functional outcomes than non-operative care and competing fixation methods (dorsal plating, intramedullary nailing, fragment-specific), with most differences favouring early function rather than final endpoint [JAAOS controversies review 2014; Hand Clinics plate-fixation review 2021; IM-nail-vs-volar-plate RCTs].
- The fixed-angle construct is the rationale for early motion. Because the locking screws hold the subchondral fragments rigidly, the plate — not a cast — maintains the reduction, so wrist motion can start before union without displacing the fracture [Hand Clinics 2021; accelerated-rehab RCT, JBJS 2014].
- In older patients the operative-vs-conservative outcome gap is small. A 3-year RCT in patients >70 found volar plating and non-operative care converged on similar patient-reported function — context that keeps post-operative rehab pragmatic and patient-centred rather than aggressive [BMC Musculoskelet Disord 2022; Hand Clinics geriatric review 2021].
- Recovery is gradual. Range, grip and patient-reported scores improve steadily over the first 3–6 months; the construct permits early motion but does not accelerate the biology of healing or the return of grip strength.
B. REHABILITATION / HAND-THERAPY EVIDENCE
The central rehab questions for this construct are (1) when to start wrist motion, (2) how much supervised therapy is needed, and (3) what the strengthening timeline should be. The evidence is clear on the first, nuanced on the second, and consensus-driven on the third.
- Early motion is safe and gives a short-term advantage. Multiple RCTs and a systematic review show that starting wrist motion early after volar plating improves short-term ROM, grip and comfort without compromising the radiographic reduction [accelerated-rehab RCT, JBJS 2014; early-vs-late motion RCT, HAND 2018; Hand Therapy systematic review 2020]. This is the direct warrant for the day-1 finger/forearm/wrist program in this protocol.
- "Early" need not mean "immediate," and the advantage washes out by 3–6 months. The landmark trial comparing wrist mobilisation at ~2 weeks vs ~6 weeks found the two groups equivalent by 3–6 months [Lozano-Calderón / JBJS 2008]. So there is a genuine early benefit but no penalty for a measured, comfort-led progression — which is exactly why this protocol can be unhurried.
- Routine supervised physiotherapy adds little over a coached home program for most patients. Systematic reviews and RCTs repeatedly find that a structured home exercise program preceded by instruction/coaching performs as well as formal supervised therapy for uncomplicated cases, and that prescribed exercise programs add limited benefit over advice for impairment/activity outcomes [HEP-vs-supervised SR, J Hand Ther 2014; J Physiother SR 2017; Hand Clinics "is therapy needed?" 2021; Arch Orthop Trauma Surg 2020]. This supports a home-program-first model with hand-therapy review, escalating supervision for stiffness, oedema or slow progress — the structure of this protocol.
- Oedema control and scar/tendon-glide management are standard therapy elements. Elevation, retrograde massage, manual oedema mobilisation and (early) compression are the evidence-informed oedema toolkit [edema-management SR, J Hand Ther 2017]; scar massage to keep the flexor tendons gliding under the volar incision is consensus hand-therapy practice rather than RCT-derived.
Phased post-op timeline (volar locking plate, early-motion pathway)
Phases match this topic's synthesis.md. Timings are post-operative weeks; the 12-week
loading limit is referenced to the fracture (injury) date.
| Phase | Window | Splint | Motion / use | Strengthening | Notes |
|---|---|---|---|---|---|
| I — Protect & move | Days 1–4 | Comfort only, not routine | Active finger (six-pack), wrist, forearm, elbow & shoulder ROM from day 1; light ADL < 1–2 kg within pain limits | — | Surgical bandage to day 3, then redress. Oedema control + elevation. No weight-bearing, gripping or lifting |
| II — Active range & oedema | Week 2–4 | Comfort/work only (no driving while splinted) | Continue active wrist ROM (no passive yet); six-pack stops once fingers full | Isometric wrist activation begins | Sutures out day 10–14; start scar massage once healed. Watch for CRPS. PRWE/DASH baseline |
| III — Passive range & light load | Week 4–6 | Off | Add gentle passive wrist stretches at 4–6 wk if x-ray satisfactory & fixation stable | Finger strengthening (low resistance) from wk 4; upgrade isometrics | Movement still prioritised over strength |
| IV — Graded strengthening & return | Week 6–8 | Off | Restore/maintain full active & passive ROM | Wrist strengthening with 0.5–1.0 kg / light theraband, progress as tolerated | Graded return over ~3 wk. No weight-bearing, heavy lifting or contact sport until 12 weeks post-fracture. Discharge on full ROM + functional return |
The phase structure mirrors published surgeon/hand-therapy ORIF protocols (early ROM → scar + oedema → passive range + light resistance → progressive strengthening, with heavy load/sport held to ~12–16 weeks) [Physiopedia Colles' ORIF protocol; institutional ORIF rehab guidelines].
C. KEY CONTROVERSIES / EVIDENCE QUALITY
- How early to mobilise. Early motion (immediate–2 wk) gives a real short-term ROM/grip/comfort advantage that equalises by 3–6 months vs starting at ~6 weeks. The evidence therefore supports early motion but does not mandate aggression — a measured progression is fully defensible. Moderate–strong (multiple RCTs + SR).
- Supervised therapy vs coached home program. For uncomplicated fractures the best available evidence finds no consistent benefit of routine formal physiotherapy over a well-instructed home program; supervision is best targeted to stiffness, oedema, CRPS risk or slow progress. Moderate (SRs/RCTs), but heterogeneous.
- Strengthening and return-to-load timing. The week-by-week strengthening ramp and the 12-week loading hold are construct- and biology-based consensus, drawn from surgeon/hand- therapy protocols rather than a strengthening-timing RCT. Weak/consensus.
- Whether the wrist needs any immobilisation at all. Some trials report that omitting post-op immobilisation does not worsen outcomes after volar plating, supporting the "splint for comfort only" stance here. Moderate.
D. EVIDENCE STRENGTH FLAGS (summary)
- STRONG / MODERATE–STRONG (RCT / SR): early wrist motion after volar plating is safe and improves short-term ROM/grip/comfort without loss of reduction (accelerated-rehab RCT JBJS 2014; early-vs-late RCT HAND 2018; Hand Therapy SR 2020); ~2-wk vs ~6-wk mobilisation equivalent by 3–6 months (Lozano-Calderón JBJS 2008).
- MODERATE: volar locking plate is a reliable fixed-angle construct with equivalent/favourable outcomes vs alternatives (JAAOS 2014; Hand Clinics 2021); operative-vs-conservative outcomes converge in the elderly (BMC 2022); coached home program ≈ supervised therapy for uncomplicated cases (J Hand Ther 2014; J Physiother 2017; Hand Clinics 2021); evidence-based oedema management (J Hand Ther 2017).
- WEAK / CONSENSUS: the detailed strengthening ramp and 12-week loading limit (surgeon & hand-therapy protocols; biology- and construct-based, not trial-derived); scar/tendon-glide massage practice.
CITATIONS
RAG corpus (180,000+ Orthopaedic articles)
- Accelerated rehabilitation compared with a standard protocol after distal radial fractures treated with volar open reduction and internal fixation. J Bone Joint Surg Am. 2014. DOI: 10.2106/jbjs.m.00860
- Wrist mobilization following volar plate fixation of fractures of the distal part of the radius. J Bone Joint Surg Am. 2008. DOI: 10.2106/jbjs.g.01368
- Early versus late motion following volar plating of distal radius fractures. HAND. 2018. DOI: 10.1177/1558944718787880
- A systematic review of how daily activities and exercises are recommended following volar plating of distal radius fractures and the efficacy and safety of early versus late mobilisation. Hand Therapy. 2020. DOI: 10.1177/1758998320967032
- AAOS/ASSH Clinical Practice Guideline Summary: Management of Distal Radius Fractures. J Am Acad Orthop Surg. 2022. DOI: 10.5435/jaaos-d-21-00719
- Controversies in the management of distal radius fractures. J Am Acad Orthop Surg. 2014. DOI: 10.5435/jaaos-22-09-566
- Plate fixation of distal radius fractures. Hand Clinics. 2021. DOI: 10.1016/j.hcl.2021.02.008
- Non-operative treatment or volar locking plate fixation for dorsally displaced distal radius fractures in patients over 70 years — a three-year follow-up of a randomized controlled trial. BMC Musculoskelet Disord. 2022. DOI: 10.1186/s12891-022-05394-7
- Distal radius fracture: HEP versus supervised therapy — a systematic review. J Hand Ther.
- DOI: 10.1016/j.jht.2013.08.017
- Prescribed exercise programs may not be effective in reducing impairments and improving activity during upper limb fracture rehabilitation: a systematic review. J Physiother. 2017. DOI: 10.1016/j.jphys.2017.08.009
- Is therapy needed after distal radius fracture treatment — what is the evidence? Hand Clinics.
- DOI: 10.1016/j.hcl.2021.02.012
- Rehabilitation after distal radius fractures: is there a need for immobilization and physiotherapy? Arch Orthop Trauma Surg. 2020. DOI: 10.1007/s00402-020-03367-w
- Management of complications of distal radius fractures. Hand Clinics. 2015. DOI: 10.1016/j.hcl.2014.12.002
- A comparison of the accuracy of two sets of diagnostic criteria in the early detection of complex regional pain syndrome following surgical treatment of distal radial fractures. J Hand Surg Eur Vol. 2012. DOI: 10.1177/1753193412469142
Distal radius / rehabilitation literature (URLs)
- AAOS/ASSH Clinical Practice Guideline Summary: Management of Distal Radius Fractures (full summary). PMC. https://pmc.ncbi.nlm.nih.gov/articles/PMC9196973/
- Practical application of the 2020 distal radius fracture AAOS/ASSH clinical practice guideline: a clinical case. PMC. https://pmc.ncbi.nlm.nih.gov/articles/PMC9035062/
- Rehabilitation for distal radial fractures in adults (Cochrane-style review). PMC. https://pmc.ncbi.nlm.nih.gov/articles/PMC9250132/
- Rehabilitation after distal radius fractures: opportunities for improvement. PMC. https://pmc.ncbi.nlm.nih.gov/articles/PMC10569825/
- Rehabilitation following surgically treated distal radius fractures: do immobilization and physiotherapy affect the outcome? PMC. https://www.ncbi.nlm.nih.gov/pmc/articles/PMC8343619/
Published rehab protocols (surgeon / hand-therapy — basis for the phase structure)
- British Society for Surgery of the Hand / British Association of Hand Therapists — Distal Radius Fractures Working Group rehabilitation guidance (2024). https://www.hand-therapy.co.uk/_userfiles/pages/files/distal_radius_fractures_working_group_2024.pdf
- Colles' Fracture Post-Operative Rehabilitation Protocol. Physiopedia. https://www.physio-pedia.com/Colles%E2%80%99_Fracture_Post_Operative_Rehabilitation_Protocol
- Distal Radius ORIF Rehabilitation Guidelines. University of Virginia Department of Orthopaedic Surgery. https://med.virginia.edu/orthopaedic-surgery/wp-content/uploads/sites/242/2024/09/Distal-radius-ORIF.pdf
- Distal Radius ORIF Rehabilitation. Jared Lee, MD. https://jaredleemd.com/pdf/distal-radius-orif-rehabilitation/