Patients › Rehabilitation
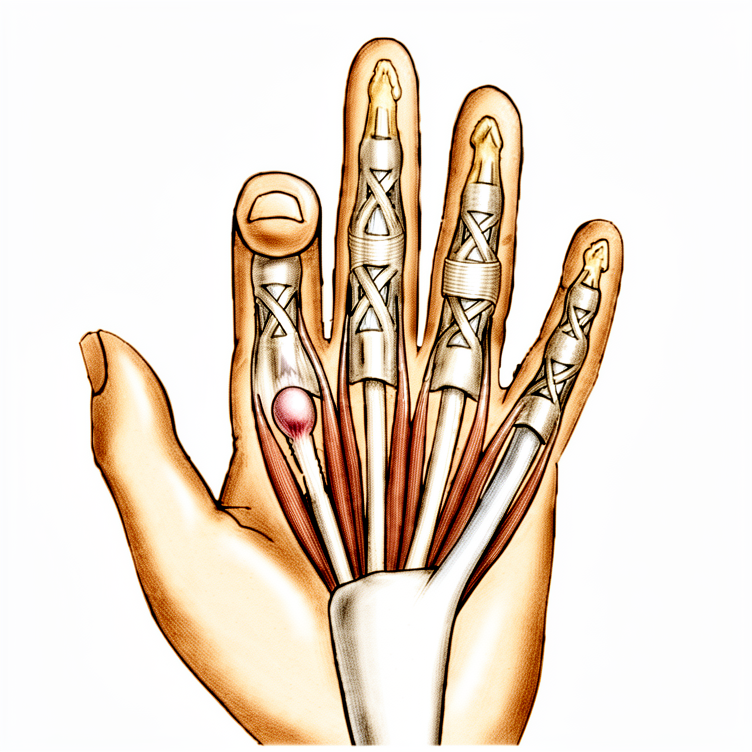
Trigger Finger Release
Post-operative exercises and precautions after trigger finger release, including tendon glides and joint blocking exercises.
This protocol guides your recovery after trigger finger release with Dr Kieran Hirpara at Mater Private Hospital Rockhampton. It explains what to expect, the precautions to follow, and the post-operative exercise program: bring this page or its PDF to your physiotherapist or hand therapist so your rehabilitation stays coordinated.
If you have any concerns about your wound after surgery, get in touch with the rooms. It is often helpful to take a photo of the wound and email it for review.
What to expect
Care of your wound is explained separately: see the wound care page linked at the end of this protocol.
The exercises below are very important to prevent your tendons sticking as your wound heals. At times the joints in your fingers can become stiff following this procedure. Preventing this stiffness early is important, so you are encouraged to apply firm, prolonged stretches to your finger (using your other hand), especially for straightening. This form of passive stretching is safe and will not affect the surgery: the pulley has already been released, so there is nothing inside that a stretch can disturb.
Once your wound is healed, apply heat to your hand for 20 minutes before performing these exercises. After completing the exercises, application of ice may be helpful to prevent inflammation.
Sometimes the hand or wound can become sensitive. This is normal, and can be prevented or minimised by commencing daily desensitisation: gently tapping or rubbing over the wound (with the dressing in place), starting immediately following your surgery. This type of "sensory feedback" allows the skin to normalise touch and texture.
In the first 48 hours, work to keep swelling down: keep the hand elevated, use ice, apply compression if your therapist has provided it, and gently "pump" the fingers (open and close) to move swelling along.
Begin using the hand for light tasks (dressing, eating and similar) as soon as pain allows, and build up gradually. Don't overdo it: if your pain or swelling clearly increases after an activity, ease back until the hand settles, then build up again.
Once the wound is fully healed, commence scar massage: firm circles over the incision. The wound care page has more information on scar management.
What the evidence says about recovery
Open release of the A1 pulley is a well-established operation with a strong track record in the published literature. The catching and locking is corrected by the surgery itself: once the pulley is divided the tendon glides freely again, and the triggering does not usually come back. In a series of nearly 1,600 open releases, fewer than 1% of patients needed a second operation for persistent or recurrent triggering, and there were no nerve injuries or deep infections [4]. A comparative study with over three years of follow-up likewise found no recurrences after open release [5].
Soreness in the palm settles substantially over the first one to two weeks. In one comparative study the median time to significant pain reduction after open release was about a week [5]. Some tenderness in the palm with firm gripping, mild swelling or finger stiffness can linger for several weeks after that. This is normal and reflects the scar maturing, which takes around three months [3]; the desensitisation, scar massage and exercise program in this protocol is designed to manage exactly this. In the large series above, about one in twenty digits had a documented problem after surgery, most commonly temporary stiffness or scar tenderness that settled with treatment; recovery of motion tends to be slower in people with diabetes, so the exercise program matters even more in that group [4].
Published hand-therapy protocols start active and passive finger motion and tendon-glide exercises within the first days after surgery, add scar management and desensitisation once the wound has healed, and reintroduce graded grip strengthening later [2][3], the same staged approach as the program on this page. Starting the exercises early is what keeps the tendon gliding and the joints supple while the wound heals.
Return to work depends on what your job asks of the hand. In a comparative study, half of patients were back at work within about two weeks of open release [5]; people in lighter or desk-based roles often manage sooner, while heavier manual work waits until the lifting and gripping restriction below lifts.
A randomised controlled trial compared three months of supervised therapy after open release with a self-directed home exercise program: overall function, motion and pain were similar between the groups at six months, grip strength recovered further with supervised therapy, and the patients who clearly benefited from formal therapy were those whose triggering had been present for more than twelve months before surgery and those doing housework or lighter work [1]. In practical terms, a well-performed home program (the exercises on this page) carries most patients through, with formal hand therapy adding value where the finger was stiff for a long time before surgery or progress is slow.
Precautions and limitations
Light functional use of your hand is encouraged for daily living tasks such as self-care, feeding, dressing, writing and typing. The limits that matter:
- Avoid lifting, gripping and weight bearing for up to 4 weeks post-op.
- Driving is limited for the first week; resume once pain allows, you can make a full fist, and you can safely control the vehicle.
For your physiotherapist:
Management
- Home exercise program as per the cards below: wrist flexion/extension stretch; DIP (distal interphalangeal) and PIP (proximal interphalangeal) joint blocking; tendon glides (Series A and Series B)
- Firm prolonged passive stretches to the finger, especially into extension, for early prevention of joint stiffness
- Heat to the hand for 20 minutes before exercises once the wound is healed; ice after exercises to prevent inflammation
- Daily desensitisation (gentle tapping / rubbing over the wound, dressing in situ) commencing immediately post-op
- Swelling management in the first 48 hours: elevation, ice, compression as indicated, gentle finger pumps
- Graded return to light functional use as pain allows, monitoring for post-activity pain/swelling flares
- Scar massage (firm circles over the incision) once the wound is fully healed
Precautions
- Light functional use only for daily living tasks (self-care, feeding, dressing, writing, typing)
- No lifting, gripping or weight bearing for up to 4 weeks post-op
- Driving limited for the first week; resume when pain allows, a full fist is achieved and the patient can safely control a vehicle
Expected milestones (criteria-based, guided by published protocols [1][2][3])
- Pain settled to comfortable levels with simple analgesia within 1–2 weeks [5]
- Wound healed, with scar massage and ongoing desensitisation under way, by 2–3 weeks [2][3]
- Full active finger flexion and extension (full fist and full composite extension) by about 3 weeks, restored and maintained through the blocking and tendon-glide program [2]
- Graded grip and pinch strengthening (e.g. putty) introduced once the 4-week lifting/gripping precaution lifts, progressing to full functional use
- Consider escalation to supervised hand therapy where triggering had been present for more than 12 months pre-operatively, where the patient's roles involve sustained light/fine hand use, or where range of motion or grip recovery is slow [1]
These are the exercises from your handout, started after surgery and continued at home as guided by your physiotherapist or hand therapist.
Your exercises
Kieran Hirpara 4.0
Wrist flexion / extension stretch
Rest your elbow on a table (or your forearm over the edge of a table or arm chair) and gently rock your wrist back and forth. Once more comfortable, grasp your palm with the other hand and push the wrist backwards (fingers loose, pointing to the ceiling) — hold 15 seconds; then the other way (fingers loose, pointing to the floor) — hold 15 seconds. Repeat 5 times each direction.
10 reps, 4–5 times daily
Kieran Hirpara 4.0
DIP joint blocking
The DIP (distal interphalangeal) joint is the end joint of your finger. Begin with the palm up, supporting your involved hand with your other hand just below the end joint. Bend and straighten the end joint, holding each position for 3–5 seconds. Support the middle joint only enough so it does not bend. It is okay if the other fingers move during this exercise.
10 reps, 4 times a day, daily
Kieran Hirpara 4.0
PIP joint blocking
The PIP (proximal interphalangeal) joint is the middle joint of your finger. Begin with the palm up, supporting your involved hand with your other hand just below the second joint. Bend and straighten your finger at the middle joint, holding each position for 3–5 seconds. It is okay if the other fingers move as well.
10 reps, 4 times a day, daily
Kieran Hirpara 4.0
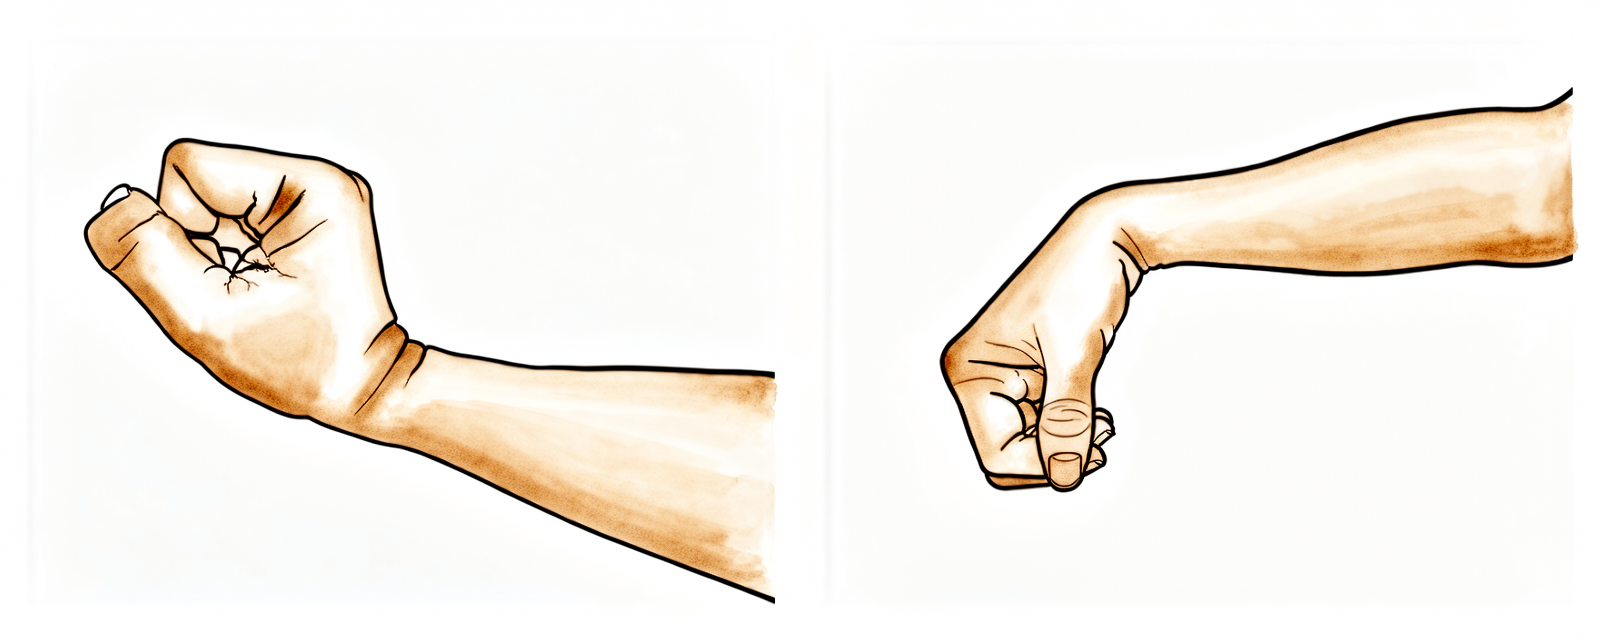
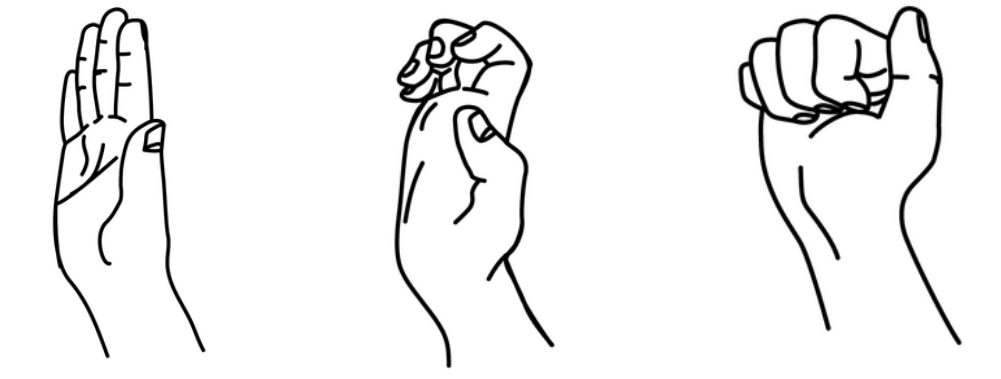
Tendon glides — Series A
With your hand in front of you and your wrist straight, fully straighten all of your fingers — you may use your other hand to ensure the fingers achieve full extension (position 1). Bend the tips of your fingers into the "hook" position with your knuckles pointing up (position 2). Then make a tight fist with your thumb over your fingers (position 3).
5–10 reps, 2–3 times a day, daily
Kieran Hirpara 4.0
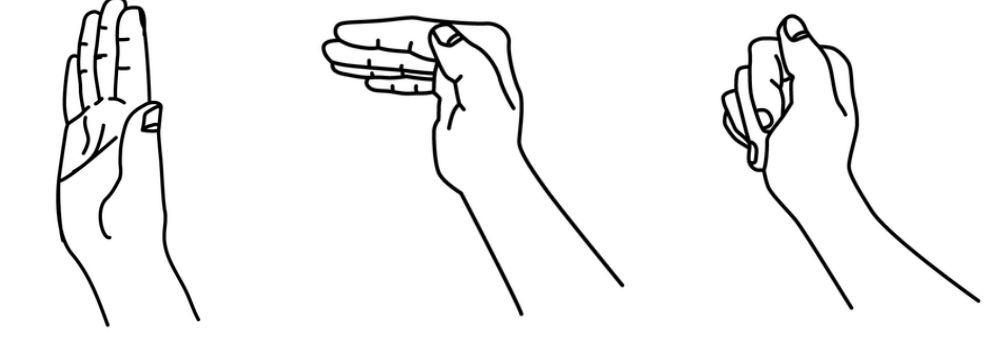
Tendon glides — Series B
With your hand in front of you and your wrist straight, fully straighten all of your fingers — you may use your other hand to ensure the fingers achieve full extension (position 1). Make a "tabletop" with your fingers by bending at your bottom knuckle and keeping the fingers straight — make sure your wrist does not drop forward (position 2). Then bend your fingers at the middle joint, touching your fingers to your palm (position 3).
5–10 reps, 2–3 times a day, daily

Kieran Hirpara 4.0
Active composite extension
Resting your elbow on a table, straighten your fingers as far as possible, then push a little further with your other hand. Count to 5, and relax.
10 reps, 3–4 times daily

Kieran Hirpara 4.0
Passive composite extension
Place your hand flat on a table, palm down. With your other hand, apply pressure over the back of the hand and 'massage' towards your body. Count to 5, and relax.
10 reps, 3–4 times daily
Kieran Hirpara 4.0
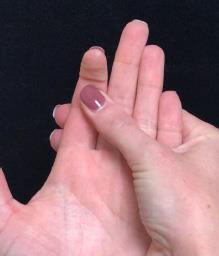
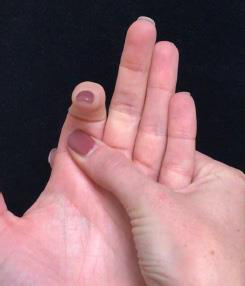
Thumb opposition
Start with the fingers straight and relaxed. Touch the tip of your thumb to the tip of your index finger. Hold for 5 seconds, then return to the start.
10 reps, 3–4 times daily
After your protocol
This protocol was written in association with Sarah Farrell, BOccThy (Bachelor of Occupational Therapy), Accredited Hand Therapist, and incorporates updated post-surgical management guidance (April 2025) from Ruby Doolan, Accredited Hand Therapist, Extend Rehabilitation. It works alongside the practice's general recovery advice: see managing post-operative pain, wound care and hand therapy basics. For the operation itself, see trigger finger release.
The recovery framing and milestones are additionally informed by published trigger finger release rehabilitation protocols, including those of the University of Virginia Hand Center and Twin Cities Orthopedics, and by published outcome studies of open trigger finger release, including a randomised controlled trial of post-operative rehabilitation (Saito et al., Journal of Clinical Medicine, 2023) and a large adverse-event series (Bruijnzeel et al., Journal of Hand Surgery, 2012).
References
- Saito T, Nakamichi R, Nakahara R, Nishida K, Ozaki T. The effectiveness of rehabilitation after open surgical release for trigger finger: a prospective, randomized, controlled study. J Clin Med. 2023;12(22):7187.
- University of Virginia Hand Center. Trigger Finger Release Guidelines (post-operative therapy protocol).
- Meletiou SD, Twin Cities Orthopedics. Post-operative Management of Trigger Release (A1 pulley release).
- Bruijnzeel H, Neuhaus V, Fostvedt S, Jupiter JB, Mudgal CS, Ring DC. Adverse events of open A1 pulley release for idiopathic trigger finger. J Hand Surg Am. 2012;37(8):1650–1656.
- Chanthanapodi P, Aodsup S. Comparative results of percutaneous and open surgery for trigger fingers: a propensity score analysis. Front Surg. 2025;12:1509292.
Evidence & references
Trigger Finger Release (A1 Pulley Release) — Surgical Outcomes & Post-operative Rehabilitation
Topic scope: (A) the place of surgery in stenosing tenosynovitis (trigger finger/thumb) after failed conservative care (splinting, corticosteroid injection), and (B) post-operative rehabilitation after surgical division of the A1 pulley — open or percutaneous. This is an early-motion pathway: nothing is reconstructed, the catching is mechanically abolished the moment the pulley is divided, and the rehab exists to keep the now-free tendon gliding and the finger joints supple while the wound heals.
Defining principle of the rehab here: A1 pulley release removes the obstruction; it does not create a construct that needs protecting. Once the pulley is divided the flexor tendon glides freely and triggering does not usually recur. So — unlike a tendon repair, and like a carpal-tunnel decompression — the pathway is immediate active motion: full active finger flexion/extension and tendon glides from the first days, oedema and scar care, early light functional use, and a quick return. Most patients need no formal hand therapy at all; supervised therapy is reserved for the minority with pre-existing joint stiffness, long-standing triggering, or slow recovery. The single branch point is whether the finger was already stiff before surgery (long-standing fixed flexion / PIP contracture) — those patients need active therapy to recover motion the release alone cannot restore.
A. WHERE SURGERY SITS IN THE PATHWAY
Trigger finger is usually managed non-operatively first: activity modification, splinting, and corticosteroid injection, which resolves a substantial proportion of digits without surgery. Surgery (A1 pulley release) is reserved for digits that fail injection, recur, or present with a fixed deformity. The corpus contains the comparative evidence underpinning this stepped approach (percutaneous release vs steroid injection; one- vs two-injection regimens; corticosteroid solution choice) — Moderate (RCT). The rehab protocol on the patient page begins after that decision has been made, so this brief concentrates on the surgical and post-surgical evidence.
B. SURGICAL OUTCOMES & RESOLUTION RATES
Open release of the A1 pulley is one of the most reliable operations in hand surgery. The mechanical problem — a thickened tendon catching under a tight pulley — is solved by dividing the pulley, and the result is durable:
- In a series of 1,598 open releases, fewer than 1% required a second operation for persistent or recurrent triggering, with no nerve injuries and no deep infections [Bruijnzeel 2012]. About one digit in twenty had a documented post-operative problem, almost all minor and self-limiting (transient stiffness, scar tenderness). Strong (large cohort).
- Recovery of motion is slower in patients with diabetes, reinforcing the value of the exercise program in that group [Bruijnzeel 2012]. Moderate.
- A propensity-matched comparison with >3 years follow-up found no recurrences after open release, with median time to significant pain reduction of about one week and roughly half of patients back at work within ~2 weeks [Chanthanapodi 2025]. Moderate.
Take-home for rehab: because the operation itself abolishes the triggering, the rehabilitation is not "earning back" a surgical result — it is preventing the two things that can go wrong during healing: tendon adhesion and joint stiffness. Early glide and early extension are the levers.
C. OPEN vs PERCUTANEOUS RELEASE
Both techniques divide the same structure and converge to the same place.
- A Level I meta-analysis of 8 RCTs (548 patients) found no significant difference between open and percutaneous release in revision, complication, or pain rates — both are appropriate options [Casey 2024, J Hand Surg Am]. Strong (meta-analysis of RCTs).
- Larger RCT syntheses show percutaneous release confers faster early functional recovery — better short/mid-term Q-DASH, ~12 days earlier return to work, and shorter analgesic use — while long-term function, grip, motion and complication/revision rates are equivalent. Strong.
- Percutaneous (including ultrasound-guided/sonographically-controlled) technique is supported by multiple corpus series for efficacy and safety, with the main theoretical risks being incomplete release and digital nerve proximity, mitigated by surface landmarks and imaging [corpus percutaneous series]. Moderate.
Rehab implication: the post-operative program is essentially the same for both approaches — early active motion, glides, oedema and scar care. The patient page applies regardless of whether the release was open or percutaneous; percutaneous patients simply tend to be comfortable and back to activity a little sooner.
D. THE ROLE — AND LIMITS — OF POST-OPERATIVE HAND THERAPY
This is the central evidence point for the protocol, and it is one where "more therapy" is not automatically better.
- A prospective RCT compared 3 months of supervised rehabilitation after open
release against a self-directed home exercise program: at six months,
overall function, motion and pain were similar between groups. Supervised
therapy added further grip-strength recovery, and the patients who clearly
benefited from formal therapy were those whose **triggering had been present
12 months pre-operatively and those in housework/lighter-work roles [Saito 2023, J Clin Med]. Moderate (single RCT).
- Published surgeon and hand-therapy protocols (e.g. University of Virginia Hand Center; Twin Cities Orthopedics) start active and passive finger motion and tendon glides within the first days, add scar massage and desensitisation once the wound is healed, and reintroduce graded grip strengthening later — precisely the staged structure of the patient page. Consensus.
Bottom line: a well-performed home program carries most patients through. Formal hand therapy is reserved, not routine — escalate it for long-standing pre-operative triggering, pre-existing joint stiffness/contracture, manual or fine-use occupational demands, or slow motion/grip recovery.
E. COMPLICATIONS
Serious complications are uncommon (roughly <1–4% across series) and most "complications" are minor, self-limiting healing phenomena:
- Digital nerve injury — the most feared complication, particularly relevant to percutaneous technique (blind division near the radial digital nerve of the thumb and index) and to scar/retraction in open release. Rare in experienced hands; transient paraesthesia is more common than true division [corpus complication series]. Moderate.
- Incomplete release / persistent triggering — failure to fully divide the A1 pulley (or an A2/FDS slip contribution); a recognised cause of revision, more often discussed with percutaneous technique. Moderate.
- Recurrent triggering — uncommon after adequate open release (<1% reoperation in the 1,598-digit series) [Bruijnzeel 2012]. Strong.
- Infection — usually superficial; deep infection rare (none in the large open series) [Bruijnzeel 2012]. Strong.
- Bowstringing — a rare complication from excessive proximal pulley loss (A1 plus encroachment on A2); largely avoided by limiting division to A1 [bowstringing case literature]. Weak (case-level).
- Stiffness / flexion contracture / "flare" — the commonest self-limiting problem; transient PIP stiffness, scar tenderness and a post-operative inflammatory flare that settle with the motion, desensitisation and scar program. Recovery is slower in diabetes. Moderate. This is the category the rehabilitation program actively targets.
F. PHASED POST-OP TIMELINE (matches the patient protocol)
| Phase | Window | Protection | Motion / use | Therapy add-ons | Notes |
|---|---|---|---|---|---|
| I — Immediate active motion & oedema control | Day 0–2 | None beyond dressing | Active finger flexion/extension and finger "pumps" from day 1; tendon glides commenced | Elevation, ice, compression if provided; desensitisation (tap/rub over dressed wound) from day 1 | Nothing reconstructed -> motion is the priority; manage swelling actively |
| II — Glide & joint motion | Week 0–2 | None | Tendon glides (Series A/B), DIP & PIP blocking, composite extension; firm passive stretch into extension | Continue desensitisation | Goal: keep tendon gliding, prevent adhesion & stiffness; pain settles substantially (~1 wk) [Chanthanapodi 2025] |
| III — Scar maturation & function | Week 2–4 | Light functional use only | Full active fist + full composite extension by ~3 wk; build light daily-living use | Scar massage (firm circles) once wound healed; heat before / ice after exercises | No lifting/gripping/weight-bearing to ~4 wk; driving limited ~first week (full fist + safe control) |
| IV — Strengthening & return | Week 4+ | None | Graded grip/pinch (e.g. putty) once 4-wk precaution lifts -> full function | Supervised therapy if indicated (long-standing trigger, stiffness, slow recovery, occupational demand) [Saito 2023] | Manual workers return later than desk/light roles |
Timings are criteria-based and drawn from published surgeon/hand-therapy protocols; they are typical, not trial-mandated.
G. KEY CONTROVERSIES / EVIDENCE QUALITY
- Is routine post-op hand therapy necessary? The best available evidence (Saito 2023 RCT) says no for most — home exercise matches supervised therapy on function/pain/motion at six months, with supervised therapy adding grip strength and benefiting a defined subgroup (long-standing trigger, lighter-work roles). The protocol's "therapy reserved, not routine" stance is evidence-aligned. Moderate.
- Open vs percutaneous. Equivalent long-term outcomes and safety (Casey 2024 meta-analysis); percutaneous offers faster early recovery. The rehab is the same either way. The live debate is technique-side (nerve safety, completeness of release), not rehab-side. Strong on equivalence.
- The rehab protocol structure itself is consensus/expert, built from surgeon patient-guidance documents plus one rehabilitation RCT — there is no large trial dictating exact phase timings.
- Diabetes modifies recovery — slower motion recovery and a lower threshold to involve a hand therapist; not a different protocol, a different pace. Moderate.
H. EVIDENCE STRENGTH FLAGS (summary)
- STRONG (meta-analysis / RCTs / large cohort): open vs percutaneous equivalence in revision/complication/pain (Casey 2024, 8 RCTs); percutaneous faster early functional recovery (RCT syntheses); durability of open release (<1% reoperation, no nerve injury/deep infection in 1,598 digits, Bruijnzeel 2012).
- MODERATE (single RCT / cohorts): home exercise ~ supervised therapy at 6 months with grip-strength edge for supervised therapy (Saito 2023); percutaneous efficacy/safety series; slower recovery in diabetes; injection-vs- surgery comparative data.
- WEAK / CONSENSUS: the post-operative rehabilitation protocol structure and exact phase timings (surgeon/hand-therapy patient-guidance documents); bowstringing risk (case-level).
CITATIONS
RAG corpus (180,000+ Orthopaedic articles)
- Open Versus Percutaneous Fixation of Trigger Finger: Meta-Analysis of Clinical Outcomes. J Hand Surg Am. 2024. DOI: 10.1016/j.jhsa.2024.03.010
- Complications of Open Trigger Finger Release. J Hand Surg Am. 2010. DOI: 10.1016/j.jhsa.2009.12.040
- Differential Pulley Release in Trigger Finger: A Prospective, Randomized Clinical Trial. Hand (N Y). 2021. DOI: 10.1177/1558944721994231
- Percutaneous A1 pulley release vs steroid injection for trigger digit. J Hand Surg Eur. 2010. DOI: 10.1177/1753193410381824
- Comparative Study of A1 Pulley Release and Ulnar Superficialis Slip Resection in Trigger Finger. J Hand Surg Am. 2022. DOI: 10.1016/j.jhsa.2022.04.021
- Risk Factors for Requiring Ulnar Superficialis Slip Resection During Trigger Finger Release. J Hand Surg Am. 2024. DOI: 10.1016/j.jhsa.2024.08.013
- Impact of Flexor Tendon Traction Tenolysis on Clinical Outcomes in Open A1 Pulley Release. J Hand Surg Glob Online. 2024. DOI: 10.1016/j.jhsg.2024.09.010
- Ultrasound-Assisted Percutaneous Trigger Finger Release: Is It Safe? Hand (N Y). 2008. DOI: 10.1007/s11552-008-9137-8
- Evaluation of Percutaneous First Annular Pulley Release: Efficacy and Complications. J Hand Surg Am. 2016. DOI: 10.1016/j.jhsa.2016.04.009
- Sonographically controlled minimally-invasive A1 pulley release using a new guide. BMC Musculoskelet Disord. 2023. DOI: 10.1186/s12891-023-06982-x
- Percutaneous A1 pulley with corticosteroid injection for trigger finger release. J Orthop Surg Res. 2025. DOI: 10.1186/s13018-025-05776-2
- A Cost and Efficiency Analysis of the WALANT Technique for the Management of Trigger Finger. Plast Reconstr Surg Glob Open. 2019. DOI: 10.1097/gox.0000000000002509
- Management of Pediatric Trigger Thumb and Trigger Finger. J Am Acad Orthop Surg. 2012. DOI: 10.5435/jaaos-20-04-206
- What's New in Hand Surgery. J Bone Joint Surg Am. 2024. DOI: 10.2106/jbjs.23.01343
Trigger finger surgical & rehabilitation literature (URLs)
- Saito T, et al. The Effectiveness of Rehabilitation after Open Surgical Release for Trigger Finger: A Prospective, Randomized, Controlled Study. J Clin Med. 2023;12(22):7187. https://pmc.ncbi.nlm.nih.gov/articles/PMC10671987/
- Bruijnzeel H, et al. Adverse Events of Open A1 Pulley Release for Idiopathic Trigger Finger. J Hand Surg Am. 2012;37(8):1650-1656. https://pubmed.ncbi.nlm.nih.gov/22763058/
- Casey JC, et al. Open Versus Percutaneous Fixation of Trigger Finger: Meta-Analysis of Clinical Outcomes. J Hand Surg Am. 2024;49(6):570-575. https://pubmed.ncbi.nlm.nih.gov/38727666/
- Chanthanapodi P, Aodsup S. Comparative results of percutaneous and open surgery for trigger fingers: a propensity score analysis. Front Surg. 2025;12:1509292. https://pmc.ncbi.nlm.nih.gov/articles/PMC11922895/
- Complications of Percutaneous Release of the Trigger Finger. PMC. https://pmc.ncbi.nlm.nih.gov/articles/PMC6485534/
- Trigger Finger. StatPearls, NCBI Bookshelf. https://www.ncbi.nlm.nih.gov/books/NBK459310/
- Bowstringing as a complication of trigger finger release. J Hand Surg Am. 1988. https://www.jhandsurg.org/article/S0363-5023(88)80097-2/abstract
- Trigger Finger (patient information). British Society for Surgery of the Hand (BSSH). https://www.bssh.ac.uk/patients/conditions/15/trigger_finger
Published rehab protocols (patient-guidance — basis for the phase structure)
- University of Virginia Hand Center. Trigger Finger Release Guidelines (post-operative therapy protocol). https://med.virginia.edu/orthopaedic-surgery/wp-content/uploads/sites/242/2015/11/Triggerfingerreleaseprotocol.pdf
- Meletiou SD, Twin Cities Orthopedics. Post-operative Management of Trigger Release (A1 pulley release). https://tcomn.com/wp-content/uploads/2017/10/Trigger-Release-A1.pdf
- EmergeOrtho. Trigger Finger Release - Post-operative Instructions. https://emergeortho.com/wp-content/uploads/2022/06/Trigger-Finger-Release.pdf