Patients › Rehabilitation
Clavicle Fixation (ORIF)
Rehabilitation after plate fixation of a clavicle fracture, gated on radiographic healing at review.
This protocol guides your recovery after plate fixation of a fractured clavicle (collarbone), open reduction and internal fixation (ORIF), with Dr Kieran Hirpara at Mater Private Hospital Rockhampton. Each phase below opens with a plain-English explanation of what is happening and what matters most, followed by the structured protocol written for your physiotherapist; bring this page or its PDF to your first physiotherapy visit so your rehabilitation stays coordinated. Your physiotherapist may adjust the plan depending on how your recovery progresses.
If you have any concerns about your wound after surgery, get in touch with the rooms. It is often helpful to take a photo of the wound and email it for review.
What to expect
The operation holds the broken ends of the collarbone in position with a plate and screws so that the bone can heal. The plate is strong, but it is a splint, not a substitute for healed bone: the bone itself typically takes around six to twelve weeks to unite, and it keeps strengthening (remodelling) for months after that. Rehabilitation is staged around that biology: the early weeks protect the fixation while the fracture starts to knit, movement is recovered next, and loading and sport come last, once the bone can take them.
Because this is a fracture, each major step up (moving the arm above shoulder height, strengthening, heavier lifting, and return to sport) depends not just on the calendar but on how the fracture looks on x-ray, as confirmed at your review with Dr Hirpara. The week ranges below are typical rather than fixed.
Bone healing is slower in smokers and in people with diabetes, and smoking in particular can delay or even prevent a fracture from uniting. If you smoke, the weeks after a fracture are a particularly worthwhile time to stop.
The collarbone sits directly under the skin, so it is common to feel (and see) the plate once the swelling settles. It may be tender under a seatbelt or a backpack strap in the early months; this usually settles as the area desensitises. If the plate remains bothersome after the fracture has fully healed, removing it is an option that can be discussed at a later review; it is a separate, unhurried decision, made well after the bone has united.
The journey at a glance:
- Phase I — Protection: weeks 0–3
- Phase II — Early motion: weeks 3–6
- Phase III — Strengthening: weeks 6–12
- Phase IV — Return to full activity and sport: week 12 onwards
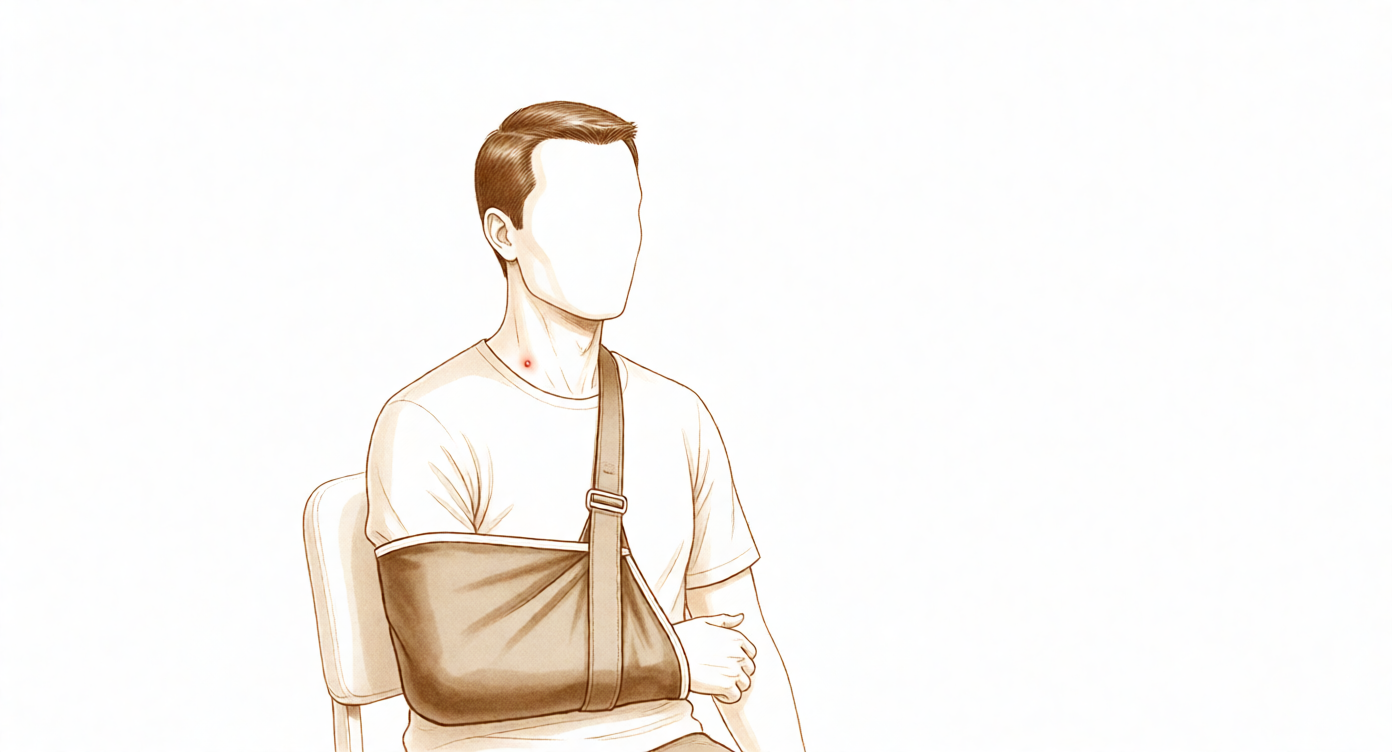
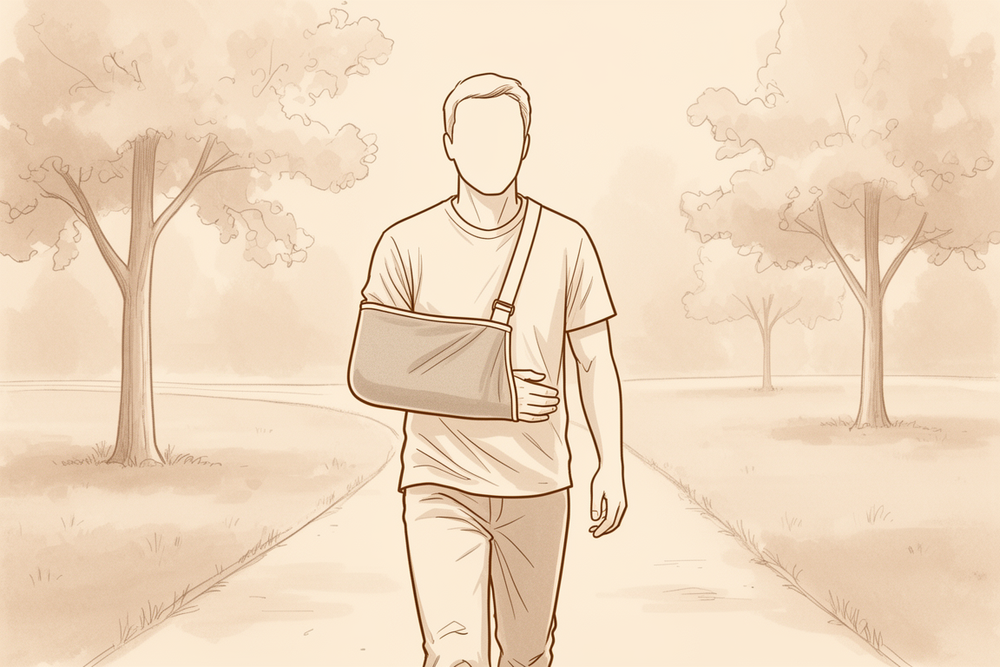
Wearing your sling
The sling supports the weight of the arm, eases discomfort and protects the healing bone in the early weeks. The rules are simple:
- Wear it especially when out of the house, to protect the arm and to stop people bumping into it. You don't need to sleep in it.
- For the first three weeks, wear it most of the time. From then on it is weaned as comfort allows, and most people have discarded it by six weeks.
- Take it off for showers, for your exercises, and for quiet tasks done sitting down with the arm supported: eating, writing, reading.
- Resting at home, the sling can come off if you are sensible about it: arm supported on a pillow while sitting, and the hand kept below shoulder height.
- No driving while you are wearing a sling. Driving resumes once you are out of the sling and can control the car comfortably and safely, as confirmed at your review with Dr Hirpara.
Your first days after surgery
If a nerve block was used during surgery, the arm may feel numb and heavy for some hours afterwards; keep it protected in the sling until normal feeling returns. A few practical tips for the early days:
- Take your painkillers before you do your exercises, and before your physiotherapy appointments.
- Use ice over the area for pain and swelling, about 15–20 minutes at a time, wrapped in a damp cloth, never directly on the skin or the wound.
- When wearing the sling, relax your shoulder and let the sling take the weight of your arm.
- Watch your posture: keep your ears, shoulders and hips in line and avoid letting the shoulders slump forward; good posture protects the fracture position and helps prevent stiffness.
- Keep your fingers, wrist, elbow and neck moving from the start.
- If you have any problems, contact the rooms or let your physiotherapist know.
Phase I — Protection (Week 0–3)
Kieran Hirpara 4.0
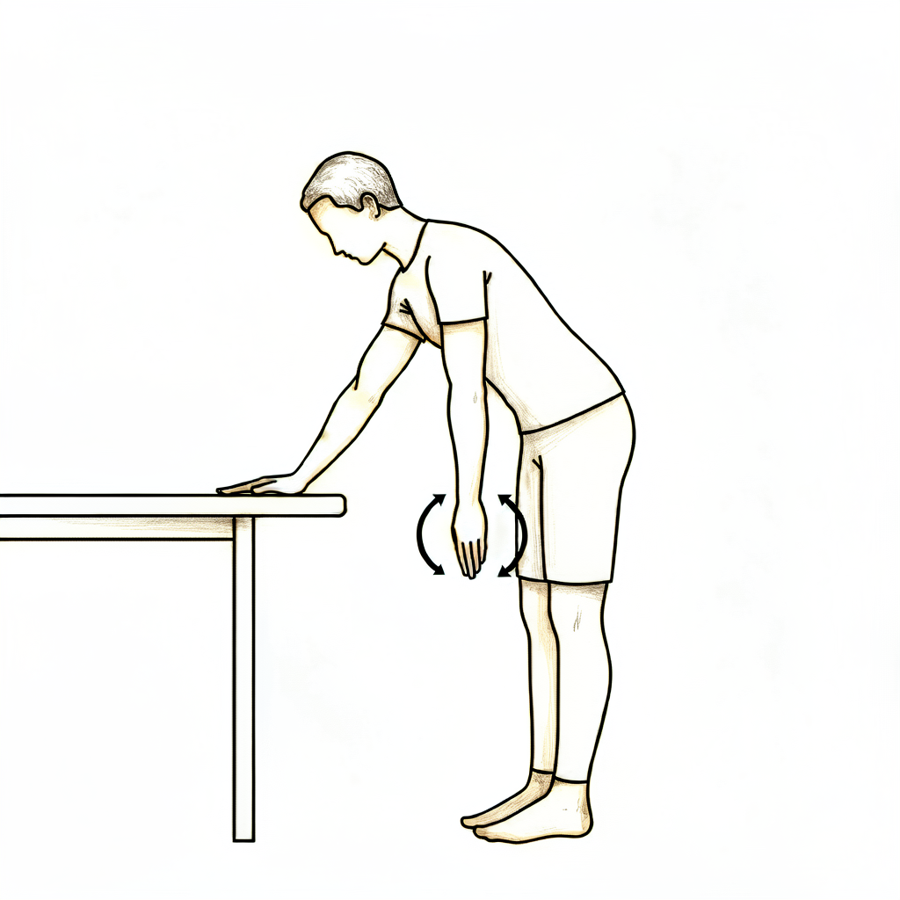
Pendulum exercises
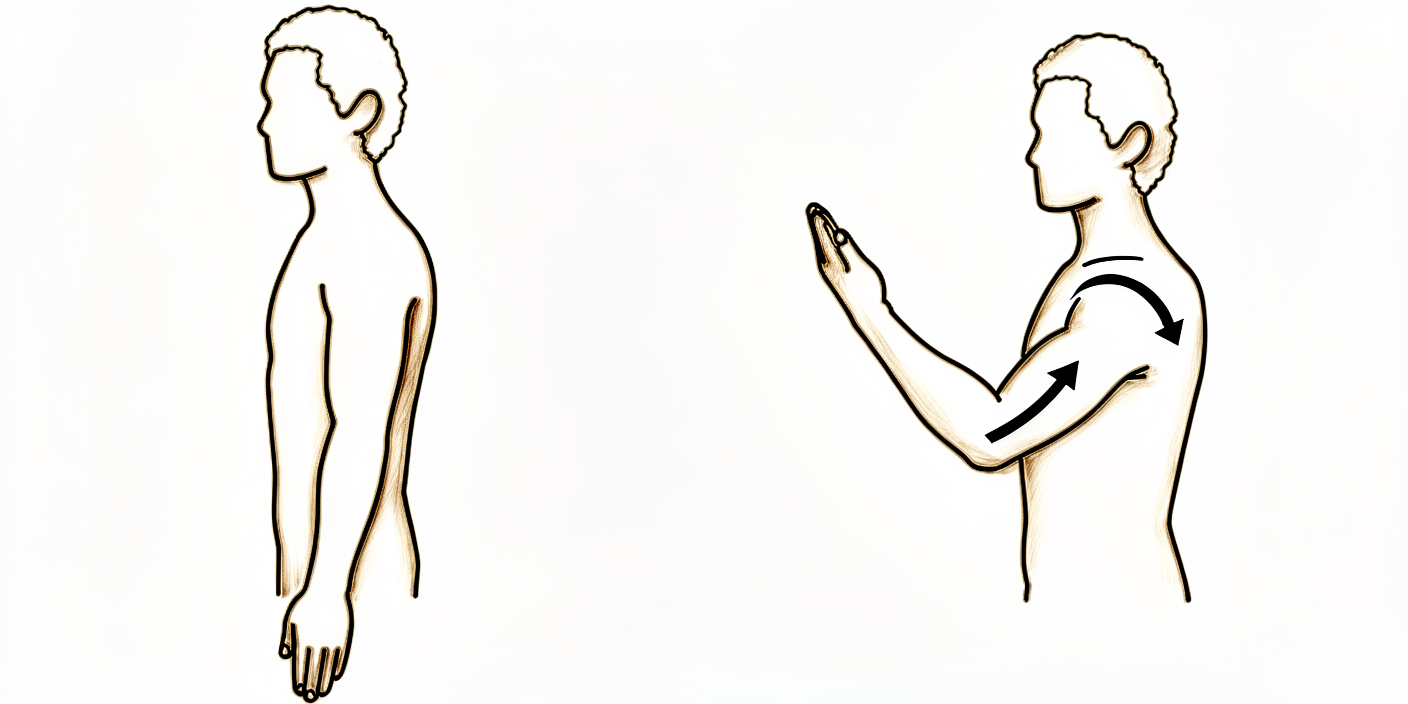
Lean forward, supporting yourself on a table with your other hand, and let the operated arm hang relaxed. Make small circles — clockwise, then anticlockwise — by gently rocking your body. The arm stays relaxed throughout; the movement comes from your body, not the shoulder.
As guided by your physiotherapist
Kieran Hirpara 4.0
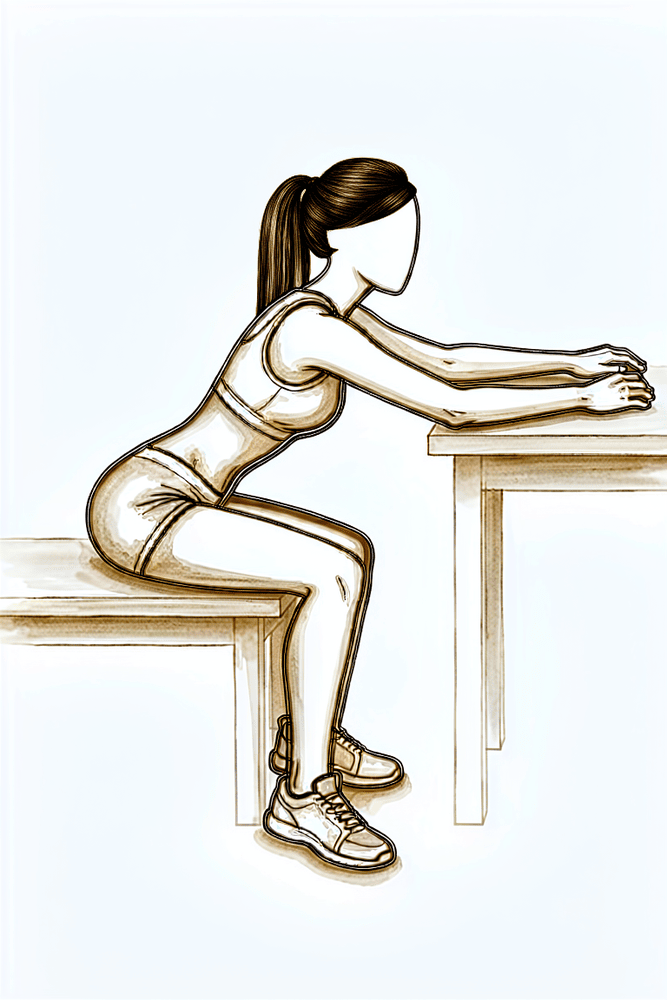
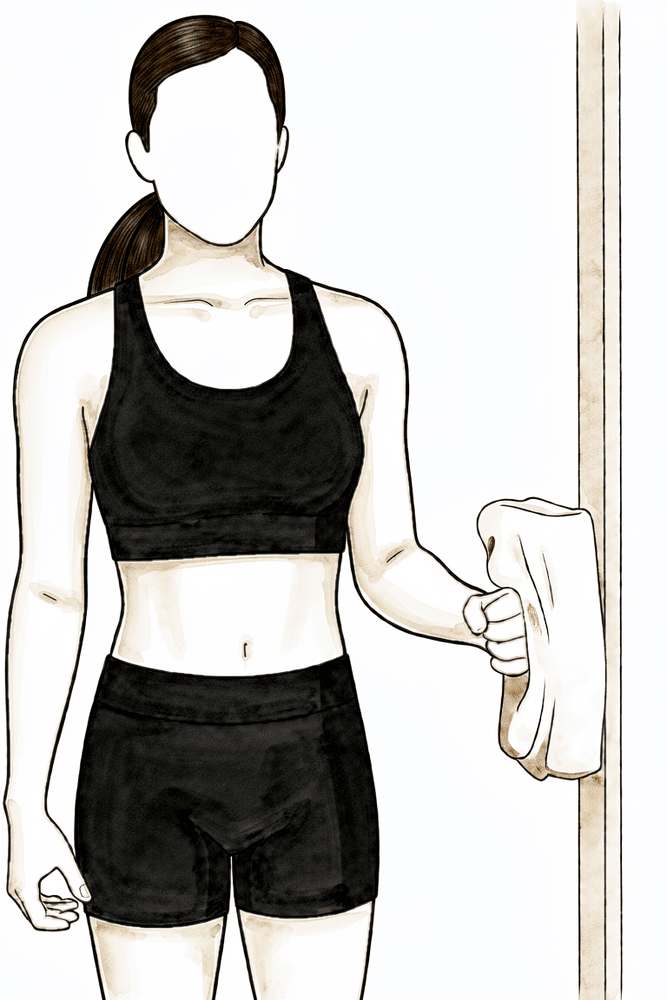
Table slides
Sit at a table with your forearm resting on it. Lean gently forward so your hand slides along the table, letting the table take the weight of the arm, then sit back up. Stay within comfort and keep the arm below shoulder height.
As guided by your physiotherapist
Kieran Hirpara 4.0
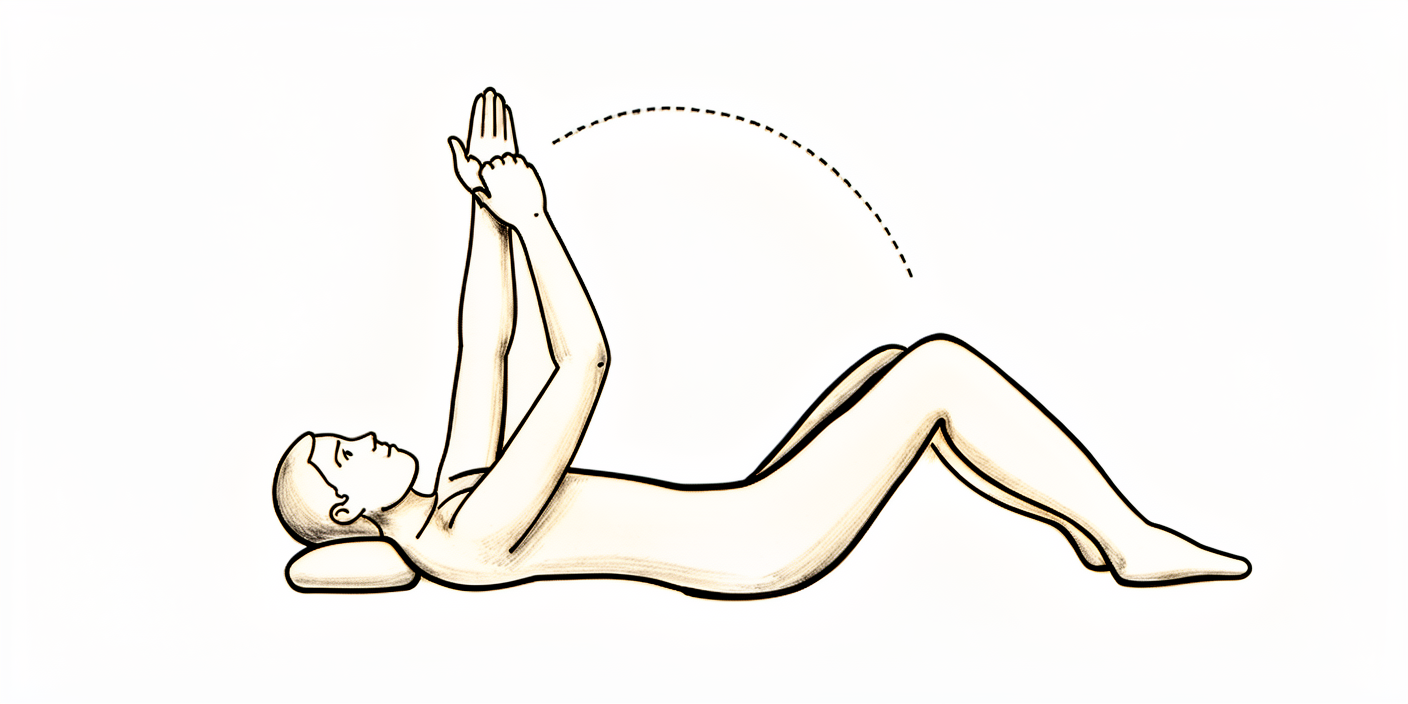
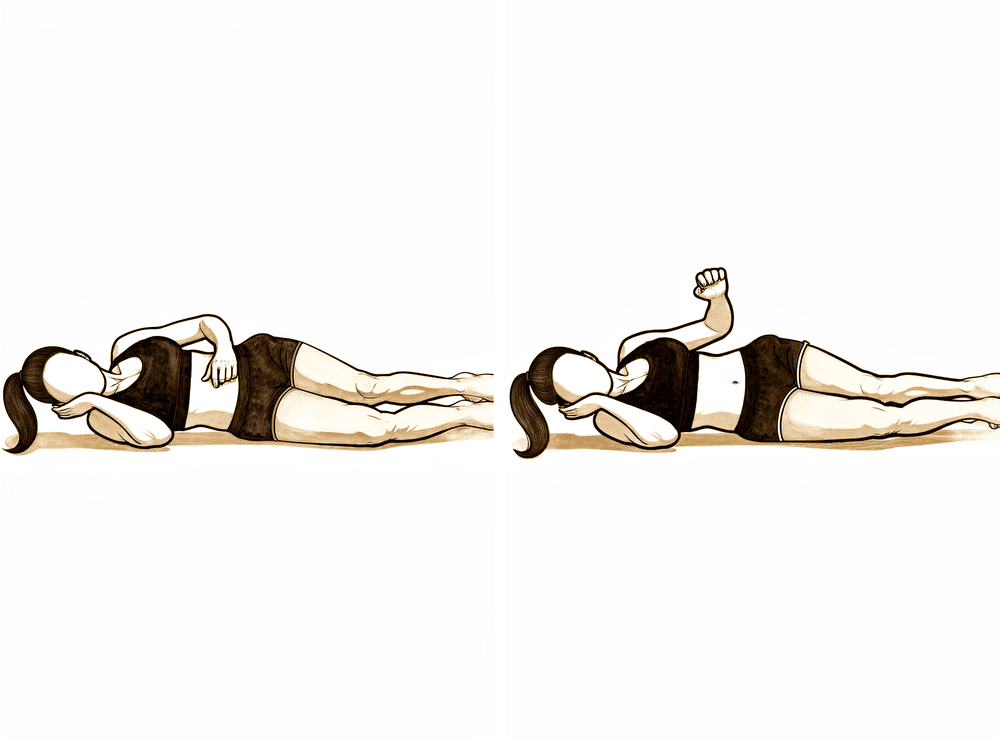
Assisted shoulder flexion (lying)
Lie on your back. With your other hand supporting the operated arm at the wrist, gently lift it forwards to a maximum of 90 degrees — pointing at the ceiling, no higher — then lower it. The operated arm stays relaxed; your other arm does the work. Do not go beyond 90 degrees until cleared at your six-week review.
As guided by your physiotherapist
Kieran Hirpara 4.0
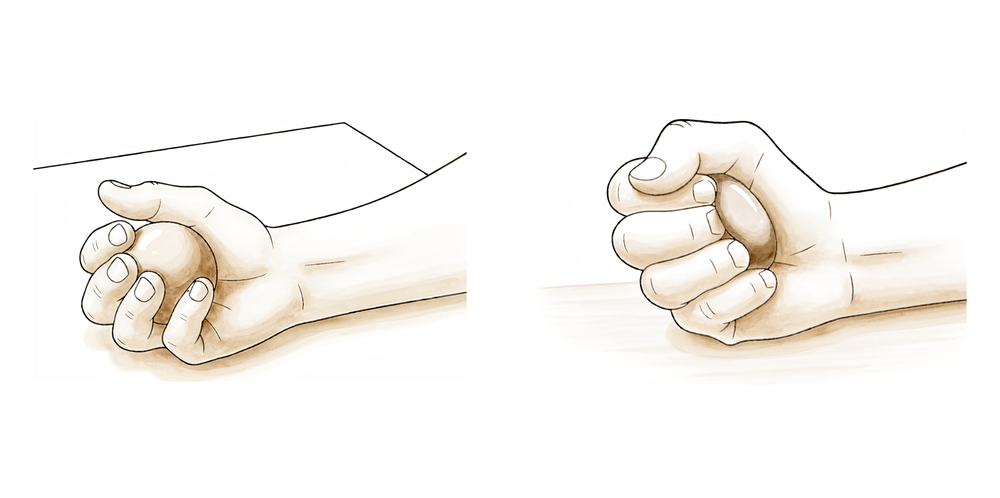
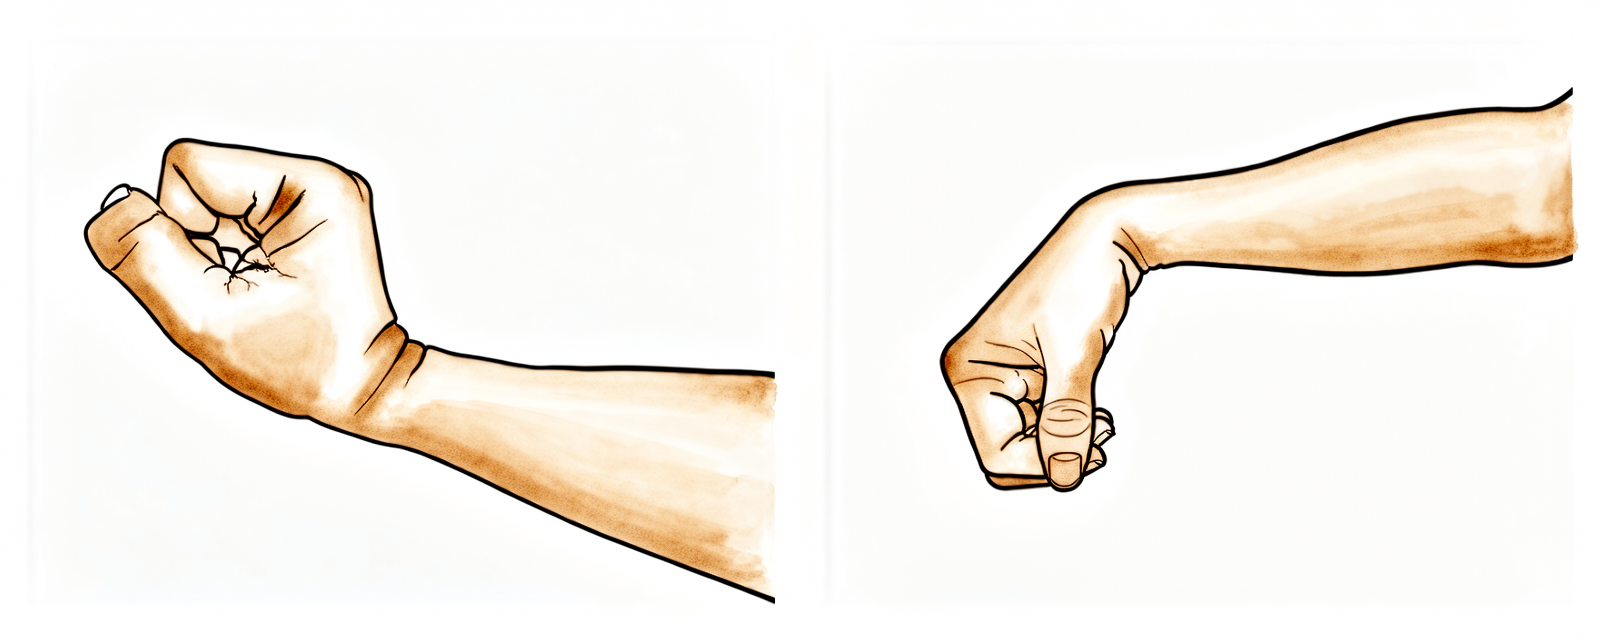
Ball squeezes
With the arm supported, squeeze a soft ball or make a tight fist, then open the hand fully. Keep your fingers, wrist and hand moving from the start.
As guided by your physiotherapist
Kieran Hirpara 4.0
Wrist movement
With the arm out of the sling and supported, keep your wrist moving by bending it forwards, backwards and side to side. Keeping the wrist working from the start prevents stiffness while the shoulder is protected.
As guided by your physiotherapist
Kieran Hirpara 4.0
Elbow bends
With the upper arm resting by your side and supported, bend the elbow as far as it comfortably goes, then straighten it fully. Only the elbow moves — keep the shoulder relaxed. This keeps the elbow free while the collarbone is protected.
As guided by your physiotherapist
Kieran Hirpara 4.0
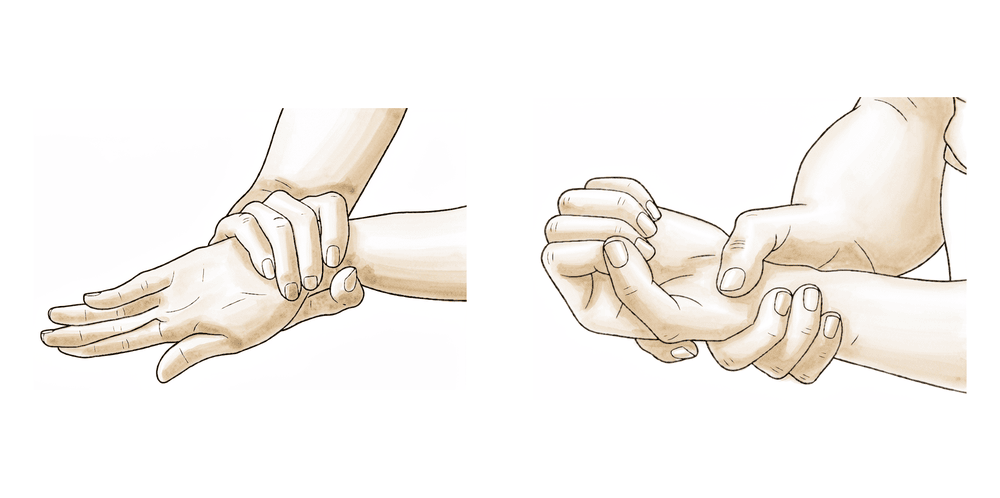
Forearm rotation
With the elbow tucked at your side and bent to a right angle, turn the palm up, then turn it down. Keep the upper arm still so only the forearm rotates. From the second week your physiotherapist may add gentle resistance to this.
As guided by your physiotherapist
Kieran Hirpara 4.0
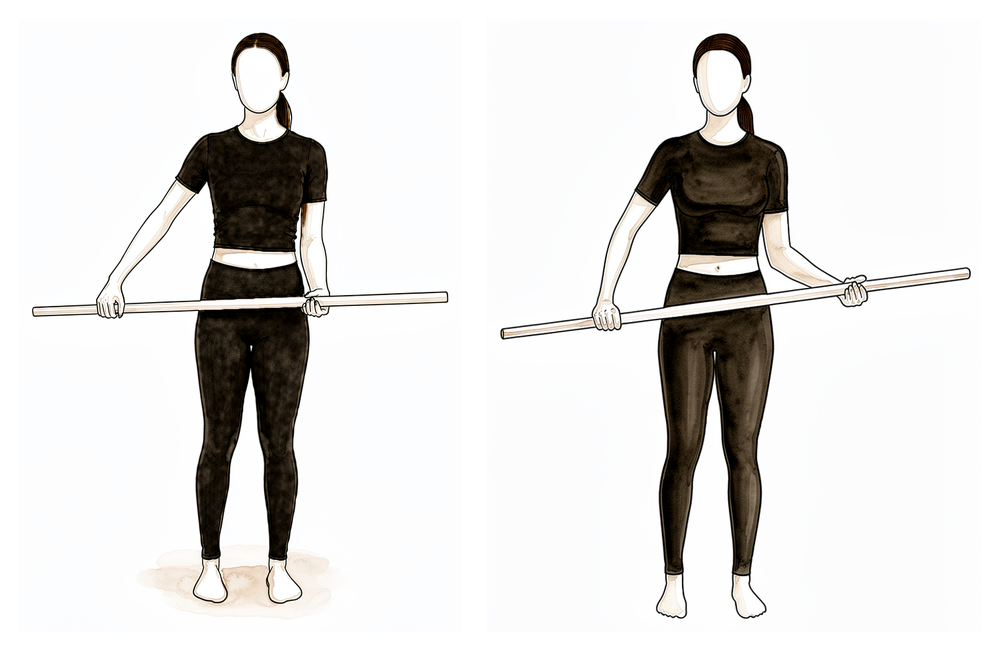
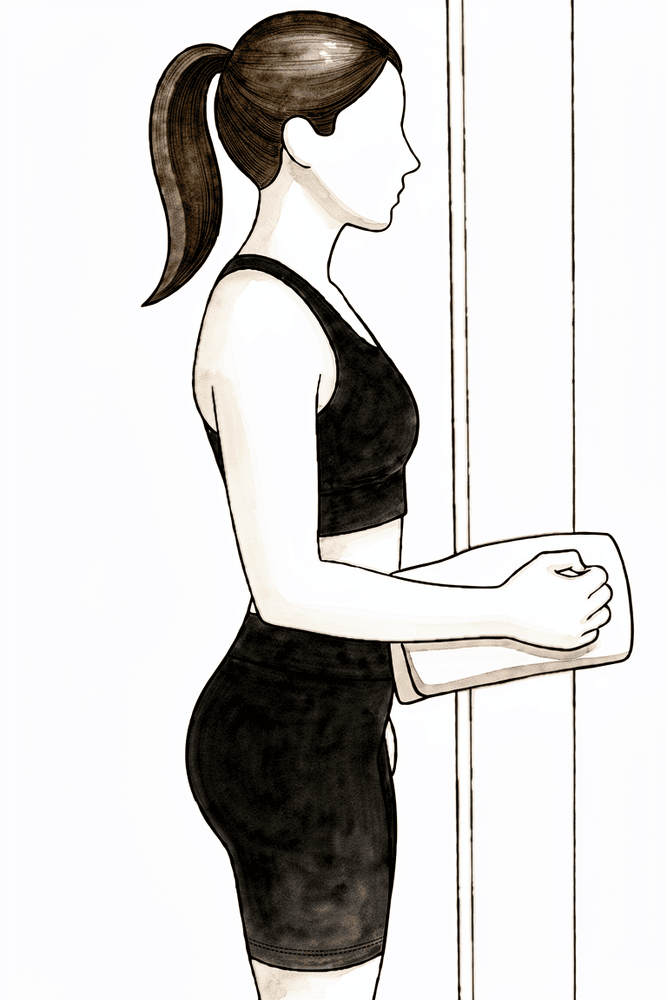
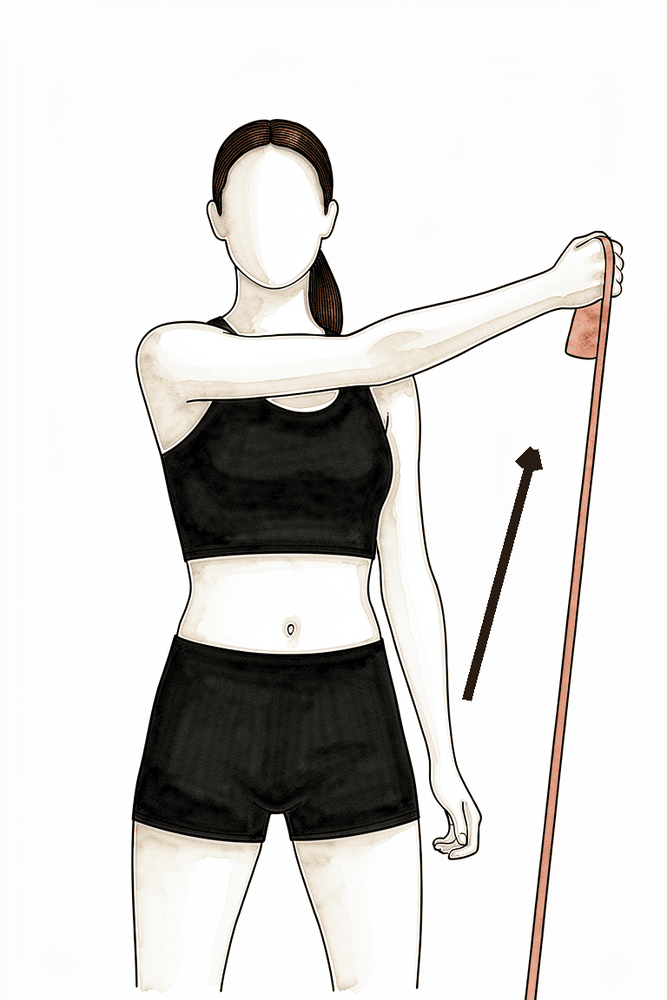
Assisted external rotation with a stick
Lie on your back with the operated elbow tucked by your side and bent to a right angle. Hold a stick in both hands and use your good arm to gently turn the operated hand outwards, rotating the shoulder, then return. Keep the elbow in at your side — this is an assisted movement, not a forced one.
As guided by your physiotherapist
Kieran Hirpara 4.0
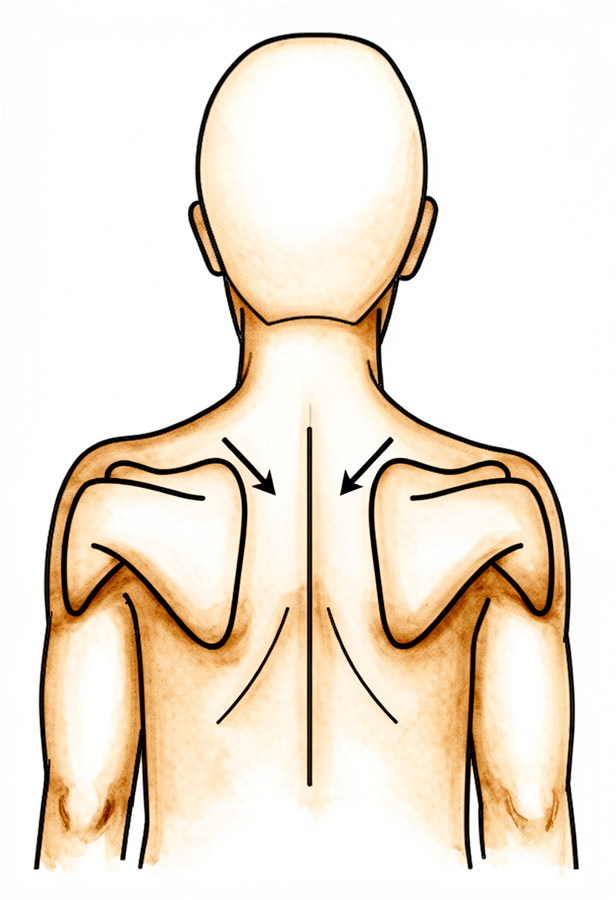
Scapular setting
Sitting or standing tall, gently draw your shoulder blades back together and down, away from your ears. Hold for a few seconds, then relax. This keeps the shoulder-blade muscles active without moving the healing collarbone.
As guided by your physiotherapist
Kieran Hirpara 4.0
Walking with the arm in the sling
Keep up gentle cardiovascular activity by walking, with the operated arm resting in the sling. This maintains your general fitness while the fracture is protected.
As guided by your physiotherapist
The first weeks are about protecting the fixation while the fracture starts to knit. You will be in the sling, managing swelling with ice, and doing gentle exercises that keep the rest of the arm moving: the hand, wrist, elbow and neck, along with pendulums and gentle assisted shoulder movement below shoulder height. The rules that matter most: do not lift the elbow above shoulder height, no lifting or carrying with the operated arm, no pushing up through the arm, and no driving while you are wearing the sling.
For your physiotherapist:
Goals
- Protect the fixation and healing bone and soft tissue
- Settle pain and swelling
- Restore passive shoulder range below 90° of elevation
- Maintain full elbow, wrist, hand and cervical range of motion
Management
- Cryotherapy and modalities as needed; analgesia before exercises and sessions
- Check sling fit; educate on sling use (protective wear, especially out of the house; not required overnight per practice convention) and posture
- Pendulums and table slides
- PROM: external and internal rotation in the plane of the scapula to comfort; flexion / scaption / abduction to a maximum of 90°
- AAROM: external rotation with a stick in neutral; supine assisted flexion to 90°
- AROM: elbow, wrist, hand and cervical spine; grip work (ball squeezes)
- From week 2: resisted wrist flexion/extension and forearm rotation; gentle scapular setting and retraction
- Cardio: walking with the arm in the sling; stationary or recumbent bike with the arm in the sling
Precautions
- No active shoulder elevation
- No shoulder flexion or abduction beyond 90°, including passively
- No lifting or carrying with the operated arm; no weight-bearing through the arm
- No driving while wearing the sling
Criteria to progress
- Comfortable passive flexion/scaption to 90° and external rotation to about 30°
- Pain settled below 4/10 at rest
- Full elbow, wrist and hand active range
- Wound healed, with no signs of complication
Phase II — Early motion (Week 3–6)
Kieran Hirpara 4.0
Side-lying external rotation
Lie on your non-operated side with the operated arm on top, elbow bent to 90 degrees and tucked against your body. Keeping the elbow in, rotate the forearm up away from your tummy as far as is comfortable, then lower with control. No weights in this phase — the arm moves under its own power.
As guided by your physiotherapist
Kieran Hirpara 4.0
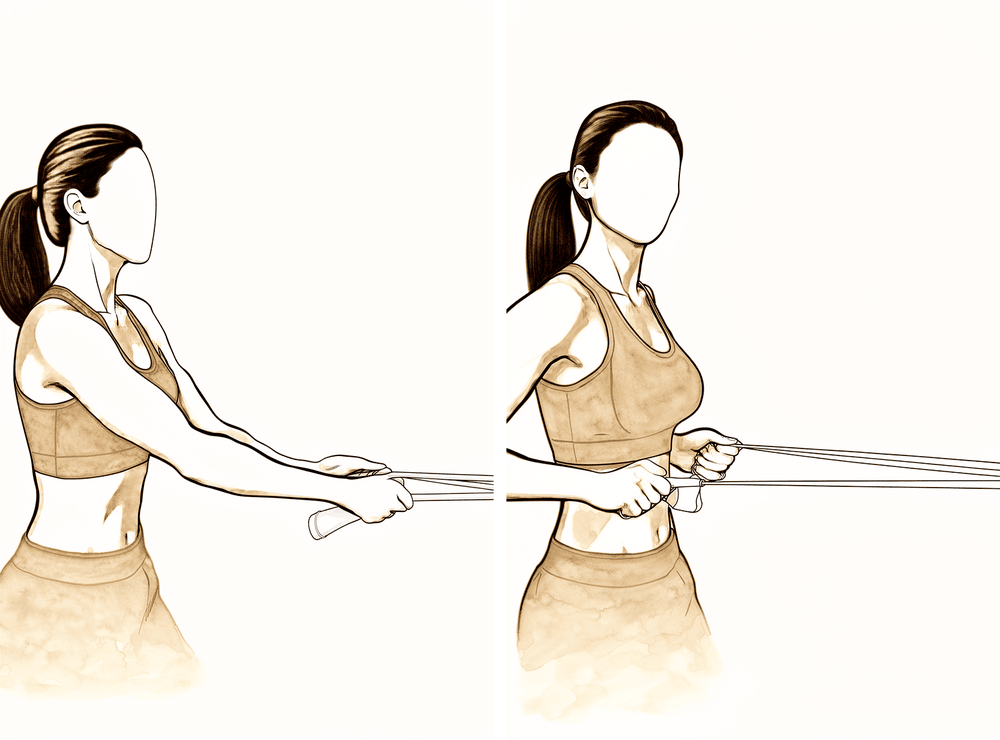
Low row with elastic band
Anchor an elastic band in front of you at waist height. Standing tall, pull the band towards you, drawing the shoulder blade gently down and back, then release with control. Keep the resistance light.
As guided by your physiotherapist
Kieran Hirpara 4.0
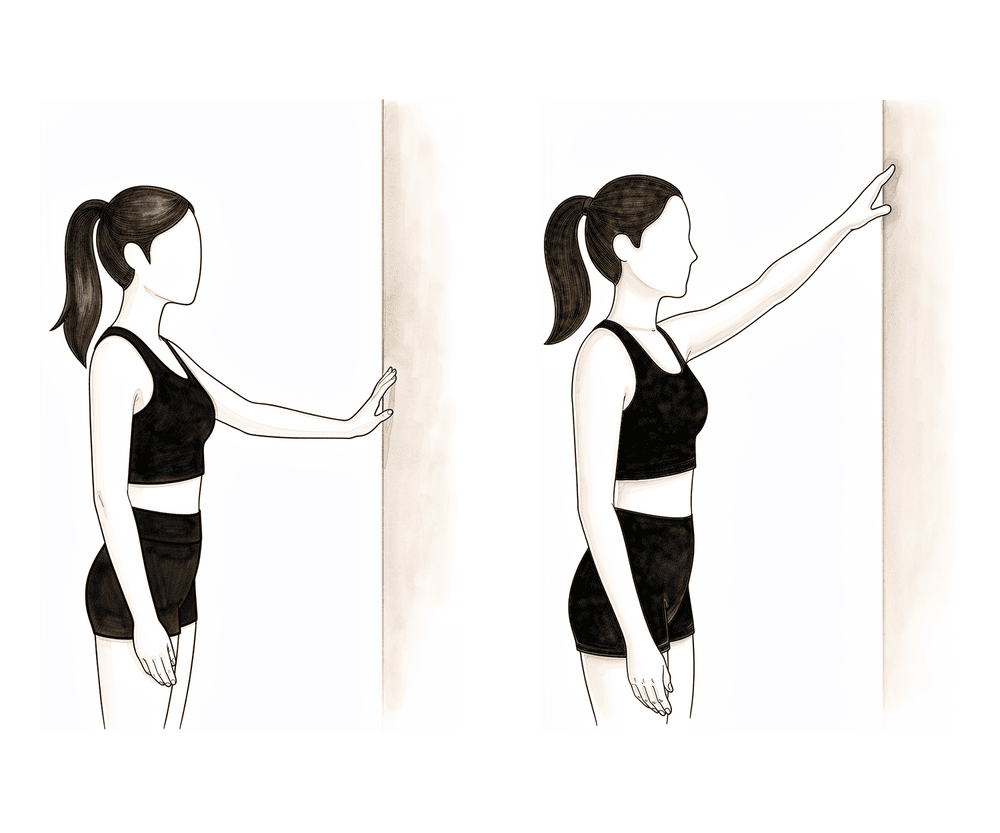
Wall slides (finger walk)
Stand facing a wall and rest your fingers on it. Walk your fingers up the wall to raise the arm, letting the wall take some of the weight, then walk back down. Keep the arm below shoulder height in this phase — the wall does the assisting, so it stays gentle.
As guided by your physiotherapist
Kieran Hirpara 4.0
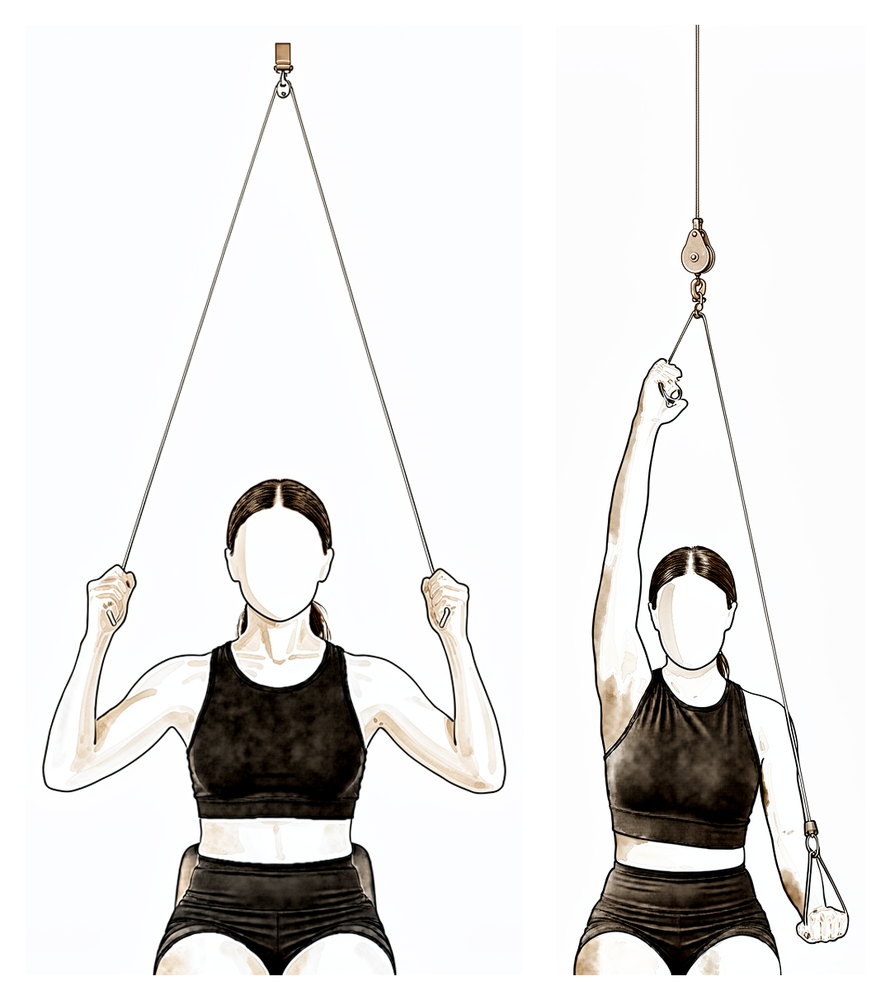
Over-door pulley
Sit under an over-door pulley with a handle in each hand. Pull down with your good arm to raise the operated arm as far as is comfortable, then lower slowly. Keep within a gentle range and below shoulder height for now — the good arm does the work.
As guided by your physiotherapist
Kieran Hirpara 4.0
Isometric external rotation
Stand with your elbow tucked at your side and bent to a right angle, the back of your hand against a wall or doorframe. Gently press outwards into it without letting the arm move, hold a few seconds, then relax. This wakes up the rotator cuff with no movement of the shoulder.
As guided by your physiotherapist
Kieran Hirpara 4.0
Isometric internal rotation
Stand with your elbow tucked at your side and bent to a right angle, the palm of your hand against a wall or doorframe. Gently press inwards into it without letting the arm move, hold a few seconds, then relax. A gentle way to begin activating the cuff.
As guided by your physiotherapist
Kieran Hirpara 4.0
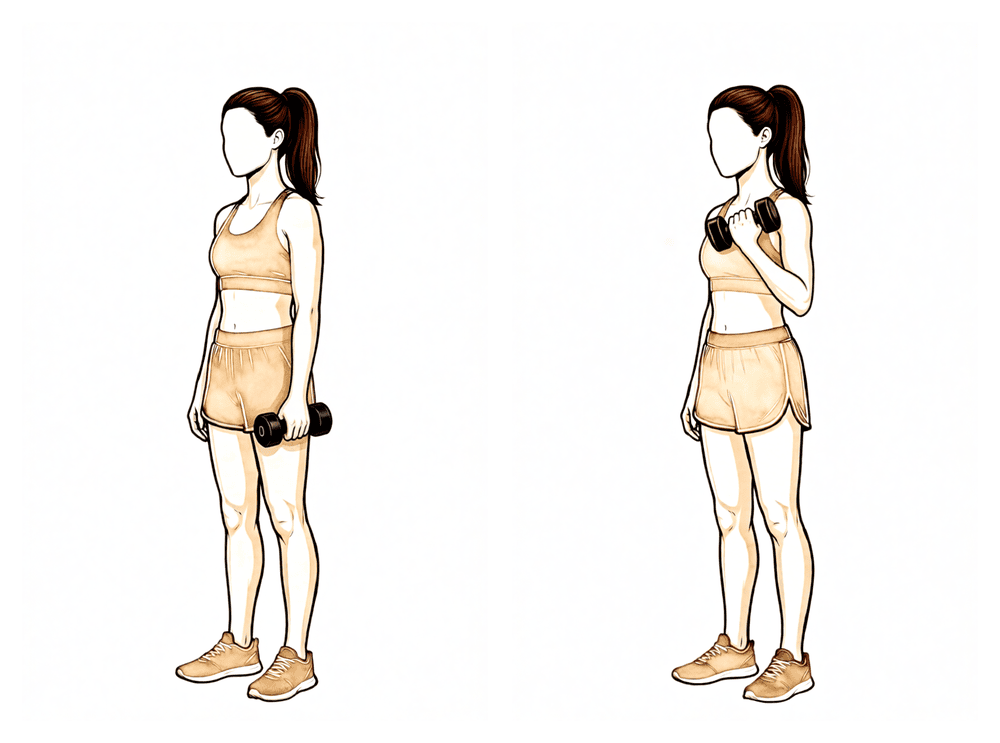
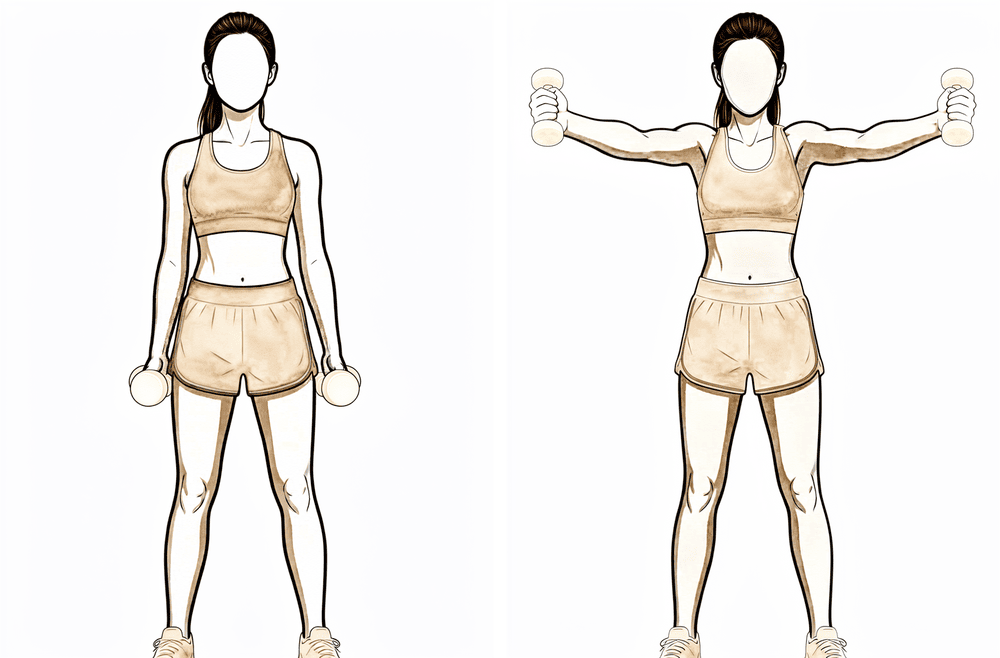
Biceps curl
With the upper arm by your side, bend the elbow to raise a light weight towards your shoulder, then lower it with control. Keep the load light — this is gentle arm conditioning, not heavy lifting.
As guided by your physiotherapist
The fracture is starting to knit, but it is not yet healed: this phase recovers movement, not strength. The sling is weaned as comfort allows, passive and assisted range progresses towards full, and you begin moving the arm under its own power below shoulder height, along with gentle muscle-activation (isometric) exercises. Keep anything you lift or carry to no more than the weight of a cup of coffee, and avoid any forceful stretching. This phase ends with an x-ray and review with Dr Hirpara at around six weeks; that review, not the calendar alone, opens the gate to strengthening and to movement above shoulder height.
For your physiotherapist:
Goals
- Wean from the sling (discarded by about week 6)
- Progress passive range towards full in all planes
- Establish active range below 90° with good mechanics
- Begin gentle isometric and periscapular work
Management
- PROM: progress towards full range in all planes, to tolerance; no forceful stretching
- AAROM: supine flexion with a dowel progressing towards upright (lawn-chair progression), wall and rail slides, pulleys
- AROM: below 90° elevation, pain-free; supine flexion progressing to standing; seated and side-lying external rotation
- Isometric rotator cuff work in neutral; light periscapular strengthening (scapular retraction, low row, mid row); light biceps and triceps work
- Monitor for compensation patterns (shoulder hitching, scapular substitution)
- Cardio: walking; stationary bike
Precautions
- No lifting or carrying heavier than about a cup of coffee
- No active elevation beyond 90° until fracture healing is confirmed at the six-week review
- No forceful stretching of the shoulder or positions that provoke pain
- No weight-bearing through the arm
- No driving while wearing the sling
Criteria to progress
- Full, or near-full, passive range of motion
- Active elevation to 90° with minimal compensation and pain below 4/10
- Satisfactory fracture healing on x-ray, as confirmed at the review with Dr Hirpara
Phase III — Strengthening (Week 6–12)
Kieran Hirpara 4.0
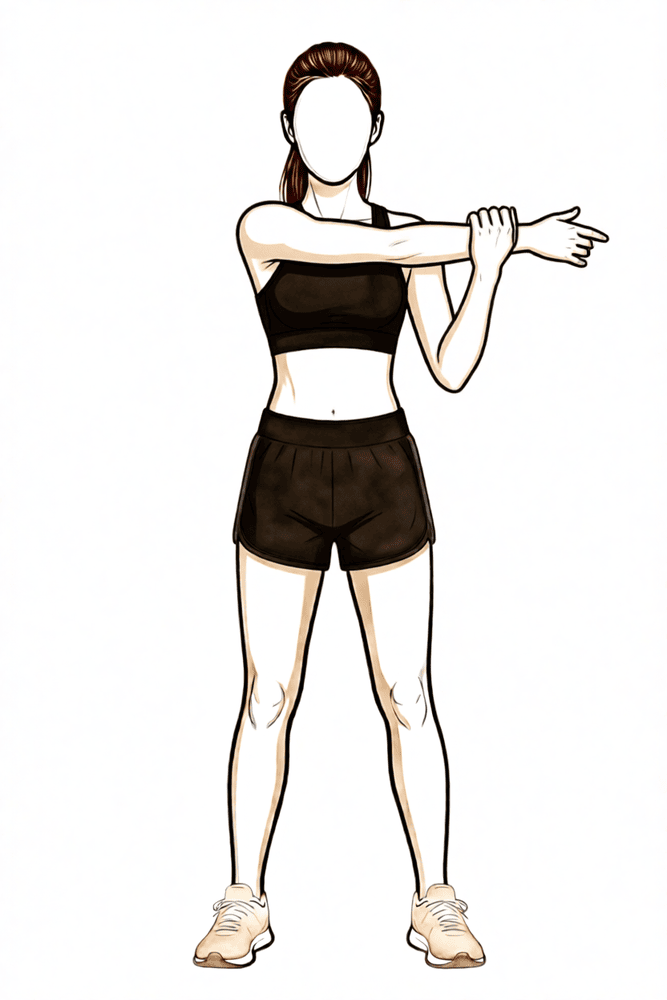
Cross-body stretch
Use your other hand to draw the operated arm across your chest until you feel a stretch at the back of the shoulder. Hold briefly, then release. Stretch to firm discomfort only — never into sharp pain.
As guided by your physiotherapist

Kieran Hirpara 4.0
Sleeper stretch
Lie on your operated side with the shoulder and elbow both bent to 90 degrees. With your other hand, gently press the forearm down towards the bed until you feel a stretch at the back of the shoulder, then release. Keep it gentle — no sharp pain.
As guided by your physiotherapist
Kieran Hirpara 4.0
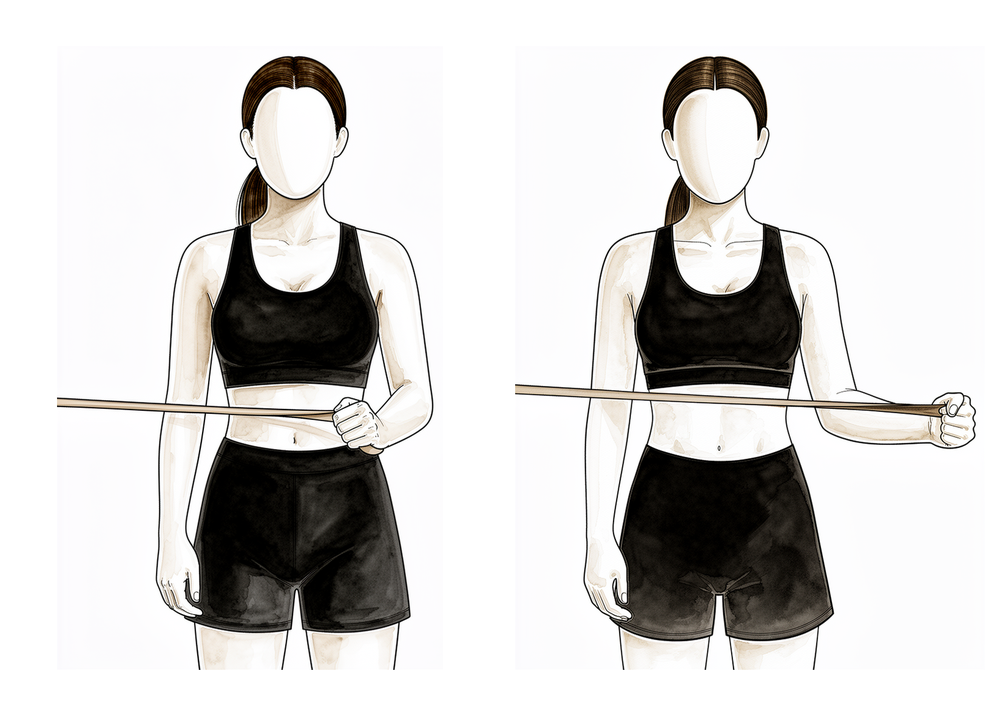
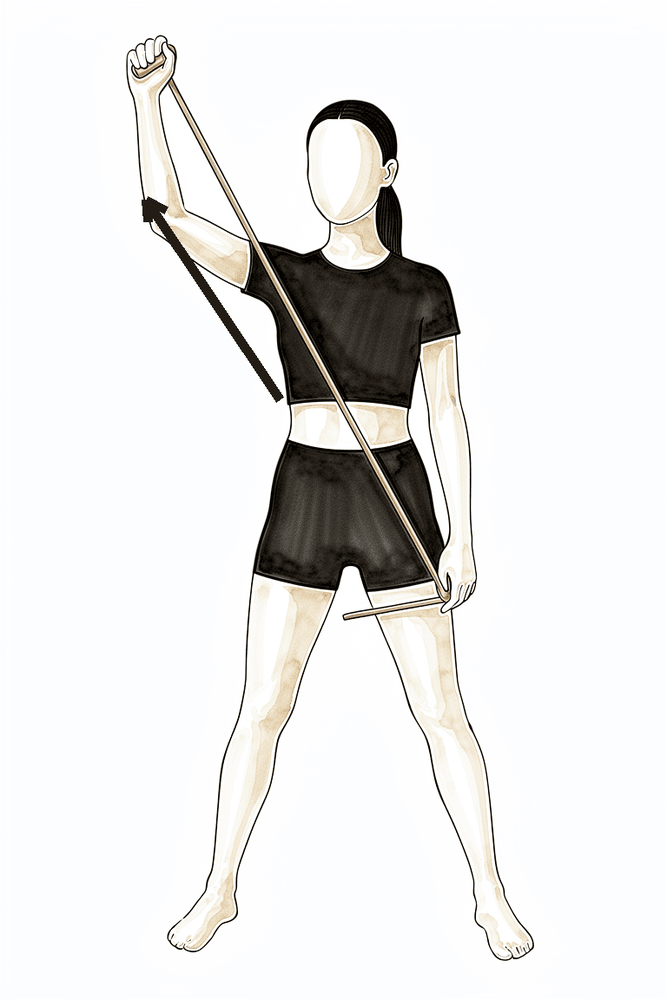
Band external rotation
Stand with your elbow tucked into your side and bent to a right angle, holding an elastic band anchored at waist height. Keeping the elbow at your side, rotate the forearm outwards against the band, then return slowly. This progresses the rotator cuff on from the earlier isometric work.
As guided by your physiotherapist

Kieran Hirpara 4.0
Low row
Hold a band anchored in front of you at waist height. Keeping the arm fairly straight, pull it back and down towards your hip, squeezing the shoulder blade down and back, then return slowly. This builds the shoulder-blade muscles that support the cuff.
As guided by your physiotherapist
Kieran Hirpara 4.0
Scaption raises (full can)
With thumbs pointing up, raise the arm out to about 45 degrees in front of you — between straight ahead and straight out to the side — then lower with control. Once your range above shoulder height is cleared, raise into a comfortable overhead range. Keep the load light.
As guided by your physiotherapist
Kieran Hirpara 4.0
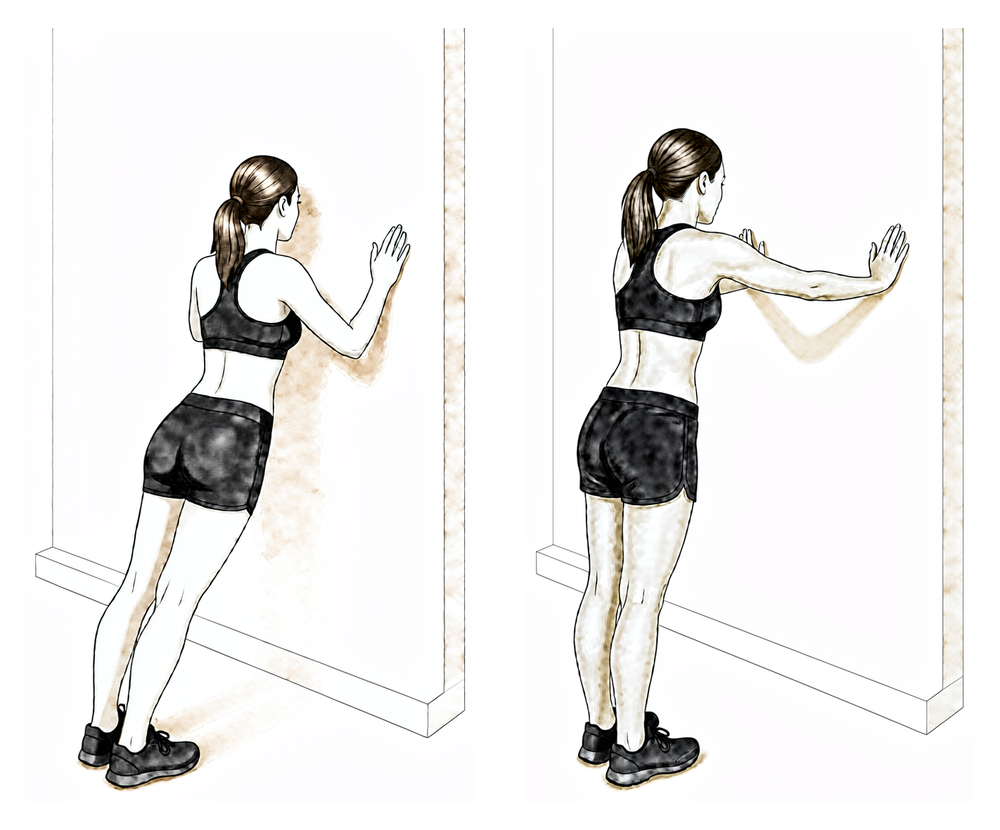
Wall push-ups
Stand facing a wall with your hands flat on it at shoulder height. Bend the elbows to lean towards the wall, then push back, adding a gentle push through the hands at the end to spread the shoulder blades. Introduce this only late in this phase, as guided by your physiotherapist.
As guided by your physiotherapist
Kieran Hirpara 4.0
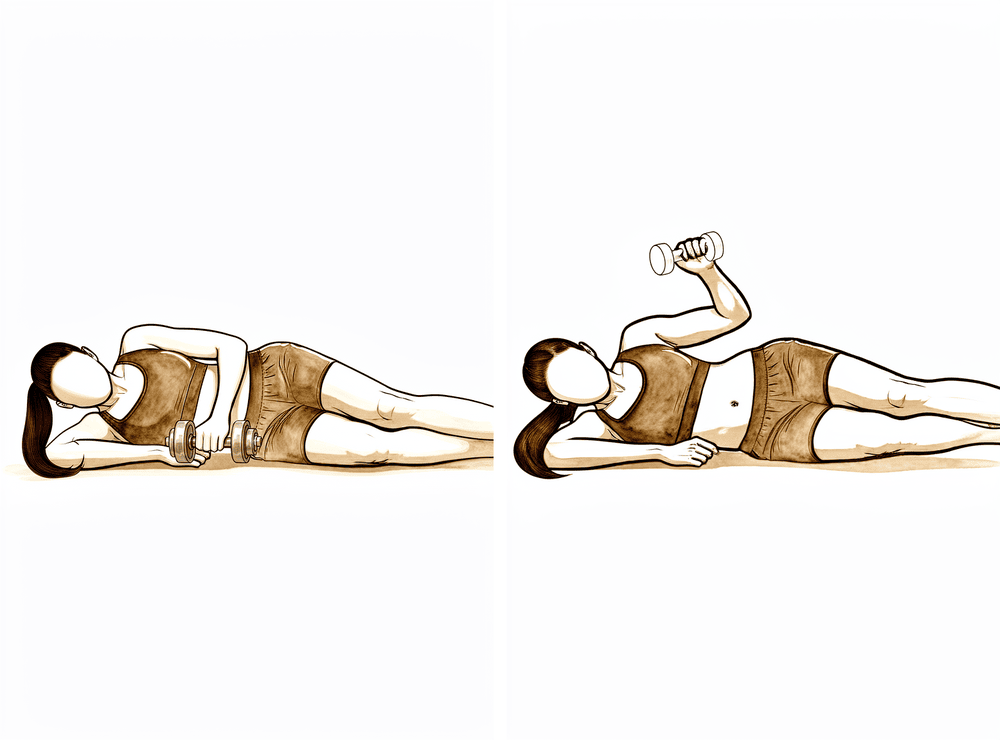
Side-lying external rotation with weight
Lie on your non-operated side with the top elbow bent to a right angle and tucked against your body. Holding a light weight, rotate the forearm up towards the ceiling, then lower slowly. Keep the load light and the repetitions higher.
As guided by your physiotherapist
Kieran Hirpara 4.0
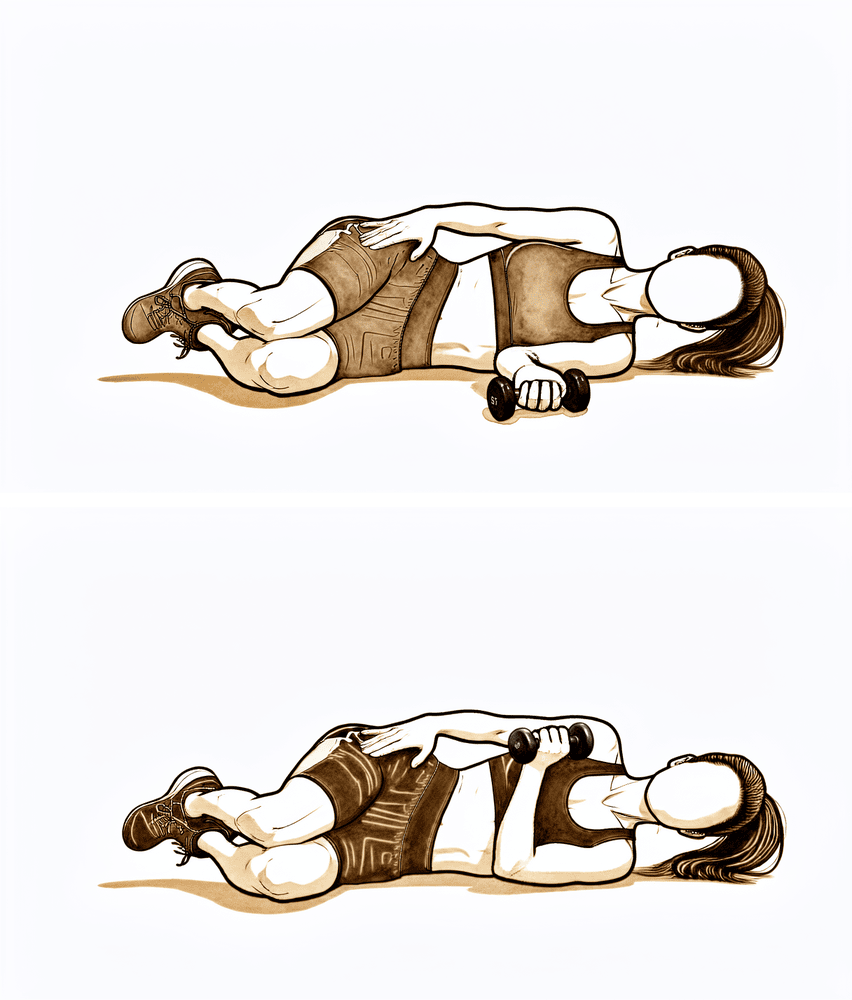
Side-lying internal rotation with weight
Lie on your operated side with the elbow bent to a right angle and tucked in. Holding a light weight, raise it up towards your tummy by rotating the shoulder inwards, then lower slowly. Keep the load light and the repetitions higher.
As guided by your physiotherapist
Once your review confirms the fracture is healing well, movement above shoulder height begins and full active range is built up over the following weeks. Strengthening starts gently: muscle-activation work first, then elastic bands, then light weights for the rotator cuff and shoulder blade muscles. Lifting stays light (no more than about 2 kg) until twelve weeks, heavy or overhead lifting waits, and there is no contact sport in this phase. Swimming and cycling typically return during this phase, as guided by your physiotherapist.
For your physiotherapist:
Goals
- Full active range of motion in all planes, with normal mechanics
- Initiate and progress rotator cuff and periscapular strengthening
- Return to normal daily activities
Management
- Progress AROM above 90° in all planes, minimising compensatory patterns
- Stretching as needed: latissimus, pectoral, posterior capsule and sleeper stretches
- Strengthening: isometric cuff work progressing to resisted external/internal rotation with bands, initially below shoulder height; scapular retraction and rows; scaption raises, serratus work and wall push-ups late in the phase
- Light free weights progressing as tolerated: low load, higher repetitions
- Cardio: stationary bike and walking; swimming and running from around 8–10 weeks if cleared at review
Precautions
- No lifting heavier than about 2 kg until 12 weeks
- Avoid heavy lifting overhead or away from the body until 12 weeks
- No contact sport; no plyometric or impact loading until late in the phase (around 10–12 weeks)
- Strengthening stays within the comfortable range and should not provoke pain that lingers
Criteria to progress
- Active range of motion at least 90% of the other side
- Good rotator cuff and periscapular activation, with pain no more than 3/10 on resisted work
- Fracture union progressing on x-ray, as confirmed at review with Dr Hirpara
Phase IV — Return to full activity and sport (Week 12 onwards)
Kieran Hirpara 4.0
Diagonal pattern with a band (D1)
Hold an elastic band and draw it diagonally across your body — from down and across at one hip up and out to the opposite side, then reverse with control. These functional diagonal patterns rebuild the coordinated, whole-arm movement used in work and sport. Add only once the fracture has united.
As guided by your physiotherapist
Kieran Hirpara 4.0
Diagonal pattern with a band (D2)
Hold an elastic band and draw it on a diagonal from across the body down low up to overhead and out, then reverse with control. This builds the overhead, sport-specific patterns of the shoulder. Add only once the fracture has united and overhead work is cleared.
As guided by your physiotherapist
The final phase is a graduated return to heavier lifting, manual work and sport. Strength work progresses through heavier resistance, overhead positions and (for athletes) plyometric, throwing and sport-specific drills. Contact and collision sport (football, rugby, horse riding) needs a united fracture on x-ray, as confirmed at your review with Dr Hirpara, typically from around three to four months at the earliest, and some protocols stage collision sport as late as six months. Returning before the bone has united risks re-fracture, so this is one gate worth respecting.
For your physiotherapist:
Goals
- Full, pain-free range of motion maintained
- Strength at least 90% of the uninvolved side
- Graduated return to manual work, recreation and sport
Management
- Progressive resistance training, including eccentric loading, overhead positions and functional patterns as tolerated
- Rhythmic stabilisation and proprioceptive work; plyometric and interval throwing or racquet programs for overhead athletes
- Work-specific conditioning for manual workers; sport-specific drills before unrestricted play
- Return-to-sport decision-making individualised (contact versus non-contact, upper-limb demand) and coordinated with the surgeon
Criteria to progress
- Full, pain-free active range of motion
- Strength at least 90% of the uninvolved side on dynamometry, with no pain on strength testing
- Completion of a graded return-to-sport program without pain or apprehension
- Radiographic union confirmed at review with Dr Hirpara before contact or collision sport
After your protocol
The phases above are adapted from published rehabilitation protocols for clavicle fracture fixation: Massachusetts General Brigham Sports Medicine, Mammoth Orthopedic Institute, the University of Colorado (Dr Jonathan Bravman) and Midwest Orthopaedics at Rush (Dr Brian Cole), together with NHS physiotherapy guidance from West Suffolk and United Lincolnshire, and return-to-sport evidence from a systematic review of clavicle fractures in athletes. The week ranges are typical rather than fixed, and your progression is guided by your physiotherapist and gated on fracture healing at your reviews with Dr Hirpara. This page works alongside the practice's general recovery advice; see managing post-operative pain and wound care. For the operation itself, see clavicle fixation. The evidence behind this protocol (the operative-versus-non-operative trial data, union and return-to-sport rates, and the published surgeon protocols) is summarised in the evidence section, available as a PDF from the top of this page.
Evidence & references
Midshaft Clavicle Fracture — Operative vs Non-operative Management & Post-operative Rehabilitation (Plate ORIF)
Topic scope: (A) the decision between non-operative management and plate fixation for displaced midshaft clavicle fractures (the randomised-trial evidence on union, function and return to sport), and (B) post-operative rehabilitation after open reduction and internal fixation (ORIF) of the clavicle with a plate and screws. Distal-third and proximal-third fractures, which involve different fixation constructs, are noted only where they bear on the rehab principles.
Defining principle of the surgical rehab here: clavicle ORIF is a protect-the-fixation / protect-the-healing-fracture pathway, NOT an early-aggressive-motion pathway. The plate is a splint, not a substitute for healed bone — it neutralises load while the fracture itself unites over roughly 6–12 weeks and remodels for months afterwards. So the rehab is staged around fracture biology: a sling and below-shoulder-height-only motion early to protect the construct, range of motion progressed as the fracture knits (overhead motion deferred until the ~6-week x-ray), and strengthening / loading / collision sport withheld until radiographic union is confirmed. This is the opposite of a debridement or capsular-release pathway, where motion is the goal from day one and there is no fracture to protect. The single most important gate throughout is the x-ray, not the calendar — every major step up depends on how the fracture is healing.
A. THE OPERATIVE-vs-NON-OPERATIVE DECISION
Most clavicle fractures heal without surgery. The debate concerns completely displaced midshaft fractures (typically ≥100% displacement or ≥~2 cm shortening), where historic "all clavicles heal" teaching was overturned by randomised data.
The landmark trial — Canadian Orthopaedic Trauma Society (COTS) 2007
The COTS multicentre RCT randomised 132 patients with displaced midshaft clavicle fractures to plate ORIF vs non-operative sling treatment. Plate fixation produced a markedly lower nonunion rate (~2% vs ~23–24% non-operative), fewer symptomatic malunions, faster time to union, and better Constant and DASH scores at one year. This trial is the basis for offering surgery to active patients with completely displaced fractures — it did not establish that all such fractures require surgery. STRONG (RCT). [COTS 2007]
What later evidence tempered
- Meta-analyses of RCTs confirm operative fixation reduces nonunion and symptomatic malunion but show that much of the early functional advantage converges by 1 year, and comes at the cost of hardware-related reoperation. The decision is therefore shared and patient-specific (activity demands, displacement, comminution, smoking, occupation) rather than automatic. STRONG (SR/MA of RCTs). [Woltz-type meta-analysis; meta-regression, JSES 2020 — DOI 10.1016/j.jse.2020.02.011]
- A modern cohort comparison of dual mini-fragment plating vs non-operative care (mean 3.4-yr follow-up) found fewer union complications with fixation but similar patient-reported outcomes at final follow-up — echoing the "fixation buys reliable union, not necessarily a better long-term shoulder" theme. MODERATE (cohort). [DOI 10.1016/j.jse.2024.10.018]
- Heterogeneity between trials (how nonunion and displacement were defined, statistical handling of time-to-union) explains some of the apparent disagreement across studies — a caution against over-reading any single union statistic. MODERATE. [DOI 10.1016/j.jse.2012.03.015; meta-regression DOI 10.1016/j.jse.2020.02.011]
Construct choice (informs the rehab, not the patient's behaviour)
- Plate vs intramedullary fixation: an RCT comparing locked intramedullary nailing with plating found both achieve union; plates remain the workhorse for comminuted/displaced patterns. MODERATE (RCT). [DOI 10.1016/j.jse.2010.05.002]
- Plate position: superior plating is biomechanically strong but the plate lies directly under thin skin and is frequently symptomatic; anteroinferior plating lowers symptomatic hardware and removal rates. This is why patients commonly feel and see the plate, and why removal is a later, elective conversation. [Hardware-removal cohort, DOI 10.1016/j.jse.2017.03.011]
- Fixation reaches union even when delayed: immediate fixation vs delayed reconstruction of displaced midshaft fractures both restore objective strength and patient-oriented outcomes — reassuring that a fracture initially treated non-operatively can still be fixed successfully if it fails to unite. MODERATE (cohort). [DOI 10.1016/j.jse.2007.01.001]
B. POST-OPERATIVE REHABILITATION (plate ORIF)
The operation holds the fracture ends in position with a plate and screws so the bone can heal. Rehab is the same staged, fracture-protective sequence used across published surgeon and NHS protocols. Key facts that shape it:
- The plate neutralises load but the bone must unite biologically — typically 6–12 weeks to radiographic union, with remodelling for months after. Strengthening and loading that precede union risk implant loosening or re-fracture. Consensus / biomechanical.
- Bone healing is slower in smokers and in diabetics, and smoking can delay or prevent union — a modifiable risk worth addressing in the post-fracture window. Established.
- Overhead motion and strengthening are gated on the x-ray, not a fixed date — published protocols restrict elevation to ≤90° until early healing is confirmed (commonly the ~6-week review).
Consensus phased post-op timeline (plate ORIF)
| Phase | Window | Sling | ROM | Strengthening | Notes |
|---|---|---|---|---|---|
| I — Protection | Week 0–3 | Most of the time; off for showers/exercises/seated tasks; not required overnight | Passive/AAROM below 90° only — flexion/scaption/abduction capped at 90°, ER/IR in scapular plane to comfort; pendulums, table slides; full elbow/wrist/hand/cervical AROM | None at shoulder (grip + wrist only) | Protect fixation; settle pain/swelling; no driving while in sling; no lifting/carrying/weight-bearing through the arm |
| II — Early motion | Week 3–6 | Weaned as comfort allows; discarded by ~6 wk | Progress passive→full all planes (no forceful stretch); active motion below 90°; AAROM lawn-chair/pulley progression | Gentle isometrics + light periscapular work only | Recover movement, not strength. Lift ≤ a coffee cup. Phase ends with x-ray + review that gates overhead motion + strengthening |
| III — Strengthening | Week 6–12 | Off | AROM progresses above 90° once union confirmed; full active range built up | Cuff + scapular strengthening: isometric → bands → light weights; lift ≤ ~2 kg until 12 wk | Swimming/cycling typically return; no contact sport; no overhead/heavy lifting |
| IV — Return to activity & sport | Week 12 + | Off | Full, pain-free, maintained | Progressive heavy/eccentric/overhead loading; sport-specific + plyometric drills | Contact/collision sport needs radiographic union — typically ~3–4 months at the earliest, some protocols stage collision as late as 6 months |
The structure above matches the topic's patient protocol and is drawn from published surgeon ORIF protocols (Massachusetts General Brigham; Mammoth Orthopedic Institute; University of Colorado / Bravman; Midwest Orthopaedics at Rush / Cole) and NHS physiotherapy guidance (West Suffolk; United Lincolnshire). These protocols broadly agree on the sling ~3 weeks, ROM ≤90° early, overhead and strengthening after the ~6-week review, return to sport gated on union sequence; exact week boundaries vary by surgeon. WEAK / CONSENSUS — no rehab RCT defines the optimal regimen.
Return to sport — the evidence
- A systematic review of return to sport after clavicle fractures (Robertson & Wood, Br Med Bull 2016, 23 studies) found ~92% return to sport, at a mean of ~96 days (~3 months). MODERATE (SR of heterogeneous cohorts). [Robertson 2016]
- A more recent systematic review and meta-analysis reported mean return to play ~3.1 months operative vs ~3.9 months non-operative, with similar overall return rates but a higher rate of return to pre-injury level after operative treatment. MODERATE. [RTP SR-MA, JSES Rev 2024]
- In elite athletes specifically (e.g. NFL series), operative management has been used to achieve predictable, timely return — though selection bias makes these cohorts hard to generalise. WEAK (selected cohorts). [DOI 10.1177/0363546510372795]
The consistent signal: most athletes return by ~3 months, operative slightly faster and more reliably to pre-injury level — but union on x-ray, not the average timeline, governs clearance for collision sport.
C. KEY CONTROVERSIES / EVIDENCE QUALITY
- Who actually needs surgery. COTS established that fixation reduces nonunion/malunion in completely displaced midshaft fractures, but the early functional gap narrows by a year and fixation adds hardware reoperations. The modern position is shared decision-making for the active, completely-displaced patient — not routine fixation of all displaced fractures. Strong evidence, nuanced application.
- How big is the nonunion benefit, really? Reported nonunion rates vary with how "nonunion" and "displacement" are defined and how time-to-union is analysed; meta-regression shows this heterogeneity drives much of the between-study disagreement. Treat single headline figures with caution. Moderate.
- Hardware prominence and removal. Because the clavicle is subcutaneous, plates are often felt and sometimes symptomatic; removal rates depend heavily on plate position (anteroinferior < superior) and design (low-profile/dual). Removal is an elective, post-union decision. Moderate (cohorts).
- The rehab protocol itself is consensus. Phase timings come from surgeon patient-guidance documents and NHS leaflets, not a rehab RCT. The ≤90°-until-6-weeks and union-gated-sport principles are widely shared; precise week boundaries are not trial-derived. Weak/consensus.
D. EVIDENCE STRENGTH FLAGS (summary)
- STRONG (RCT / SR-MA of RCTs): plate fixation reduces nonunion and symptomatic malunion in displaced midshaft fractures (COTS 2007 RCT; meta-analyses), with early functional benefit that converges by ~1 year; plate vs IM nail both achieve union (RCT).
- MODERATE (cohorts / SR of cohorts): similar long-term PROs fixation vs non-op despite fewer union complications (dual-plate cohort 2024); return to sport ~92% at ~3 months, operative slightly faster/more reliable to pre-injury level (Robertson 2016 SR; RTP SR-MA 2024); hardware removal rate and its dependence on plate position; delayed fixation still succeeds.
- WEAK / CONSENSUS: the post-operative rehabilitation protocol itself (surgeon + NHS patient-guidance documents; no defining rehab RCT); elite-athlete operative series (selection bias).
CITATIONS
RAG corpus (180,000+ Orthopaedic articles) — clavicle-specific evidence
- Canadian Orthopaedic Trauma Society. Nonoperative treatment compared with plate fixation of displaced midshaft clavicular fractures: a multicenter, randomized clinical trial. J Bone Joint Surg Am. 2007;89(1):1–10. (also corpus-adjacent reanalysis: DOI 10.1016/j.jse.2012.03.015)
- Factors explaining heterogeneity in studies comparing surgical and nonsurgical treatment of midshaft clavicle fractures: a meta-regression analysis of RCTs and high-quality observational studies. J Shoulder Elbow Surg. 2020. DOI: 10.1016/j.jse.2020.02.011
- Dual mini-fragment plate fixation of midshaft clavicle fractures demonstrates fewer union complications but similar patient-reported outcomes compared to nonoperative management: a cohort study (mean 3.4-yr follow-up). J Shoulder Elbow Surg. 2024. DOI: 10.1016/j.jse.2024.10.018
- Locked intramedullary fixation vs plating for displaced and shortened mid-shaft clavicle fractures: a randomized clinical trial. J Shoulder Elbow Surg. 2010. DOI: 10.1016/j.jse.2010.05.002
- Does delay matter? Restoration of objectively measured shoulder strength and patient-oriented outcome after immediate fixation versus delayed reconstruction of displaced midshaft clavicle fractures. J Shoulder Elbow Surg. 2007. DOI: 10.1016/j.jse.2007.01.001
- Functional outcome of surgical treatment of symptomatic nonunion and malunion of midshaft clavicle fractures. J Shoulder Elbow Surg. 2007. DOI: 10.1016/j.jse.2006.12.002
- Plate fixation of midshaft clavicular fractures: patient-reported outcomes and hardware-related complications. J Shoulder Elbow Surg. 2015. DOI: 10.1016/j.jse.2015.09.029
- What is the hardware removal rate after anteroinferior plating of the clavicle? A retrospective cohort study. J Shoulder Elbow Surg. 2017. DOI: 10.1016/j.jse.2017.03.011
- A biomechanical and clinical comparison of midshaft clavicle plate fixation: are 2 screws as good as 3 on each side of the fracture? Orthop J Sports Med. 2017. DOI: 10.1177/2325967117725293
- Evolving management of middle-third clavicle fractures in the National Football League. Am J Sports Med. 2010. DOI: 10.1177/0363546510372795
- Effect of different statistical methods on union or time to union in a published study about clavicular fractures. J Shoulder Elbow Surg. 2012. DOI: 10.1016/j.jse.2012.03.015
- Treatment of clavicle fractures: current concepts review. J Shoulder Elbow Surg. 2011. DOI: 10.1016/j.jse.2011.08.053
Literature (URLs)
- Canadian Orthopaedic Trauma Society. Nonoperative treatment compared with plate fixation of displaced midshaft clavicular fractures: a multicenter RCT. JBJS 2007. https://journals.lww.com/jbjsjournal/fulltext/2007/01000/nonoperative_treatment_compared_with_plate.1.aspx
- Plate fixation versus nonoperative treatment for displaced midshaft clavicular fractures: a meta-analysis of RCTs. PubMed. https://pubmed.ncbi.nlm.nih.gov/28632595/
- Robertson GA, Wood AM. Return to sport following clavicle fractures: a systematic review. Br Med Bull. 2016;119(1):111–128. https://academic.oup.com/bmb/article-abstract/119/1/111/1744610
- Return to play following clavicular fracture — a systematic review and meta-analysis. JSES Rev Rep Tech. 2024. https://www.sciencedirect.com/science/article/pii/S2666639124001500
- Hardware removal after clavicle plating (rates, plate position): retrospective cohort. PubMed. https://pubmed.ncbi.nlm.nih.gov/28478898/
- Have new plate designs reduced hardware removal following midshaft clavicle fixation? J Clin Med. 2025. https://www.mdpi.com/2077-0383/14/18/6351
Published rehab protocols (patient-guidance — basis for the phase structure)
- Massachusetts General Brigham Sports Medicine. Rehabilitation Protocol for Clavicle ORIF. https://www.massgeneral.org/assets/MGH/pdf/orthopaedics/sports-medicine/physical-therapy/rehabilitation-protocol-for-clavicle-ORIF.pdf
- Crall T, Perumal J. Rehabilitation Guidelines for Clavicle Fracture S/P ORIF. Mammoth Orthopedic Institute. 2018. https://www.mammothortho.com/pdf/shoulder-clavicle-fx-orif-protocol.pdf
- Bravman JT. Clavicle ORIF Rehab Protocol. University of Colorado School of Medicine. https://www.sportsandshoulderdoc.com/pt-protocols/clavicle-orif.pdf
- Cole BJ. Clavicle Fracture ORIF Rehabilitation Protocol. Midwest Orthopaedics at Rush. https://www.briancolemd.com/wp-content/themes/ypo-theme/pdf/orif-clavicle-fracture-post-op-ver2.pdf
- West Suffolk NHS Foundation Trust. Clavicle ORIF — physiotherapy advice for patients after surgery. 2023. https://www.wsh.nhs.uk/CMS-Documents/Patient-leaflets/Physiotherapy/6857-1-Clavicle-open-reduction-internal-fixation-ORIF-physiotherapy-advice.pdf
- United Lincolnshire Teaching Hospitals NHS Trust. Clavicle Fracture ORIF — physiotherapy advice for patients after surgery. June 2025. https://www.ulh.nhs.uk/wp-content/uploads/2025/07/Clavicle-fracture.pdf