Patients › Rehabilitation
Reverse Shoulder Arthroplasty
Phase-by-phase rehabilitation protocol after reverse shoulder replacement, including dislocation precautions and the early exercise program.
This protocol guides your recovery after reverse shoulder arthroplasty (reverse shoulder replacement) with Dr Kieran Hirpara at Mater Private Hospital Rockhampton. Each phase below opens with a plain-English explanation of what is happening and what matters most, followed by the structured protocol written for your physiotherapist: bring this page or its PDF to your first physiotherapy visit so your rehabilitation stays coordinated. Your physiotherapist may adjust the plan depending on how your recovery progresses.
If you have any concerns about your wound after surgery, get in touch with the rooms. It is often helpful to take a photo of the wound and email it for review.
What to expect
You will have a numb arm when you wake up, and the feeling usually returns within 6 to 12 hours. Rarely, some numbness or weakness can continue for 2 to 3 days.
When you wake up from your operation, you will be in a sling, with a big pad over your shoulder. This pad will be removed before discharge. Underneath will be a waterproof dressing covering a surgical glue strip, which can be left alone for 2 weeks. Your stitches are dissolvable and do not need removing, but there may be some tails of stitch at each end of the wound that can be cut flush with the skin after 2 weeks. You will be booked to see our nurse for a wound check 1–2 weeks after your surgery. If you are unable to attend the dressing check, you can remove your dressing yourself after 2 weeks.
Approximate timeframes for return to activities:
- Driving: 6 weeks
- Swimming: breaststroke: 8 weeks; freestyle: 12 weeks
- Golf: 4–6 months
- Lifting: light lifting can begin at 6 weeks; avoid lifting heavy items for 6 months
- Work: sedentary job: 6 weeks; manual job: guided by your surgeon
Wearing your sling
Your sling supports your shoulder for comfort while the early soreness settles. It is there to support the weight of the arm. It is not holding a repair in place. The rules are simple:
- Wear it for about 2 weeks for comfort and support, then start weaning off it during the day. A brief spell in the sling at night is fine if it helps you settle, but it is optional.
- Take it off for showers and for your exercises, once you have been shown how.
- Resting at home, it can come off whenever you are comfortable: arm supported on a pillow while sitting.
- Use ice if the shoulder is swollen or sore, especially after exercise.
Your physiotherapist will help you put the sling on at first, and will teach you to manage it independently before you go home. Fitting it correctly matters, as a loose sling does not support you properly:
- Always ensure that when fitting the sling, your elbow is positioned in the corner of the sling and well supported.
- The end of a well-fitted sling should rest comfortably at the knuckle of your little finger. If your hand extends too far out of the sling, it will not provide you with adequate support.
- Your sling has two Velcro straps: one attaches around your neck and one around your waist.
- Once you have positioned your elbow and forearm correctly, use your non-operated arm to swing the upper strap around your neck to the front and attach it through the upper loop on the sling.
- Use the same method to attach the lower strap around your waist, securing through the lower loop on the sling.
During your time in the sling, be conscious of your posture at all times and avoid allowing your shoulders to adopt a slumped position. To achieve a good postural position, try to keep your ears, shoulders and hips in line; this is important for your back and will help prevent stiffness in your shoulder joint. A rolled-up towel placed in the small of your back when sitting can serve as a friendly reminder.
Your first days in hospital
Before you go home, the hospital physiotherapists will start you on a simple set of exercises, shown below. It helps to understand three terms they will use. Active range of motion means movement you do yourself, without aid or help. Active-assisted range of motion means using your other arm (or an object, such as a cane) to help move the arm. Passive range of motion means the arm stays completely relaxed while your other arm (or someone else) does the work. From the start you can begin moving the shoulder with assistance from your other arm and, within comfort, gently under your own power, often easiest lying on your back so gravity helps. Let comfort be your guide and progress as it allows.
A few practical points for these first days:
- Use the sling for comfort. A brief spell in it at night is fine if it helps you settle, but it is optional.
- Use ice for pain relief if needed.
- When wearing your sling, relax your shoulder and let the sling take the weight of your arm.
- Take your painkillers before you do your exercises, and before your physiotherapy appointments.
- You are allowed to take your arm out of the sling for your exercises and showering.
- Wear the sling for comfort and support for about 2 weeks, then wean off it during the day.
- Unless you have chosen to arrange your own physiotherapy, an appointment has been made for you and is detailed in your discharge pack.
- If you have any problems, contact the office or let your physiotherapist know.
These are the exercises the hospital physiotherapists will start you on, continued at home as guided by your physiotherapist.
Your hospital exercises
Kieran Hirpara 4.0
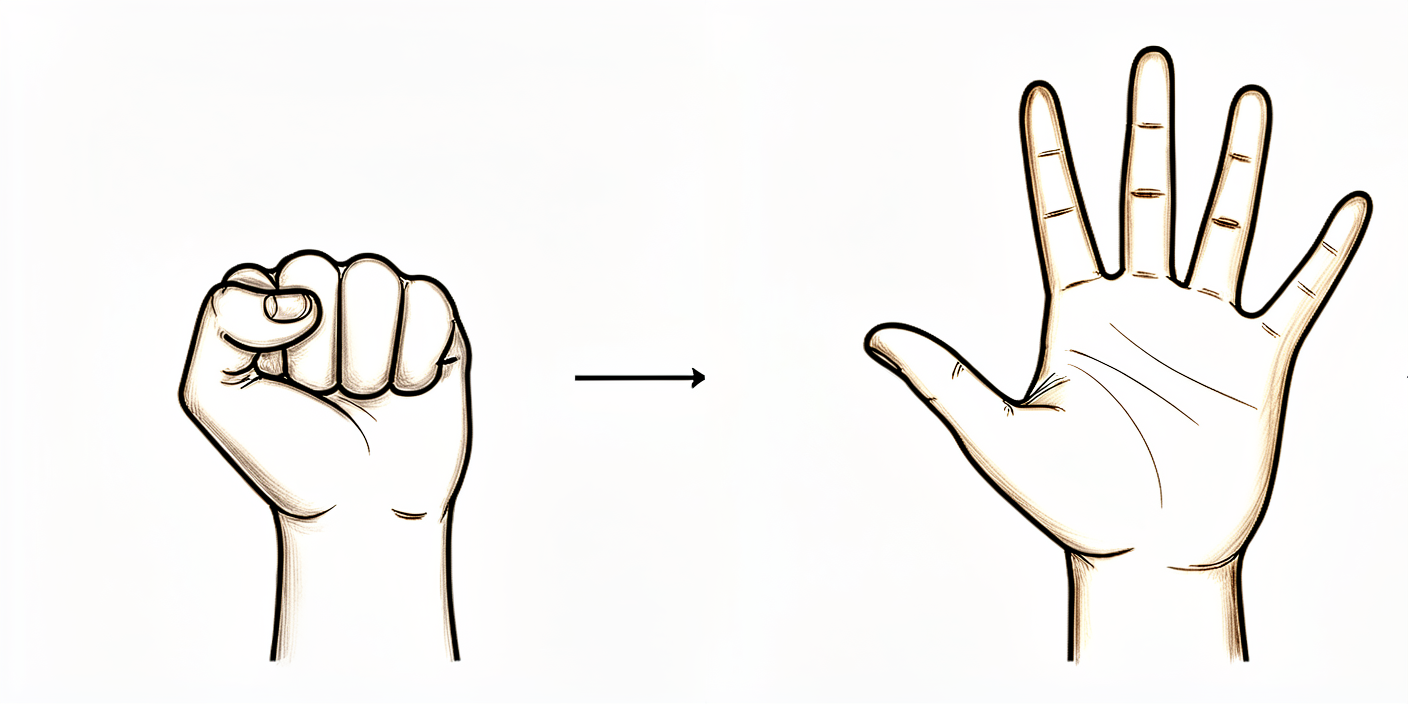
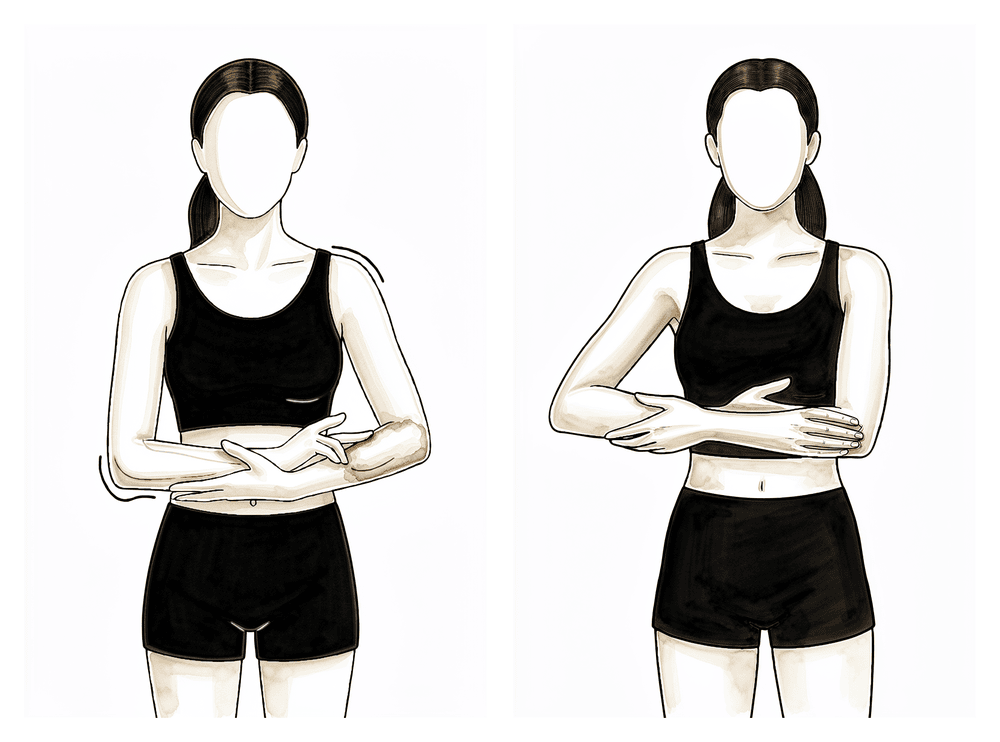
Open and close hand
Keep your hand and fingers moving by opening and closing them, or by squeezing a soft ball.
10 times, 3 times per day
Kieran Hirpara 4.0
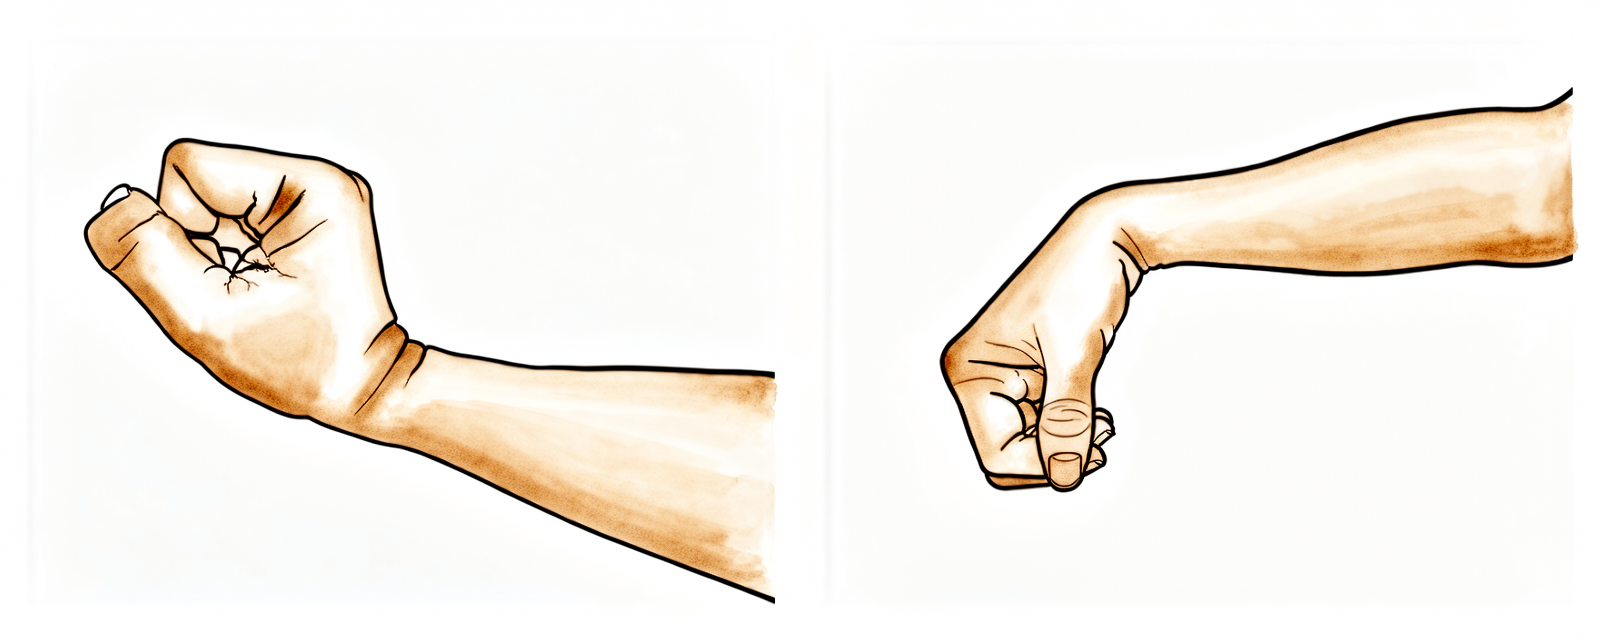
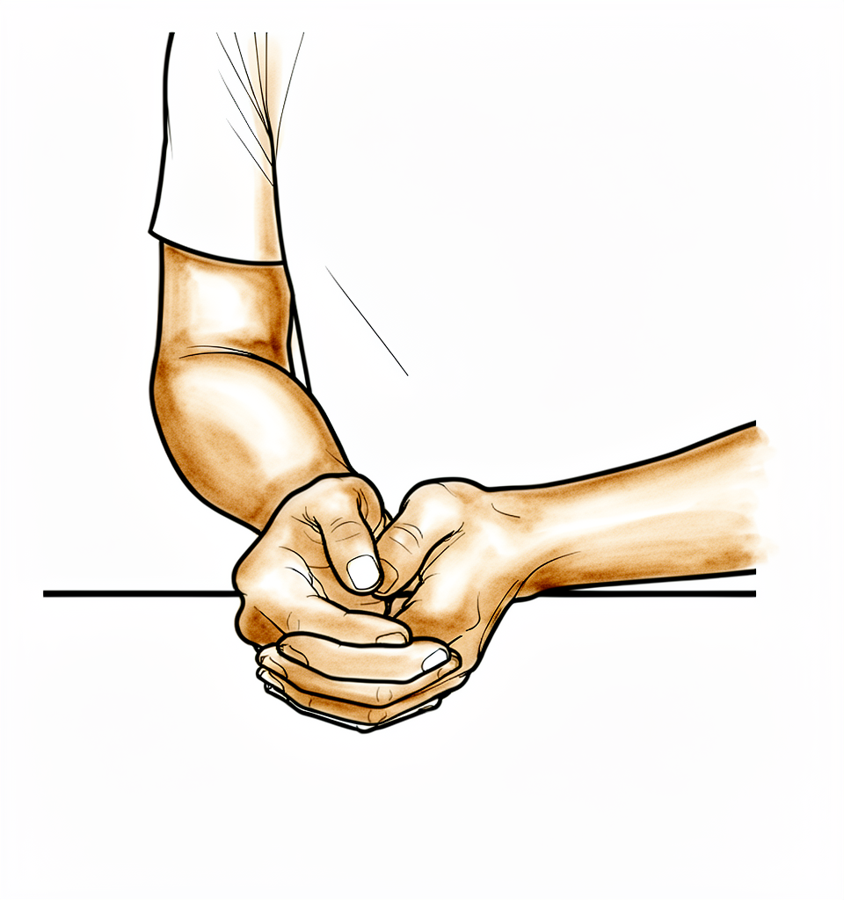
Wrist movement
Keep your wrist moving by bending it forwards, backwards and side to side.
10 times, 3 times per day
Kieran Hirpara 4.0
Elbow
Bend and straighten your elbow.
10 times, 3 times per day
Kieran Hirpara 4.0
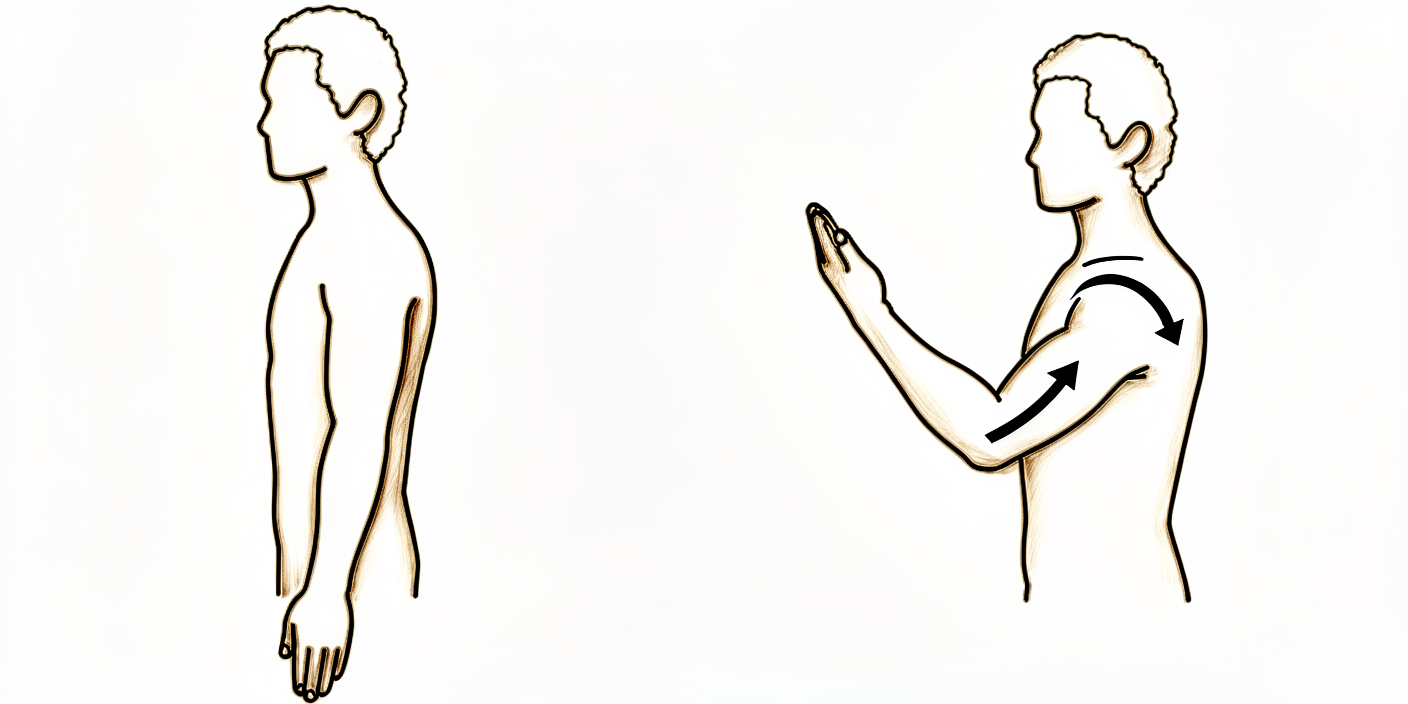
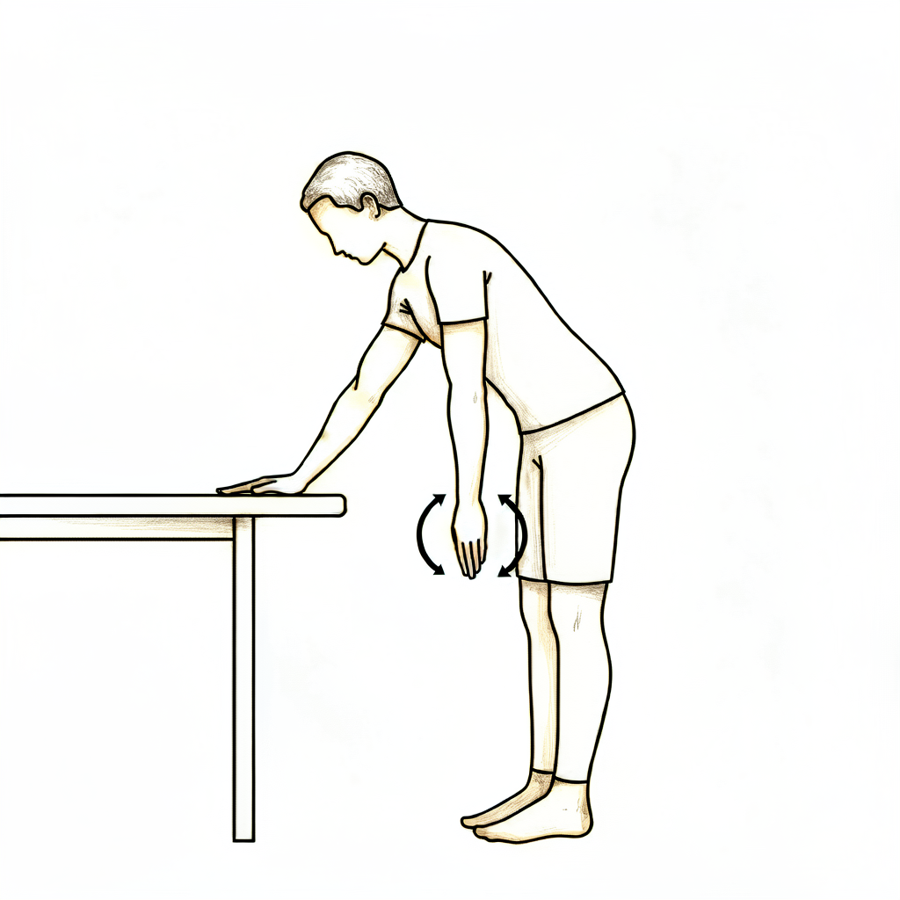
Pendulums
This is a passive exercise. Lean forward and let your arm relax down. Use your body to move the arm gently either clockwise or anti-clockwise, along with forwards, backwards and side to side.
About 30 seconds each way, 3 times per day
Kieran Hirpara 4.0
Forward flexion
Sitting on a chair and leaning forward, cradle your operated arm with the other arm and gently move your arm upwards in front of you. Lower it back down with the assistance of your non-operated arm. You could also try lying on your back in bed and helping the arm upwards if you would prefer.
10 times, 3 times per day
Kieran Hirpara 4.0
Abduction
Sitting on a chair and leaning forward, cradle the arm again and help it out to the side (e.g. like rocking a baby).
10 times, 3 times per day
Kieran Hirpara 4.0
External rotation
Sitting on a chair, only move your arm from where it would be in the sling to pointing straight in front of you. Don't go further outwards.
Gently, 10 times, 3 times per day
Kieran Hirpara 4.0
Lower trapezius setting
Squeeze your shoulder blades downwards and together.
Hold 5 seconds, 5 times; repeat 3 times daily

Kieran Hirpara 4.0
Upper trapezius stretch
Use your non-operated arm to bring your ear towards your shoulder, away from the operated side.
Hold 10 seconds, 3 times; repeat 3 times per day

Kieran Hirpara 4.0
Levator scapulae stretch
Use your non-operated arm to bring your nose towards your nipple or armpit area.
Hold 10 seconds, 3 times; repeat 3 times per day
Phase I — Protection (Weeks 0–3)
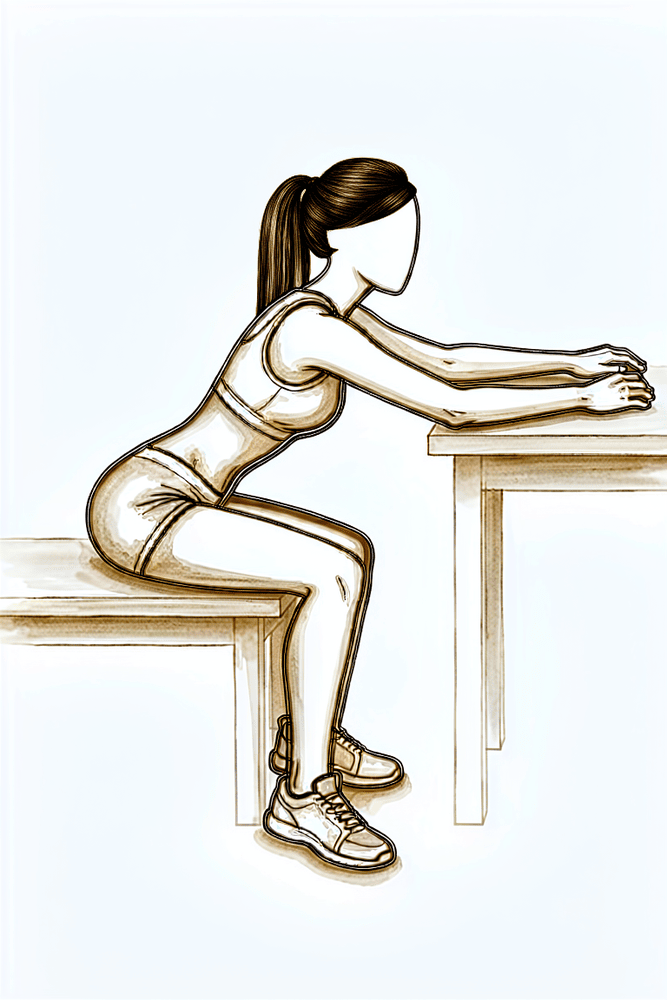
Kieran Hirpara 4.0
Seated table slide
Sit at a table with your forearm resting on the surface. Let your hand slide forwards along the table as you lean gently in, letting the shoulder fold forwards without using the shoulder muscles, then slide back. Keep the movement relaxed and comfortable — the shoulder itself stays passive.
As guided by your physiotherapist
The first three weeks are about settling your new shoulder joint and easing it back into movement. You use the sling for comfort, manage swelling with ice and compression, and keep your elbow, wrist and hand moving. From the outset you also start gentle shoulder movement, assisted by your other arm and, within comfort, gently under your own power, often easiest lying on your back so gravity helps. Let comfort be your guide and do not force anything. The rules that matter most are about protecting the joint from slipping out of place: do not reach behind your back or rotate the arm inwards, do not lift anything, and do not push up through your hands. When lying on your back, keep a small pillow or rolled towel under your elbow so the shoulder does not stretch backwards.
For your physiotherapist:
Goals
- Protect component stability (avoid the dislocation position)
- Reduce swelling, minimise pain
- Maintain upper extremity (UE) range of motion (ROM) in elbow, hand and wrist
- Establish early shoulder active-assisted and active motion within comfort
- Minimise muscle inhibition
- Patient education
Sling
- Neutral rotation
- For comfort and support; optional brief night use; wean off during the day from ~2 weeks
Management
- Swelling management: ice, compression
- Range of motion / mobility:
- PROM: external rotation (ER) in the scapular plane to tolerance; flexion/scaption ≤ 120 degrees; abduction (ABD) ≤ 90 degrees; seated glenohumeral (GH) flexion table slide; pendulums; seated horizontal table slides
- Active-assisted range of motion (AAROM): from the start: active-assisted shoulder flexion (begin supine/gravity-assisted), within the PROM limits above
- Active range of motion (AROM): from the start: gentle active shoulder motion as tolerated within comfort; plus elbow, hand, wrist
Precautions
- No shoulder PROM/AROM into internal rotation (IR)
- No reaching behind back, especially into internal rotation
- Avoid the combined extension + adduction + internal-rotation (dislocation) position
- No lifting of objects
- No supporting of body weight with hands
- Place small pillow/towel roll under elbow while lying on back to avoid shoulder hyperextension
Criteria to progress
- Gradual increase in shoulder PROM, AAROM and AROM within comfort
- 0 degrees shoulder PROM into IR
- Pain < 4/10
- No complications with Phase I
Phase II — Intermediate (Weeks 4–6)
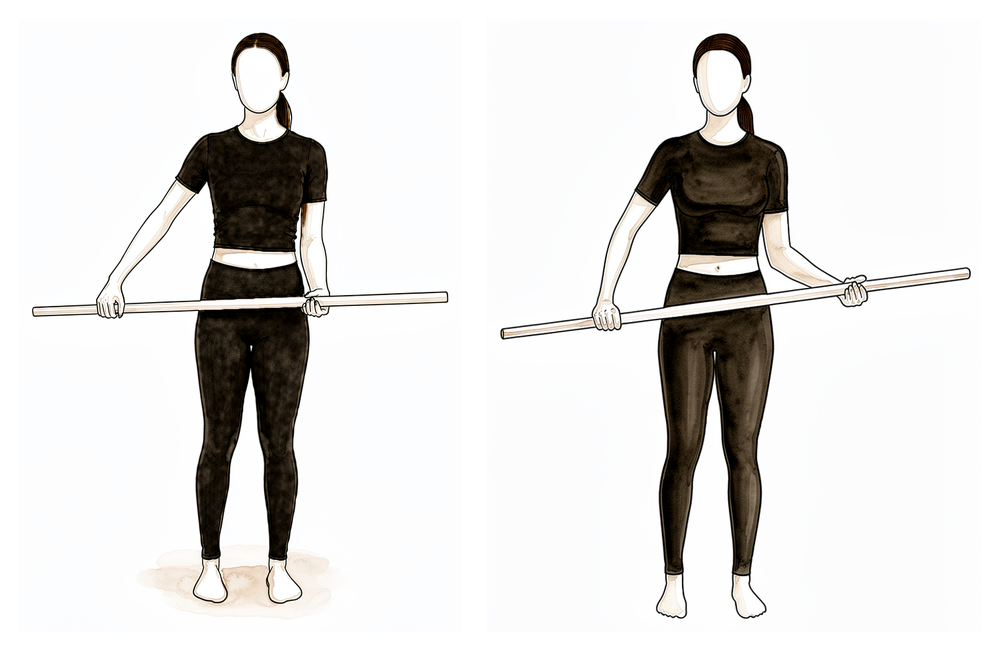
Kieran Hirpara 4.0
Cane external rotation stretch
Lie on your back with your elbow by your side and bent to 90 degrees. Hold a cane or stick in both hands and use the non-operated arm to push the hand of the operated arm gently outwards, within comfort. Never force the movement.
As guided by your physiotherapist
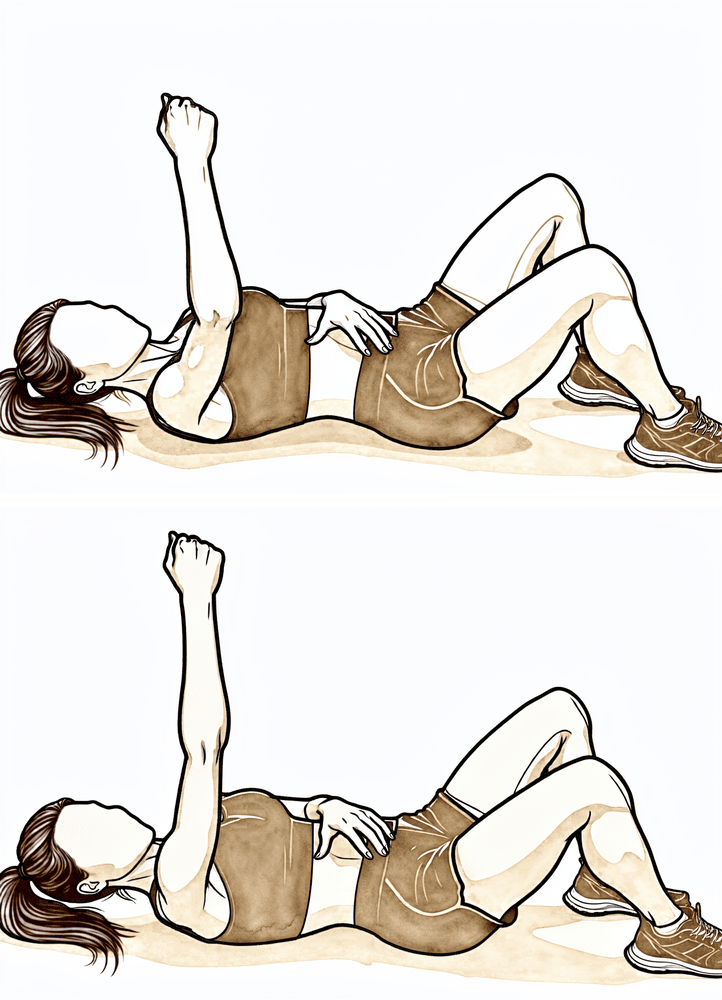
Kieran Hirpara 4.0
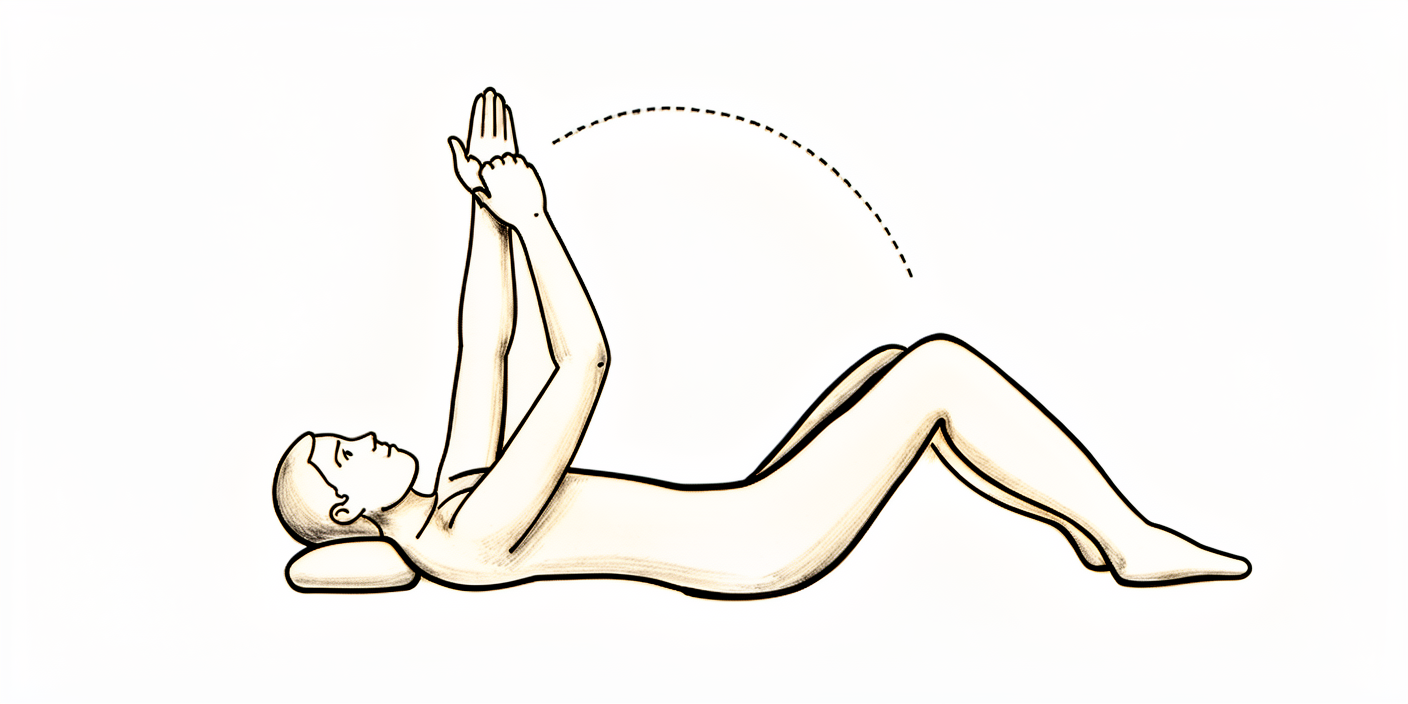
Supine punch
Lie on your back and hold the operated arm straight up towards the ceiling. Keeping the elbow straight, push the hand a little further towards the ceiling so the shoulder blade lifts off the bed, then lower back with control.
As guided by your physiotherapist
The shoulder now builds on the movement you began straight after surgery. Range of motion continues to increase, and the first activation and strengthening work for the shoulder-blade (periscapular) muscles and the deltoid begins around week 4. By this stage you should be out of the sling during the day; you may still use it briefly at night only if it adds comfort. The protective rules still apply: lift nothing heavier than a coffee cup, do not reach behind your back, do not push through your hands, and keep the pillow under your elbow when lying on your back.
For your physiotherapist:
Goals
- Continue to protect component stability (avoid the dislocation position)
- Reduce swelling, minimise pain
- Gradually increase shoulder PROM
- Progress shoulder AAROM/AROM
- Initiate periscapular muscle activation and strengthening (~week 4)
- Initiate deltoid activation and strengthening (~week 4; avoid shoulder extension when activating posterior deltoid)
- Patient education
Sling
- Discontinue daytime use (weaned off from ~2 weeks)
- Optional brief night use only if it adds comfort
Management
- Continue with Phase I interventions
- Range of motion / mobility:
- AAROM: active-assistive shoulder flexion, shoulder flexion with cane, cane external rotation stretch, washcloth press, seated shoulder elevation with cane
- AROM: supine flexion, salutes, supine punch
- Strengthening:
- Periscapular: scapular retraction, standing scapular setting, supported scapular setting, low row, inferior glide
- Deltoid: isometrics in the scapular plane
Precautions
- No reaching behind back, especially into internal rotation
- Avoid the combined extension + adduction + internal-rotation (dislocation) position through ~week 6
- No lifting of objects heavier than a coffee cup
- No supporting of body weight with hands
- Place small pillow/towel roll under elbow while lying on back to avoid shoulder hyperextension
Criteria to progress
- Gradual increase in shoulder PROM, AAROM, AROM
- 0 degrees shoulder PROM into IR
- Palpable muscle contraction felt in scapular musculature
- Pain < 4/10
- No complications with Phase II
Phase III — Intermediate, continued (Weeks 7–8)
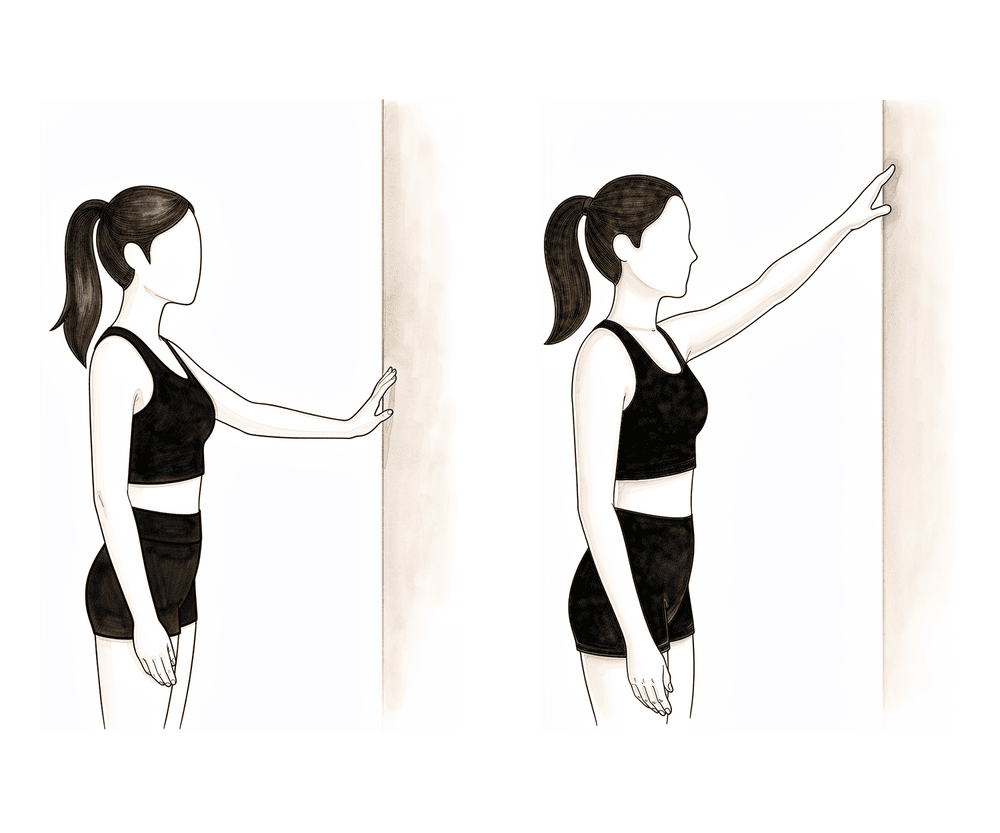
Kieran Hirpara 4.0
Wall climbs
Stand facing a wall and walk the fingers of the operated arm up the wall as far as is comfortable, letting the wall assist the arm upwards. Walk the fingers back down with control — do not let the arm drop.
As guided by your physiotherapist
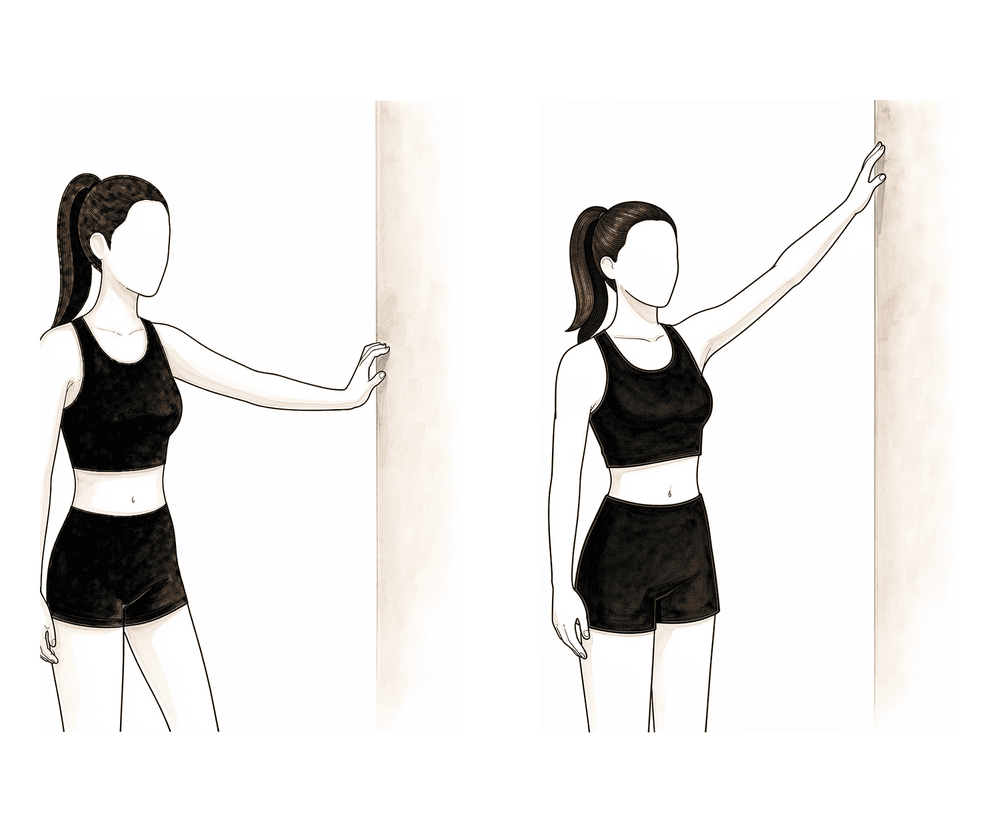
Kieran Hirpara 4.0
Wall walk out to the side
Stand side-on to a wall with your fingertips resting on it. Walk your fingers up the wall out to the side, raising the arm as far as is comfortable, then walk them back down with control. The wall supports the arm as you regain movement out to the side.
As guided by your physiotherapist
The sling is well behind you by now. Movement progresses in all directions, including the first gentle passive internal rotation (rotating the arm inwards), and the strengthening work for the deltoid and shoulder-blade muscles steps up, along with the first motor-control (coordination) exercises. The limits that remain: nothing heavier than a coffee cup, no reaching behind your back beyond your pant pocket, no body weight through your hands, and avoid stretching the arm backwards behind your body.
For your physiotherapist:
Goals
- Minimise pain
- Gradually progress shoulder PROM; initiate shoulder PROM IR in the scapular plane
- Gradually progress shoulder AAROM
- Gradually progress shoulder AROM
- Progress deltoid strengthening
- Progress periscapular strengthening
- Initiate motor control exercise
- Patient education
Sling
- Discontinue
Management
- Continue with Phase I & II interventions
- Range of motion / mobility:
- PROM: full in all planes; gradual PROM IR in scapular plane ≤ 50 degrees
- AAROM: incline table slides, wall climbs, pulleys, seated shoulder elevation with cane with active lowering
- AROM: seated scaption, seated flexion, supine forward elevation with elastic resistance to 90 degrees
- Strengthening:
- Periscapular: row on a physioball, serratus punches
- Deltoid: seated shoulder elevation with cane, seated shoulder elevation with cane with active lowering, ball roll on wall
- Motor control:
- IR/ER in scaption plane and flexion 90–125 degrees (rhythmic stabilisation) in supine
- Stretching:
- Sidelying horizontal adduction (ADD), triceps and lats
Precautions
- No reaching behind back beyond pant pocket
- No lifting of objects heavier than a coffee cup
- No supporting of body weight with hands
- Avoid shoulder hyperextension
Criteria to progress
- ROM goals (PROM and AROM expectations are individualised and dependent upon ROM measurements attained in the operating room post-operatively):
- Elevation ≤ 140 degrees
- ER ≤ 30 degrees in neutral
- IR ≤ 50 degrees in scapular plane, or back pocket
- Minimal to no substitution patterns with shoulder AROM
- Pain < 4/10
Phase IV — Transitional (Weeks 9–11)
This phase is the bridge back to normal use of the arm. Passive movement should now be full in all planes, and the focus shifts to strengthening the deltoid and shoulder-blade muscles, building dynamic stability and coordination, and gradually restoring strength and endurance, with a return to full functional activities. The one firm limit: no lifting of heavy objects (over 5 kg).
For your physiotherapist:
Goals
- Maintain pain-free ROM
- Progress periscapular strengthening
- Progress deltoid strengthening
- Progress motor control exercise
- Improve dynamic shoulder stability
- Gradually restore shoulder strength and endurance
- Return to full functional activities
Management
- Continue with Phase II–III interventions
- Range of motion / mobility:
- PROM: full ROM in all planes
- Strengthening:
- Periscapular: resistance band shoulder extension, resistance band seated rows, rowing, robbery, lawnmowers, tripod, pointer
- Deltoid: gradually add resistance with deltoid exercise
- Motor control:
- IR/ER and flexion 90–125 degrees (rhythmic stabilisation)
- Quadruped alternating isometrics and ball stabilisation on wall
- Field goals
- Proprioceptive neuromuscular facilitation (PNF): D1 diagonal lifts, D2 diagonal lifts
Precautions
- No lifting of heavy objects (> 5 kg)
Criteria to progress
- Performs all exercises demonstrating symmetric scapular mechanics
- Pain < 2/10
Phase V — Advanced strengthening (Weeks 12–16)
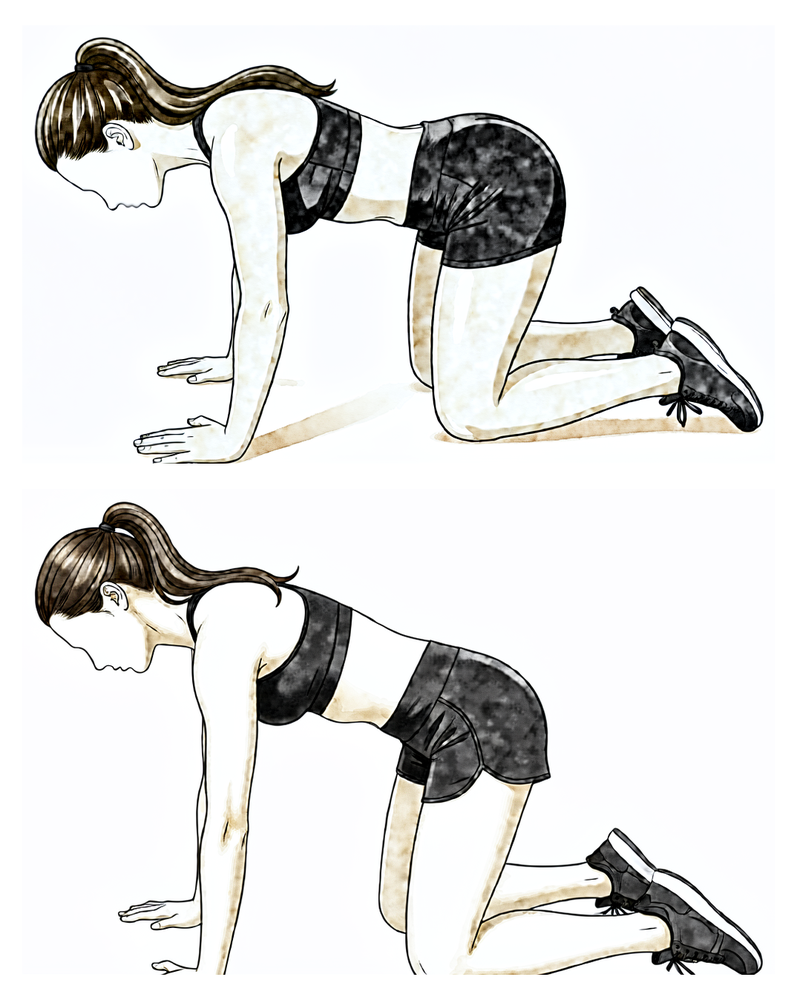
Kieran Hirpara 4.0
Push-up plus on knees
From a push-up position on your knees with hands under the shoulders, keep the elbows straight and push the upper back towards the ceiling, letting the shoulder blades slide apart, then lower with control.
As guided by your physiotherapist
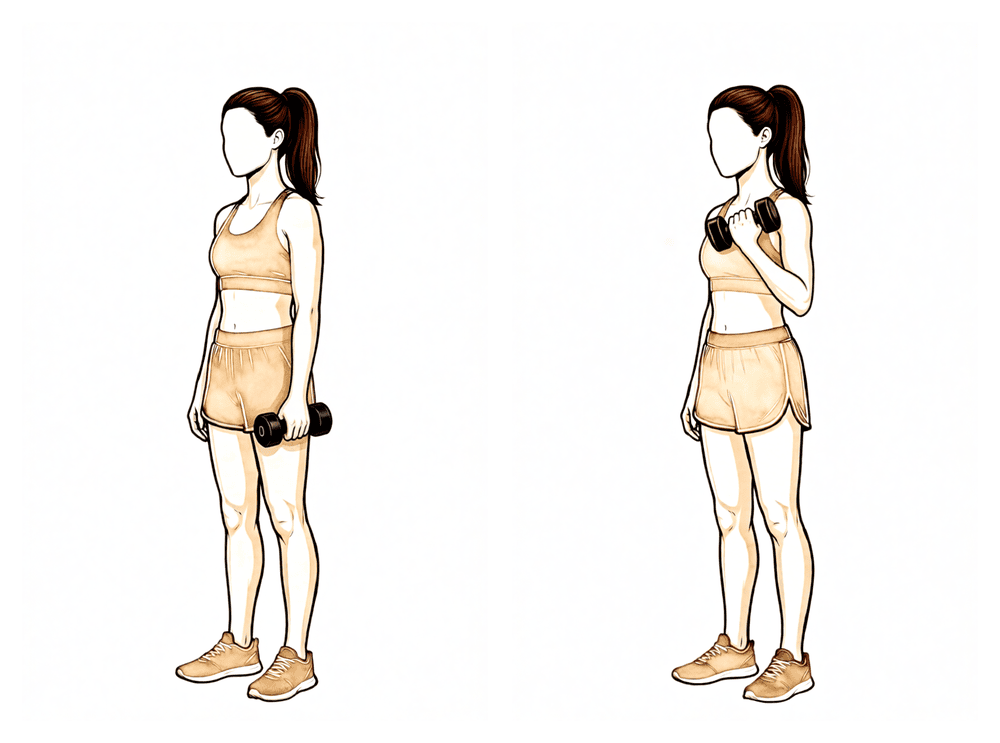
Kieran Hirpara 4.0
Biceps curl
Holding a light weight with your palm facing up and your upper arm by your side, bend the elbow to bring the hand towards the shoulder, then lower with control. Keep the load light — heavy lifting (over 7 kg) is still off-limits in this phase.
As guided by your physiotherapist
The final phase conditions the shoulder for everyday life: keeping your movement pain-free while building the strength and endurance to use the arm confidently. If a rotator cuff repair was performed at the same time as your replacement, rotator cuff (RTC) strengthening starts now. The lifting limit rises, but heavy objects (over 7 kg) are still off-limits. This phase, and the protocol, finishes with clearance from your surgeon once all the milestones have been met.
For your physiotherapist:
Goals
- Maintain pain-free ROM
- Initiate rotator cuff (RTC) strengthening with a concomitant repair
- Improve shoulder strength and endurance
- Enhance functional use of upper extremity
Management
- Continue with Phase II–IV interventions
- Strengthening:
- Periscapular: push-up plus on knees, "W" exercise, resistance band Ws, prone shoulder extension Is, dynamic hug, resistance band dynamic hug, resistance band forward punch, forward punch, T and Y, "T" exercise
- Deltoid: continue gradually increasing resisted flexion and scaption in functional positions
- Elbow: bicep curl, resistance band bicep curls, and triceps
- Rotator cuff: internal/external rotation isometrics, side-lying external rotation, standing external rotation with resistance band, standing internal rotation with resistance band, internal rotation, external rotation, sidelying ABD progressing to standing ABD
- Motor control:
- Resistance band PNF pattern, PNF D1 diagonal lifts with resistance, diagonal-up, diagonal-down, wall slides with resistance band
Precautions
- No lifting of heavy objects (> 7 kg)
Criteria to progress
- Clearance from the surgeon, and ALL milestone criteria have been met
- Maintains pain-free PROM and AROM
- Performs all exercises demonstrating symmetric scapular mechanics
- QuickDASH and ASES patient-reported outcome measures
After your protocol
This protocol works alongside the practice's general recovery advice: see managing post-operative pain and wound care. For the operation itself, see reverse shoulder replacement.
The clinical evidence behind this protocol (the published rehabilitation trials, the reasoning for the sling and movement rules, and the research references) is set out in the accompanying evidence summary (available as a downloadable PDF).
Evidence & references
Reverse Shoulder Arthroplasty (Cuff-Tear Arthropathy / Arthritis) — Post-operative Rehabilitation Evidence
Topic scope: Post-operative rehabilitation after elective reverse total shoulder arthroplasty (RSA / rTSA) for rotator-cuff-tear arthropathy, glenohumeral arthritis with an irreparable cuff, or a massive irreparable cuff tear — not the acute proximal-humerus-fracture indication, where tuberosity healing imposes its own restrictions. The evidence base for the operation (when RSA is indicated, implant survivorship, complication profile) is extensive; the evidence base for the rehabilitation protocol is smaller but, unusually for shoulder surgery, now includes several randomised trials directly comparing immobilisation strategies.
Defining principle of this rehab: RSA rehabilitation is comparatively permissive and is increasingly run on an accelerated footing. Two features of the reconstructed joint explain why. First, the deltoid — not the rotator cuff — drives elevation after RSA; the design medialises and lowers the centre of rotation so the deltoid can elevate an arm that has no functioning cuff. Second, there is usually no subscapularis repair to protect (and many surgeons deliberately leave it unrepaired with a lateralised implant), so the external-rotation restriction that dominates anatomic-TSA rehab is far less central here. The principal early caution is therefore not tissue healing but component stability: a reverse prosthesis can dislocate, and the at-risk position is the combination of extension + adduction + internal rotation (the hand-behind-the-back / tucking-in-a-shirt movement). Early rehab accordingly protects against that position while otherwise encouraging motion. The sling is largely for comfort, support and dislocation-avoidance, and the published trial evidence shows that shortening or even omitting it does not increase the dislocation or complication rate.
Surgeon's protocol note: Dr Hirpara's protocol on this page is run on an accelerated footing, directly aligned with the randomised and cohort evidence below: a short ~2-week comfort sling (weaned off during the day; optional brief night use), active-assisted and active shoulder motion from the start (within defined limits, beginning supine/gravity-assisted), and deltoid + periscapular strengthening from ~week 4. The main early constraint is component stability, so the extension + adduction + internal-rotation (hand-behind-back) dislocation position is avoided for the first ~6 weeks while motion is otherwise encouraged. Elevation after RSA is deltoid-driven, which is why strengthening is deltoid- and periscapular-focused. Follow the protocol your surgeon has set.
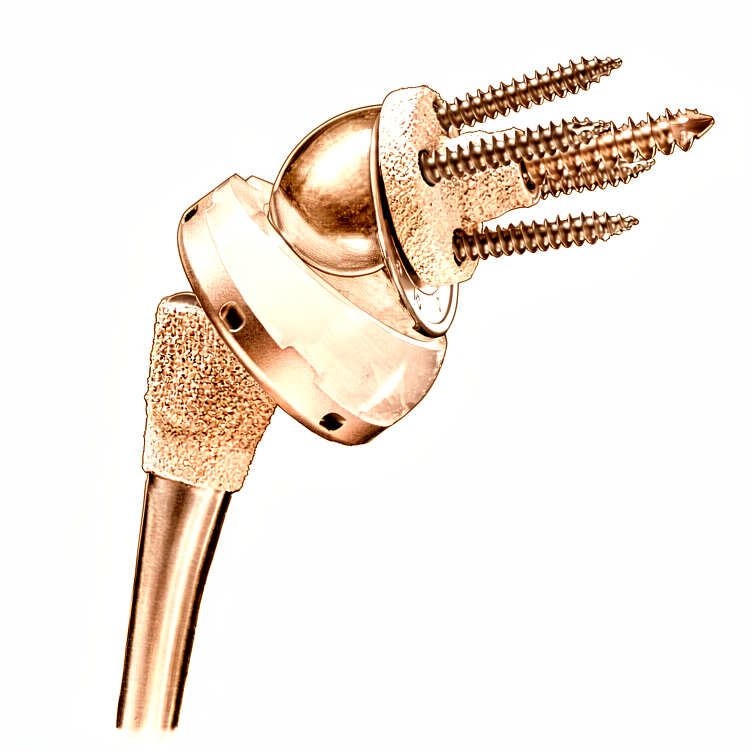
The operation, in brief
In a reverse replacement the normal anatomy is inverted: a ball (glenosphere) is fixed to the shoulder blade and a cup is fixed to the top of the arm bone. This moves the joint's pivot point down and in, which lengthens and tensions the deltoid and lets that muscle lift the arm even when the rotator cuff is gone — the situation in cuff-tear arthropathy. Because the implant, not the patient's own cuff, provides stability and power, the rehabilitation logic differs fundamentally from a cuff repair (where a healing tendon must be protected) and from an anatomic replacement (where a repaired subscapularis must be protected).
Evidence by theme
1. Early / accelerated motion is safe — multiple randomised trials
This is the best-supported part of RSA rehabilitation, and it is unusually strong for a shoulder rehab question because it rests on randomised controlled trials, not just consensus:
- Hagen et al. (2020), single-blind RCT, 107 shoulders — randomised to immediate physical therapy (passive + active ROM from the start) versus 6-week delayed therapy. No difference in final ROM, patient-reported outcomes, or dislocation/complication rate (early 7.1% vs delayed 9.1%). [RAG corpus — 10.1016/j.jse.2020.11.017]
- Edwards / "two rehabilitation approaches" RCT, 61 patients (63 shoulders) — early active (submaximal isometric deltoid work from week 2) versus delayed active rehab, both with a 6-week sling. Pain and overall function were equivalent at 3, 6 and 12 months, but the early-active group had significantly better active forward flexion at 3 months (p = 0.019) — i.e. earlier functional gain without added risk. [Literature — PMC8512973]
- Lee et al. (2021), 357 shoulders — randomised to no immobilisation / early motion, 3-week sling, or 6-week sling. No difference in patient-reported outcomes, satisfaction, pain or ROM; the immediate-motion group had the lowest overall complication rate (reported as ~4% vs ~24.6% in the 6-week cohort in the pooled systematic-review re-analysis). [via Sachinis 2024 SR]
A systematic review (Sachinis et al., 2024; 3 controlled trials, ~527 shoulders) concluded that accelerated rehabilitation is safe and yields equivalent 12-month outcomes, while cautioning that protocols should still be individualised by bone quality, age, diagnosis and surgical complexity rather than applied uniformly. [Literature — PMC11034463]
Evidence: MODERATE–STRONG (several RCTs + SR), though individual trials are modest in size.
2. Sling duration can be shortened without added risk
- A large retrospective cohort (960 patients) compared 2-week vs 6-week sling immobilisation after RSA and found no difference in complication rate (12.0% vs 15.0%, p = 0.21), dislocation rate (p = 0.79), acromial stress fracture, loosening or infection; final flexion and ER were equivalent. The authors concluded shorter immobilisation does not incur additional risk. [Literature — PMC10638591]
- Published institutional protocols (e.g. Massachusetts General Brigham) have themselves moved from a 6-week to a 4-week sling standard, attributing the change to improved implant design. [Published protocol — MGH Sports Medicine]
Evidence: MODERATE (one large cohort + protocol trend; the question is now whether 6 weeks is necessary, not whether it is safe).
3. The deltoid drives recovery — and formal active PT may add little
Because elevation depends on deltoid recruitment (with documented compensatory recruitment of upper trapezius, latissimus and posterior deltoid), strengthening is deltoid- and periscapular-focused rather than cuff-focused. Notably, a multicentre RCT found that a formal active physical-therapy programme did not improve outcomes over a home/self-directed programme after RSA — many patients recover well with a structured home programme and physiotherapist supervision rather than intensive hands-on active therapy. [RAG corpus — 10.1016/j.jse.2022.12.011] This supports a pragmatic, education-and-home-exercise model.
Evidence: MODERATE (RCT).
4. Dislocation: low but real, and the early protective position is specific
Dislocation is the relevant early stability complication (as opposed to the tissue-healing concern of a cuff repair). Corpus series on dislocation following RSA identify the at-risk position as adduction + internal rotation + extension, and identify subscapularis insufficiency and implant/soft-tissue tensioning as contributors to instability. [RAG corpus — 10.1016/j.jse.2016.12.073; 10.1016/j.jse.2008.12.013] This is precisely why early protocols — accelerated or conservative — restrict reaching behind the back and forced internal rotation while otherwise allowing supported elevation. The role of routine subscapularis repair in preventing dislocation is debated and interacts with glenosphere lateralisation (a lateralised design appears less reliant on subscapularis repair for stability). [RAG corpus — 10.5435/jaaos-d-16-00781]
Evidence: MODERATE (cohort/registry); the precaution itself is universal consensus.
5. Contrast with anatomic TSA rehabilitation
The American Society of Shoulder and Elbow Therapists (ASSET) consensus on anatomic TSA rehab centres on protecting the subscapularis repair — limiting passive external rotation and active internal rotation for ~6 weeks. [RAG corpus — 10.1016/j.jse.2020.05.019] After RSA that specific constraint is usually absent or much reduced (no cuff repair to protect; subscapularis often not repaired), which is the structural reason RSA rehab is more permissive in external rotation while being more attentive to the dislocation-position combination.
Phased post-operative timeline
This table reflects Dr Hirpara's protocol on this page (the accelerated, ~2-week-sling approach). The right-hand column notes the published evidence that the protocol is grounded in.
| Phase | Window | Sling | Shoulder motion | Strengthening | Accelerated-evidence basis |
|---|---|---|---|---|---|
| I — Protection | Week 0–3 | Comfort/support; wean off during the day from ~2 weeks; optional brief night use | Active-assisted and active as tolerated from the start (begin supine/gravity-assisted; ER in scapular plane to tolerance; flexion/scaption ≤120°; abduction ≤90°); no IR, no reaching behind back, avoid the dislocation position; elbow/wrist/hand active | — | RCTs show early active/AAROM from the start carries no added dislocation/complication risk (Hagen 2020; Edwards) |
| II — Intermediate | Week 4–6 | Off during the day; optional brief night use | Progress AAROM and AROM | Periscapular + deltoid activation and strengthening initiated (~week 4) | Early active deltoid work gives earlier functional gain without added risk (Edwards) |
| III — Intermediate cont. | Week 7–8 | Discontinued | Progress AROM all planes; first gentle passive IR in scapular plane (≤50°) | Deltoid + periscapular progressed; motor control | Cohort data: 2-week sling non-inferior to 6 weeks (no extra dislocations) |
| IV — Transitional | Week 9–11 | — | Full passive ROM all planes | Resisted deltoid/periscapular; dynamic stability; PNF; no lifting >5 kg | — |
| V — Advanced strengthening | Week 12–16 | — | Maintain pain-free full ROM | Add rotator-cuff strengthening if a cuff repair was done; functional loading; no lifting >7 kg | Resisted IR / eccentric / closed-chain typically from ~12 weeks |
Return-to-activity anchors (from this protocol): driving ~6 weeks; light lifting from 6 weeks but no heavy lifting for ~6 months; swimming (breaststroke) 8 weeks / freestyle 12 weeks; golf ~3 months; sedentary work 6 weeks, manual work surgeon-guided. Published sport-return data after RSA are encouraging for low-impact activity (≈60–86% return; swimming ~84%, golf/fitness ~77%) but caution against high-impact and contact sport given prosthesis-loading and revision concerns. [Literature — PMC10043097]
Key controversies / evidence quality
-
Accelerated vs conservative rehab — and where this protocol sits. The randomised evidence shows early motion and shorter (or no) immobilisation are safe and may give earlier functional gain, with equivalent 12-month outcomes. Dr Hirpara's ~2-week comfort sling, active-assisted/active motion from the start, strengthening from ~week 4 protocol aligns with this accelerated evidence. The systematic review still endorses individualisation (bone quality, fixation, intra-operative stability, soft-tissue tensioning, any concomitant cuff repair), so the surgeon may dial the plan back for a borderline-stable construct, softer bone, or a concomitant repair. The prescribed plan is the one to follow.
-
Immobilisation duration. Trial and large-cohort data show 2–4 weeks is non-inferior to 6 weeks for dislocation and complications, which is why this protocol uses a short ~2-week comfort sling. Longer 6-week protocols persist elsewhere out of surgeon preference and construct-specific factors, with the low absolute dislocation rate making the question hard to power definitively.
-
Precautions. The extension + adduction + internal rotation (hand-behind-back) restriction is near-universal consensus early on; the disagreement is about how long, and how much external-rotation freedom to allow (more than anatomic TSA, but bounded by soft-tissue tension).
-
Subscapularis repair. Whether to repair it — and whether repair reduces dislocation — interacts with glenosphere lateralisation and remains debated; this in turn influences how restrictive early rehab needs to be.
-
Active physiotherapy intensity. At least one RCT found formal active PT did not beat a structured home programme, supporting an education-led, home-exercise model with physiotherapist oversight rather than intensive hands-on therapy.
Evidence-strength flags (summary)
- MODERATE–STRONG (RCT / SR): accelerated/early-motion rehab is safe with equivalent 12-month outcomes (Hagen 2020 RCT; Edwards RCT; Lee 2021; Sachinis 2024 SR); formal active PT not superior to home programme (multicentre RCT).
- MODERATE (large cohort): 2-week sling non-inferior to 6-week sling for dislocation/complications (960-patient cohort); deltoid-driven recovery biomechanics.
- CONSENSUS / WEAK: the dislocation-position precaution (universal but not trial-quantified for duration); the specific phase timings of this protocol (drawn from published institutional protocols + surgeon preference, not a head-to-head rehab RCT); subscapularis-repair effect on instability (conflicting cohort data).
Citations
RAG corpus (180,000+ Orthopaedic articles) — real DOIs returned by search
- Hagen MS, et al. Accelerated rehabilitation following reverse total shoulder arthroplasty. J Shoulder Elbow Surg / Semin Arthroplasty. 2021. DOI: 10.1016/j.jse.2020.11.017
- Active physical therapy does not improve outcomes after reverse total shoulder arthroplasty: a multi-center, randomized clinical trial. J Shoulder Elbow Surg. 2023. DOI: 10.1016/j.jse.2022.12.011
- Kennedy J, et al. The American Society of Shoulder and Elbow Therapists' consensus statement on rehabilitation for anatomic total shoulder arthroplasty. J Shoulder Elbow Surg. 2020. DOI: 10.1016/j.jse.2020.05.019
- Dislocation following reverse total shoulder arthroplasty. J Shoulder Elbow Surg. 2017. DOI: 10.1016/j.jse.2016.12.073
- Edwards TB, et al. Subscapularis insufficiency and the risk of shoulder dislocation after reverse shoulder arthroplasty. J Shoulder Elbow Surg. 2009. DOI: 10.1016/j.jse.2008.12.013
- Clinical Outcomes After Reverse Shoulder Arthroplasty With and Without Subscapularis Repair: The Importance of Considering Glenosphere Lateralization. J Am Acad Orthop Surg. 2018. DOI: 10.5435/jaaos-d-16-00781
Literature (URLs)
- Sachinis NP, et al. Can we accelerate rehabilitation following reverse shoulder arthroplasty? A systematic review. Shoulder Elbow. 2024. https://pmc.ncbi.nlm.nih.gov/articles/PMC11034463/
- A randomised trial comparing two rehabilitation approaches following reverse total shoulder arthroplasty (early active vs delayed active). 2021. https://pmc.ncbi.nlm.nih.gov/articles/PMC8512973/
- No difference in complications between two-week vs. six-week duration of sling immobilization after reverse total shoulder arthroplasty (960-patient cohort). 2023. https://www.ncbi.nlm.nih.gov/pmc/articles/PMC10638591/
- Optimizing Outcomes After Reverse Total Shoulder Arthroplasty: Rehabilitation, Expected Outcomes, and Maximizing Return to Activities. 2023. https://pmc.ncbi.nlm.nih.gov/articles/PMC10043097/
- Kim Y-T, et al. Four weeks of immobilisation after reverse shoulder arthroplasty yields outcomes comparable to six weeks. Clin Shoulder Elb. 2024. https://www.ncbi.nlm.nih.gov/pmc/articles/PMC11546419/
Published rehabilitation protocols (basis for the phase structure)
- Massachusetts General Brigham Sports Medicine. Rehabilitation Protocol for Reverse Shoulder Arthroplasty. Revised December 2018. https://www.massgeneral.org/assets/mgh/pdf/orthopaedics/sports-medicine/physical-therapy/rehabilitation-protocol-for-reverse-shoulder-arthroplasty.pdf
- Brigham and Women's Hospital. Reverse Total Shoulder Arthroplasty Protocol. https://www.brighamandwomens.org/assets/BWH/patients-and-families/pdfs/shoulder--reverse-total-shoulder-arthroplasty-protocol.pdf